

Help Center/ TaurusDB/ Best Practices/ From ECS-hosted MySQL to TaurusDB/ Procedure/ ECS-hosted MySQL Server/ Installing a MySQL Database (Community Edition)
Updated on 2026-09-15 GMT+08:00
Installing a MySQL Database (Community Edition)
This section describes how to initialize disks and install a MySQL database (community edition).
Log In to the ECS
- Log in to the ECS console.
- Locate the ECS ecs-mysql and click Remote Login in the Operation column.
- Select CloudShell-based Login.
- Enter the password of user root.

The password is the one you specified during the ECS creation.
Initializing Disks
- Create the mysql folder.
mkdir /mysql
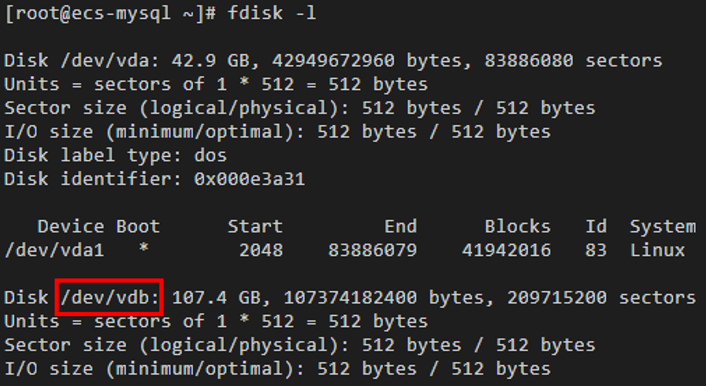
- View data disk information.
fdisk -l
The command output is as follows.
- Initialize the data disk.
mkfs.ext4 /dev/vdb
- Attach the disk.
mount /dev/vdb /mysql
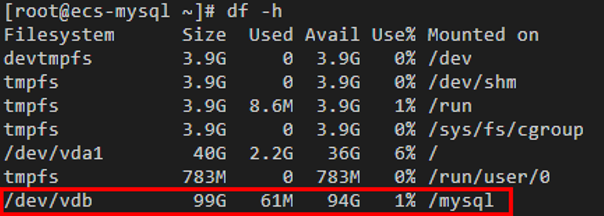
- Check whether the disk has been attached.
df -h
If the following output is returned, the disk has been attached.
- Create a folder and switch to the install folder.
mkdir -p /mysql/install/data
mkdir -p /mysql/install/tmp
mkdir -p /mysql/install/file
mkdir -p /mysql/install/log
cd /mysql/install
- Download and install a MySQL client.
- Initialize the MySQL.
/mysql/install/mysql-8.0.22/bin/mysqld --defaults-file= /etc/my.cnf --initialize-insecure
- Start the MySQL.
nohup /mysql/install/mysql-8.0.22/bin/mysqld --defaults-file= /etc/my.cnf &
- Connect to the MySQL.
/mysql/install/mysql-8.0.22/bin/mysql
- Create user root and assign the required permissions to it.
grant all privileges on *.* to 'root'@'%' identified by 'xxx' with grant option;
FLUSH PRIVILEGES;
What is your overall rating for this page?
0
1
2
3
4
5
6
7
8
9
10
Very dissatisfiedVery satisfied
Thank you very much for your feedback. We will continue working to improve the documentation.See the reply and handling status in My Cloud VOC.
The system is busy. Please try again later.
For any further questions, feel free to contact us through the chatbot.
Chatbot


