
Managing Categorical Mappings
Categorical mappings are used to match alert types and map alert fields for cloud service alerts.
This section describes how to manage categories and mappings, including Viewing Categorical Mappings, Creating a Categorical Mapping, Copying a Categorical Mapping, Editing a Categorical Mapping, and Enabling, Disabling, and Deleting a Categorical Mapping.
Viewing Categorical Mappings
- Log in to the management console.
- Click
 in the upper part of the page and choose Security > SecMaster.
 - In the navigation pane on the left, choose Workspaces > Management. In the workspace list, click the name of the target workspace.
Figure 1 Workspace management page

- In the navigation pane on the left, choose Security Orchestration > Objects. On the page displayed, click the Classify&Mapping tab.
Figure 2 Classify&Mapping tab
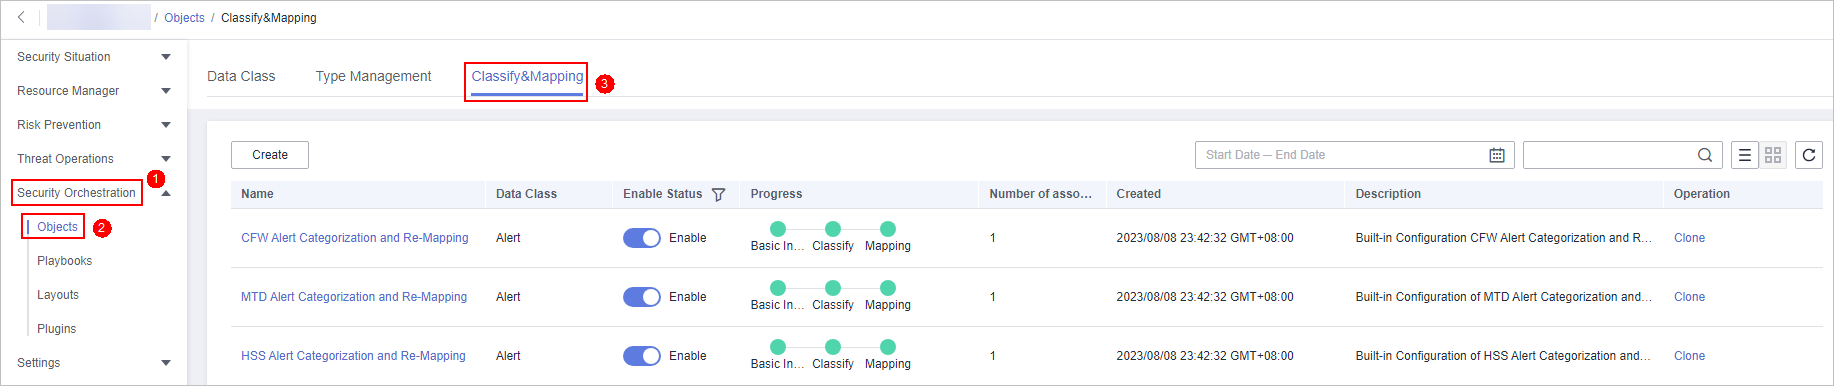
- On the Classify&Mapping tab, view details about the created categorical mappings.
- In the categorical mapping list, view details such as the categorical mapping name, data class, and number of associated plug-in instances.
- If there are many categorical mappings, use filters and keywords to search for a specific one.
- To edit a categorical mapping, click its name to go to the edit page.
On the edit page, you can edit details about the categorical mapping.
- In the categorical mapping list, you can also enable, disable, clone, and delete a categorical mapping.
Creating a Categorical Mapping
- Log in to the management console.
- Click in the upper part of the page and choose Security > SecMaster.
- In the navigation pane on the left, choose Workspaces > Management. In the workspace list, click the name of the target workspace.
Figure 3 Workspace management page
- In the navigation pane on the left, choose Security Orchestration > Objects. On the page displayed, click the Classify&Mapping tab.
Figure 4 Classify&Mapping tab
- On the Classify&Mapping tab, click Create.
- On the Create Categorical Mapping page, set categorical mapping parameters.
Figure 5 Create Categorical Mapping
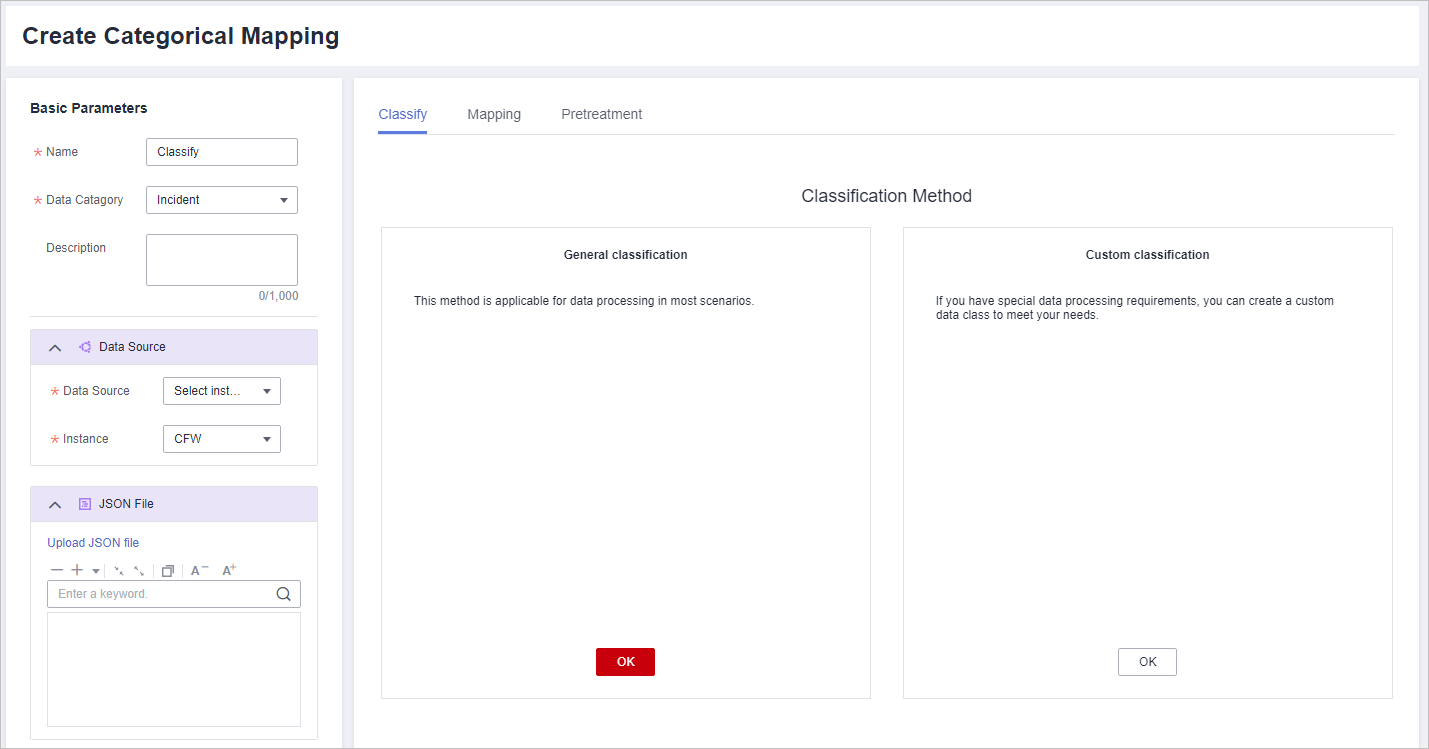
- In the Basic Parameters area on the left, configure basic information about the categorical mapping. For details about the parameters, see Table 1.
- In the Data Source area on the left, select the data source for the categorical mapping.
If Data Source is set to Upload JSON file, you need to click Upload JSON file and upload the JSON file.
- On the Classify tab on the right, select a classification method and set related parameters.
- After the classification configuration is complete, click
 at the upper right corner of the page to save the configuration.
 - On the Mapping tab on the right, select a mapping mode and set related parameters.
- After the categorical mapping is complete, click
 at the upper right corner of the page to save the configuration.
 - On the Preprocessing tab on the right, set preprocessing mapping parameters.
- Click
 at the upper right corner of the page to save the configuration.
Copying a Categorical Mapping
- Log in to the management console.
- Click in the upper part of the page and choose Security > SecMaster.
- In the navigation pane on the left, choose Workspaces > Management. In the workspace list, click the name of the target workspace.
Figure 6 Workspace management page
- In the navigation pane on the left, choose Security Orchestration > Objects. On the page displayed, click the Classify&Mapping tab.
Figure 7 Classify&Mapping tab
- On the Classify&Mapping page, click Clone in the Operation column of the target categorical mapping.
- In the displayed dialog box, enter the name for replicated mapping and click OK.
Editing a Categorical Mapping
- Log in to the management console.
- Click in the upper part of the page and choose Security > SecMaster.
- In the navigation pane on the left, choose Workspaces > Management. In the workspace list, click the name of the target workspace.
Figure 8 Workspace management page
- In the navigation pane on the left, choose Security Orchestration > Objects. On the page displayed, click the Classify&Mapping tab.
Figure 9 Classify&Mapping tab
- On the Classify&Mapping page, click the target categorical mapping name to go to the edit page.
- On the Edit Categorical Mapping page, set parameters.
- In the Basic Parameters area on the left, configure basic information about the categorical mapping. For details about the parameters, see Table 1.
Table 2 Configuring basic information Parameter
Description
Name
Name of a user-defined categorical mapping.
Data Category
This field cannot be edited.
Description
Description of the custom categorical mapping.
- In the Data Source area on the left, select the data source for the categorical mapping.
If Data Source is set to Upload JSON file, you need to click Upload JSON file and upload the JSON file.
- On the Classify tab on the right, select a classification method and set related parameters.
- After the classification configuration is complete, click
 at the upper right corner of the page to save the configuration.
 - On the Mapping tab on the right, select a mapping mode and set related parameters.
- After the categorical mapping is complete, click
 at the upper right corner of the page to save the configuration.
 - On the Preprocessing tab on the right, set preprocessing mapping parameters.
- Click
 at the upper right corner of the page to save the configuration.
- In the Basic Parameters area on the left, configure basic information about the categorical mapping. For details about the parameters, see Table 1.
Enabling, Disabling, and Deleting a Categorical Mapping
- Log in to the management console.
- Click in the upper part of the page and choose Security > SecMaster.
- In the navigation pane on the left, choose Workspaces > Management. In the workspace list, click the name of the target workspace.
Figure 10 Workspace management page
- In the navigation pane on the left, choose Security Orchestration > Objects. On the page displayed, click the Classify&Mapping tab.
Figure 11 Classify&Mapping tab
- On the Classify&Mapping tab, manage categorical mappings.

- Custom categorical mappings cannot be enabled or disabled.
- Currently, built-in categorical mappings cannot be deleted.
Table 3 Managing categorical mappings Operation
Description
Enable
Locate the row containing the target categorical mapping and click Disable in the Status column.
If the status changes to Enable, the categorical mapping has been enabled.
Disable
Locate the row containing your desired categorical mapping and click Enable in the Status column.
If the status changes to Disable, the categorical mapping has been disabled.
Delete
- Click Delete in the Operation column of the target categorical mapping.
- In the displayed pane on the right, click Delete.
NOTE:
- If a categorical mapping is deleted, the plug-ins and connections associated with the categorical mapping will be stopped immediately.
- Deleted categorical mappings cannot be restored. Exercise caution when performing this operation.
Feedback
Was this page helpful?
Provide feedbackThank you very much for your feedback. We will continue working to improve the documentation.See the reply and handling status in My Cloud VOC.
For any further questions, feel free to contact us through the chatbot.
Chatbot


