
Managing Labeling Data
Synchronizing New Data
ModelArts automatically synchronizes data and labeling information from datasets to labeling jobs.
To quickly obtain the latest data in a dataset, in the All statuses, Unlabeled, or Labeled tab of the labeling job details page, click Synchronize New Data.

Symptom:
After the labeled data is uploaded to OBS and synchronized, the data is displayed as unlabeled.
Possible causes:
Automatic encryption is enabled in the OBS bucket.
Solution:
Create an OBS bucket and upload data again, or disable bucket encryption and upload data again.
Filtering Data
In the All statuses, Unlabeled, or tab, click  in the filter criteria area and add filter criteria to quickly filter the data you want to view.
The following filter criteria are supported. You can set one or more filter criteria.
- Example Type: Select Hard example or Non-hard example.
- Label: Select All or one or more labels you specified.
- File Name or Path: Filter files by file name or file storage path.
- Labeled By: Select the name of the user who labeled the image.
- Sample Attribute: Select the attribute generated by auto grouping. This filter criterion can be used only after auto grouping is enabled.
- Data Attribute: Select All or Inference to filter the data source.
Viewing Labeled Images
On the labeling job details page, click the Labeled tab to view the list of labeled images. By default, the corresponding labels are displayed under the image thumbnails. You can also select an image and view the label information of the image in the Labels of Selected Images area on the right.
Viewing the Labeled Text
On the dataset details page, click the Labeled tab to view the list of the labeled text. You can also view all labels supported by the dataset in the All Labels area on the right.
Modifying Labeled Data
- Modifying based on images
On the labeling job details page, click the Labeled tab, and select one or more images to be modified from the image list. Modify the image information in the label information area on the right.
Modifying a label: In the Labels of Selected Images area, click the edit icon in the Operation column, enter the correct label name in the text box, and click the check mark to complete the modification.
Deleting a label: In the Labels of Selected Images area, click the delete icon in the Operation column to delete the label. This operation deletes only the labels added to the selected image.
- Modifying based on labels
- On the labeling job details page, click Label Management. All labels are displayed on the list.
- Modifying a label: Click Modify in the Operation column. In the displayed dialog box, enter a new label name and click OK. After the modification, the images with the label added will use the new label name.
- Deleting a label: Click Delete in the Operation column to delete the label from all images that have been added with the label.
Figure 1 Label Management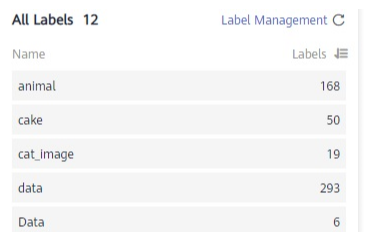
- Click Label in the Operation column of the target labeling job to go to the label management page.
- Click Modify in the Operation column of the target label to modify it.
- Click Delete in the Operation column of the target label to delete it.
- On the labeling job details page, click Label Management. All labels are displayed on the list.
- Modifying based on texts
On the labeling job details page, click the Labeled tab and select the text to be modified from the text list.
In the text list, click the text. When the text background turns blue, the text is selected. If a text file has multiple labels, you can click
 on the above to delete the label.
- Modifying based on labels
On the labeling job details page, click the Labeled tab. The information about all labels is displayed on the right.
- Batch modification: In the All Labels area, click the edit icon in the Operation column, modify the label name in the text box, select a label color, and click OK.
- Batch deletion: In the All Labels area, click the deletion icon in the Operation column to delete the label. In the displayed dialog box, select Delete the label or Delete the label and objects with only the label, and click OK.
After labeling data, you can modify the labeled data on the Labeled tab page.
- Modifying based on audio
On the labeling job details page, click the Labeled tab. Select one or more audio files to be modified from the audio list. Modify the label in the label details area on the right.
- Modifying a label: In the File Labels area, click the edit icon in the Operation column, enter the correct label name in the text box, and click the check mark to complete the modification.
- Deleting a label: In the File Labels area, click the delete icon in the Operation column to delete the label.
- Modifying based on labels
On the labeling job details page, click the Labeled tab. The information about all labels is displayed on the right.
- Modifying a label: Click the edit icon in the Operation column. In the displayed dialog box, enter the new label name and click OK. After the modification, the new label applies to the audio files that contain the original label.
- Deleting a label: Click the deletion icon in the Operation column. In the displayed dialog box, select the object to be deleted as prompted and click OK.
Modifying a Label
After labeling data, you can modify labeled data in the Labeled tab.
On the labeling details page, click the Labeled tab and then the image to be modified. On the displayed labeling page, modify the labeling information in the File Labels area on the right.
- Modifying a label: In the Labeling area, click the edit icon, set the target label name or color in the displayed dialog box, and click
 to save the modification. Alternatively, click a label to be modified. In the image labeling area, adjust the position and size of the bounding box. After the adjustment is complete, click another label to save the modification.
 - Deleting a label: In the Labeling area, click the deletion icon to delete a label from the image. After all labels of an image are deleted, the image is displayed in the Unlabeled tab.
After the labeling information is modified, click Back to Data Labeling Preview in the upper left part of the page to exit the labeling page. In the displayed dialog box, click Yes to save the modification.
Adding Data
In addition to the data automatically synchronized from datasets, you can directly add images to labeling jobs for labeling. The added data is first imported to the dataset associated with the labeling task. Then, the labeling task automatically synchronizes the latest data from the dataset.
- On the labeling job details page, click All statuses, Labeled, or Unlabeled tab, click Add data in the upper left corner.
- Configure input data.
Figure 2 Adding images

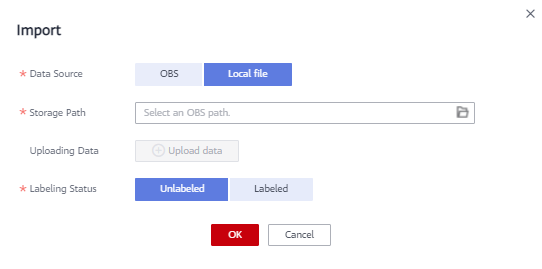
- Click OK.
The images you have added will be automatically displayed in the image list in the All statuses tab. You can choose Add data > View historical records to view task history.
Figure 3 Viewing historical data
Deleting Data
Yu can quickly delete the files you want to discard.
In the All statuses, Unlabeled, or Labeled tab, select the content to be deleted or click Select Images on Current Page, and click Delete. In the displayed dialog box, select or deselect Delete the source files from OBS as required. After confirmation, click OK.

If a tick is displayed in the upper left corner, the data is selected. If no data is selected on the page, the Delete button is unavailable.
If you select Delete the source files from OBS, images stored in the OBS directory will be deleted accordingly. This operation may affect other dataset versions or datasets using those files, for example, leading to an error in page display, training, or inference. Deleted data cannot be recovered. Exercise caution when performing this operation.
Feedback
Was this page helpful?
Provide feedbackThank you very much for your feedback. We will continue working to improve the documentation.See the reply and handling status in My Cloud VOC.
For any further questions, feel free to contact us through the chatbot.
Chatbot


