
Labeling Audio
Model training requires a large amount of labeled data. Therefore, before the model training, label the unlabeled audio files. ModelArts enables you to label audio files in batches by one click. In addition, you can modify the labels of audio files, or remove their labels and label the audio files again. Only Chinese and English are supported for audio labeling.
Sound classification is to classify different sounds. Speech labeling is to label speech content. Speech paragraph labeling is to segment and label speech content.
Starting Labeling
- Log in to the ModelArts management console. In the navigation pane on the left, choose Data Preparation > Label Data.
- In the labeling job list, select a labeling type from the All type drop-down list, click the job to be performed based on the labeling type. The details page of the job is displayed.
Figure 1 Selecting a labeling type

- The job details page displays all data of the labeling job.
Sound Classification
The labeling job details page displays the Unlabeled and Labeled tabs. The Unlabeled tab is displayed by default. Click  on the left of the audio to preview the audio.
- In the Unlabeled tab, select the audio files to be labeled.
- Manual selection: In the audio list, click the target audio. If the blue check box is displayed in the upper right corner, the audio is selected. You can select multiple audio files of the same type and label them together.
- Batch selection: If all audio files of the current page belong to one type, you can click Select Current Page in the upper right corner of the list to select all the audio files on the page.
- Add labels.
- In the label adding area on the right, set a label in the Label text box.
Method 1 (the required label already exists): In the right pane, select a shortcut from the Shortcut drop-down list, select an existing label name from the Label text box, and click OK.
Method 2 (adding a label): In the right pane, select a shortcut from the Shortcut drop-down list, and enter a new label name in the Label text box.
- The selected audio files are automatically moved to the Labeled tab page. On the Unlabeled tab page, the labeling information is updated along with the labeling process, including the added label names and the number of audio files corresponding to each label.

Shortcut key description: After specifying a shortcut key for a label, you can select an audio file and press the shortcut key to add a label for the audio file. Example: Specify 1 as the shortcut key for the aa label. Select one or more files and press 1. A message is displayed, asking you whether to label the files with aa. Click OK.
Each label has a shortcut key. A shortcut key cannot be specified for different labels. Shortcut keys can greatly improve the labeling efficiency.
Figure 2 Adding an audio label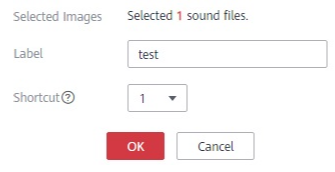
- In the label adding area on the right, set a label in the Label text box.
Speech Labeling
The labeling job details page displays the labeled and unlabeled audio files. The Unlabeled tab is displayed by default.
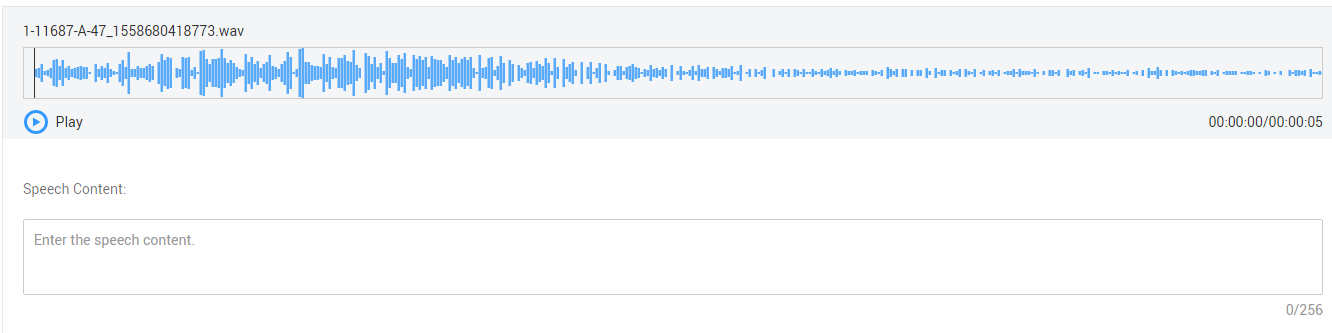
- In the audio file list in the Unlabeled tab, click the target audio file. In the area on the right, the audio file is displayed. Click
 below the audio file to play the audio.
 - In Speech Content, enter the speech content.
- After entering the content, click OK to complete the labeling. The audio file is automatically moved to the Labeled tab.
Figure 3 Labeling speech content
Speech Paragraph Labeling
The labeling job details page displays the Unlabeled and Labeled tabs. The Unlabeled tab is displayed by default.
- In the audio file list in the Unlabeled tab, click the target audio file. In the area on the right, the audio file is displayed. Click
 below the audio file to play the audio.
 - Select an audio segment based on the content being played, and enter the audio file label and content in the Speech Content text box.
- After entering the content, click Label to complete the labeling. The audio file is automatically moved to the Labeled tab.
Feedback
Was this page helpful?
Provide feedbackThank you very much for your feedback. We will continue working to improve the documentation.See the reply and handling status in My Cloud VOC.
For any further questions, feel free to contact us through the chatbot.
Chatbot


