Preparing for Adding a Host to a Host Cluster
Preparations
- A target host or proxy is available. For details about how to apply for a host, see Purchasing an ECS in Custom Config Mode.
- An EIP is available. You can create one when applying for an ECS or anytime by referring to Assigning an EIP.
- Configure a security group for the created ECS by referring to Configuring a Security Group.
- To ensure successful host connectivity, configure the host as follows:
- If your host is a newly applied ECS, configure the port by referring to Configuring a Security Group.
- If you use your own host, configure the port by referring to Configuring the Firewall.
Configuring a Security Group
Before verifying host connectivity, configure a security group and enable some ports. Otherwise, the connectivity verification may fail. (The following uses a Linux host as an example.)
- Go to the console, and choose Service List > Compute > Elastic Cloud Server. The Elastic Cloud Server page is displayed.
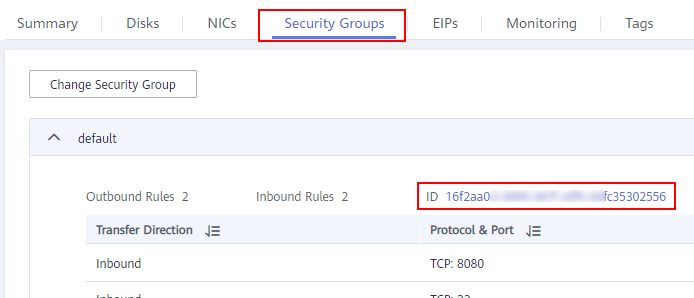
- Click the target ECS. On the ECS details page, click the Security Groups tab. Click a security group ID. On the page that is displayed, click Manage Rules > Inbound Rules.
Figure 1 Configuring rules
- Click Fast-Add Rules and set the parameters as follows:
Figure 2 Fast-add rules
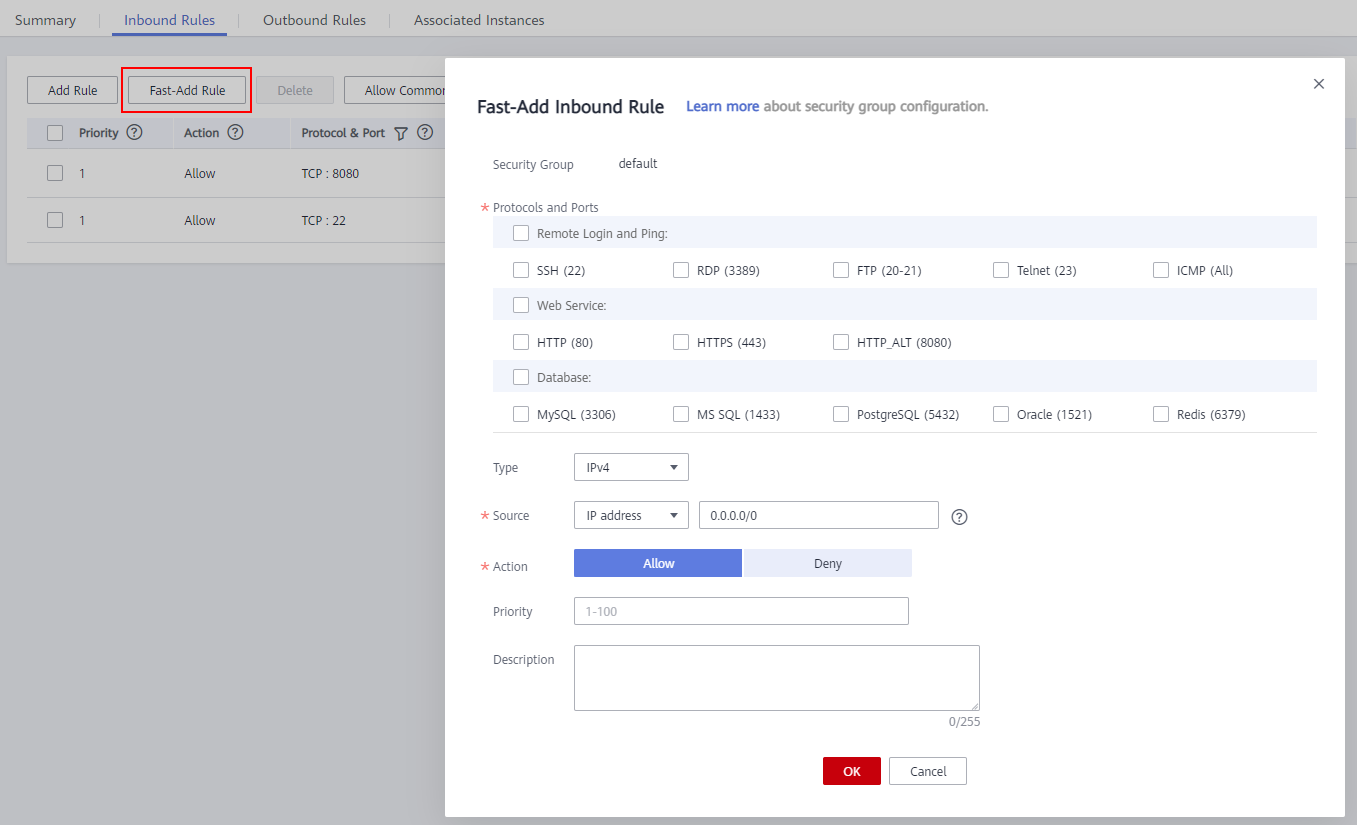
- For Linux hosts, enable port 22 in the inbound rule. For Windows hosts, enable ports 54, 5985, and 5986 in the inbound rule when adding the target host or proxy host. Set the remote end to 0.0.0.0/0 (open the preceding ports for all IP addresses).

If you have high security requirements on the overall deployment process and the preceding ports cannot be opened to all IP addresses, add the following IP addresses (public IP addresses) to the security group and remove port restrictions. Otherwise, host connectivity verification cannot be performed.
These IP addresses above are open IP addresses in the default agent pool of CodeArts Deploy for communications with target hosts and agent hosts.
- Remove the inbound restriction on the port of the application deployed on the host (for example, port 8080 of the Tomcat application or all ports of other applications must be enabled in the inbound direction). Otherwise, the application cannot be accessed.
- Remove the restriction on the outbound direction or at least make ports 80 and 443 accessible.
- For Linux hosts, enable port 22 in the inbound rule. For Windows hosts, enable ports 54, 5985, and 5986 in the inbound rule when adding the target host or proxy host. Set the remote end to 0.0.0.0/0 (open the preceding ports for all IP addresses).
Configuring the Firewall
Check the firewall configuration of the host to make sure that the firewall allows access to the SSH protocol. Otherwise, the connectivity verification may fail. The following part describes how to configure the firewall for different OSs.
- Linux firewall configurations
Table 1 Linux firewall configurations OS Series
Configuration Method
CentOS/EulerOS/UnionTechOS
- Check whether the SSH software package is installed on the local host.
rpm -qa | grep ssh
If the command output contains openssh-server, the SSH software package has been installed.
- If no SSH software package is available, run the following command:
yum install openssh-server
- Enable the SSH service.
service sshd start
- Open the sshd configuration file.
vi /etc/ssh/sshd_config
- Delete the comment tag before the listening port number.
- Restart the SSH service.
sudo service sshd restart
- Check whether port 22 is enabled.
Run the following command, the current ufw status (Active indicates that it is enabled) and rule list are displayed. If port 22 is enabled, 22/tcp or ssh will be displayed in the rule (SSH uses port 22 by default).
netstat -ntpl | grep 22
NOTE:If you have high security requirements on the overall deployment process and do not want to open the preceding ports to all IP addresses, you can configure an IP address whitelist.
Add the following command to the end of the sshd_config file and save the file.
User: whitelisted username. IP: whitelisted IP address. The whitelist should contain CodeArts IP address range.
AllowUsers {User}@{IP}Restart the SSH service.
sudo service sshd restart
All regions: For details, see Notes and Constraints. These IP addresses above are open IP addresses in the default agent pool of CodeArts Deploy for communications with target hosts and agent hosts.
Debian
- Log in to the system as the root user and install UFW.
apt install ufw
- Enable port 22.
ufw allow 22/tcp
- Check whether port 22 is enabled.
Run the following command, the current ufw status (Active indicates that it is enabled) and rule list are displayed. If port 22 is enabled, 22/tcp or ssh will be displayed in the rule (SSH uses port 22 by default).
ufw status
If the UFW status is inactive, run the following command to start UFW:
ufw enable
NOTE:If you have high security requirements on the overall deployment process and do not want to open the preceding ports to all IP addresses, you can configure an IP address whitelist.
Run the following command to add an IP address whitelist. IP: whitelisted IP address. The whitelist should contain CodeArts IP address range.
ufw allow from {IP} to any port 22Check the ufw rule list. The sequence number is marked for each rule, facilitating subsequent rule deletion or modification.
ufw status numbered
Disable the SSH connection rule (disable the rule whose source IP address is Anywhere to implement whitelist restriction). {Number} indicates the number of the rule to be disabled.
ufw delete {Number}All regions: For details, see Notes and Constraints. These IP addresses above are open IP addresses in the default agent pool of CodeArts Deploy for communications with target hosts and agent hosts.
Ubuntu
- Check the IP address of the local host.
ifconfig
The value following inet is the IP address.
- Check whether the 22 port is occupied.
netstat -nltp|grep 22
If any command output is displayed, port 22 is occupied. If no command output is displayed, port 22 is not listened on by any process.
- If no port process exists, run the following commands in sequence:
sudo apt-get install openssh-server
sudo apt-get install ufw
sudo ufw enable
sudo ufw allow 22
NOTE:If you have high security requirements on the overall deployment process and do not want to open the preceding ports to all IP addresses, you can configure an IP address whitelist.
Run the following command to add an IP address whitelist. IP: whitelisted IP address. The whitelist should contain CodeArts IP address range.
sudo ufw allow from {IP} to any port 22Check the ufw rule list. The sequence number is marked for each rule, facilitating subsequent rule deletion or modification.
ufw status numbered
Disable the SSH connection rule (disable the rule whose source IP address is Anywhere to implement whitelist restriction). {Number} indicates the number of the rule to be disabled.
ufw delete {Number}All regions: For details, see Notes and Constraints. These IP addresses above are open IP addresses in the default agent pool of CodeArts Deploy for communications with target hosts and agent hosts.
- Check whether the SSH software package is installed on the local host.
- Windows firewall configurations
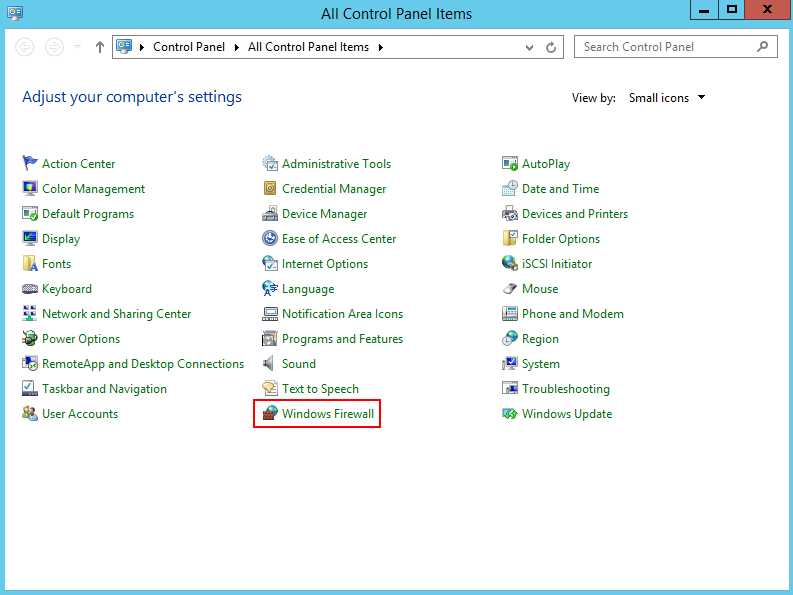
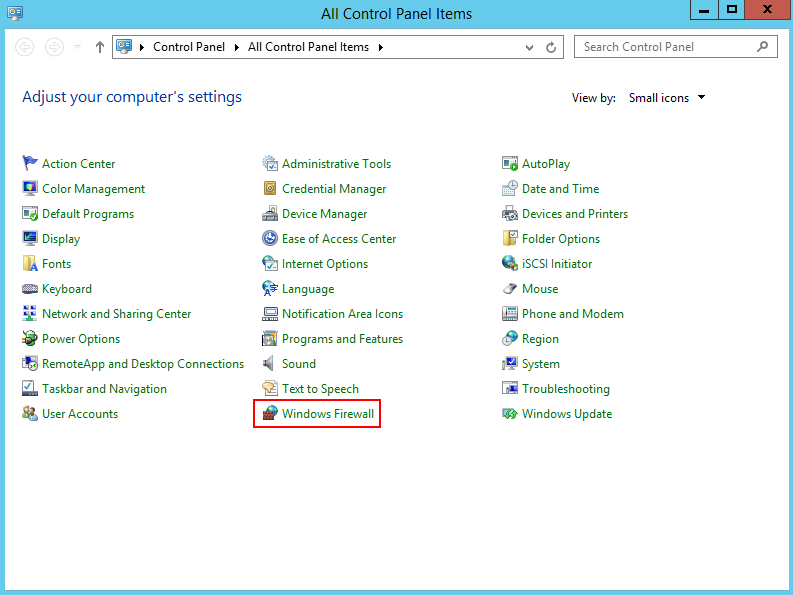
- Choose Windows Firewall on the control panel of the Windows host.
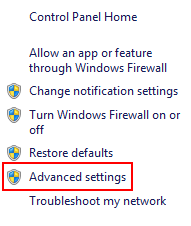
- Click Advanced settings.
- Click Inbound Rules.
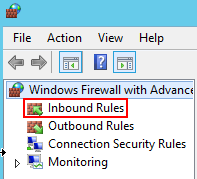
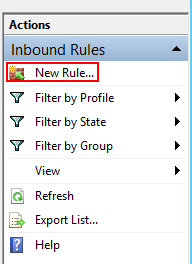
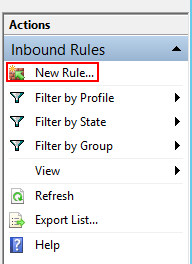
- Click New Rule.
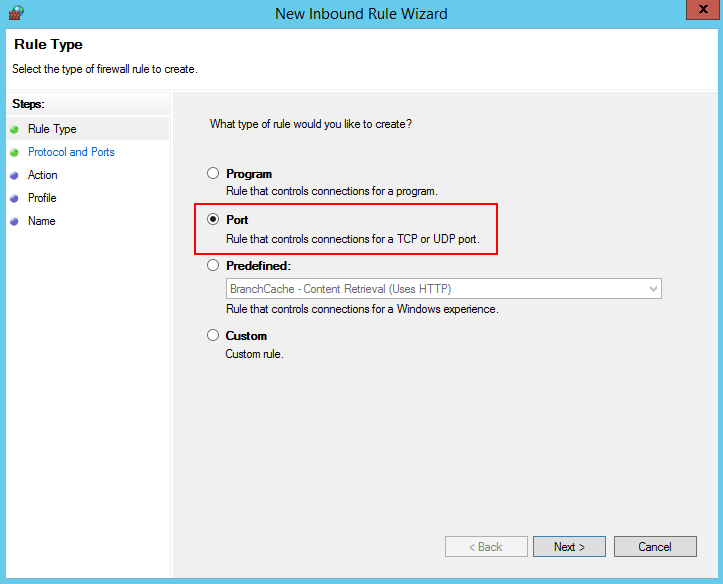
- Set Rule Type to Port and click Next.
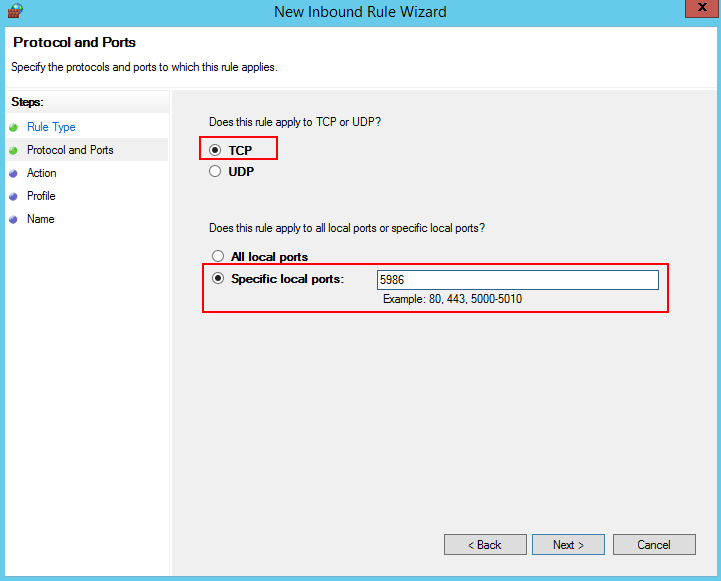
- Select TCP and Specific local ports, enter port 5986, and click Next.
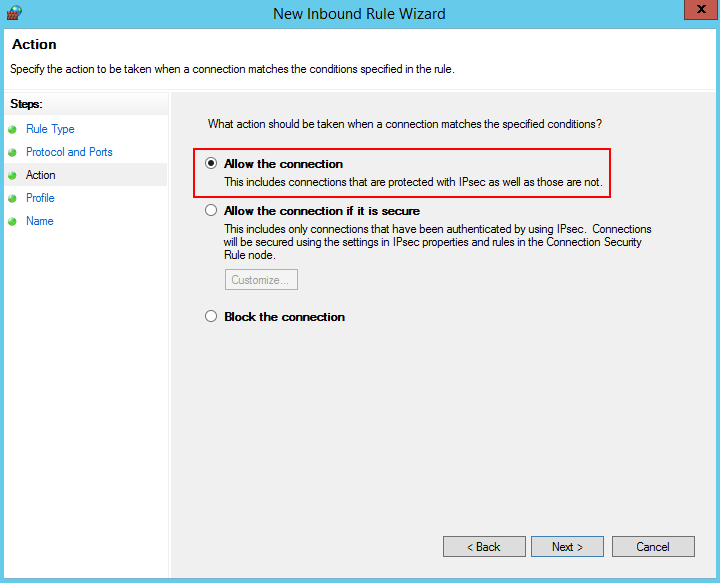
- Select Allow the connection, and click Next.
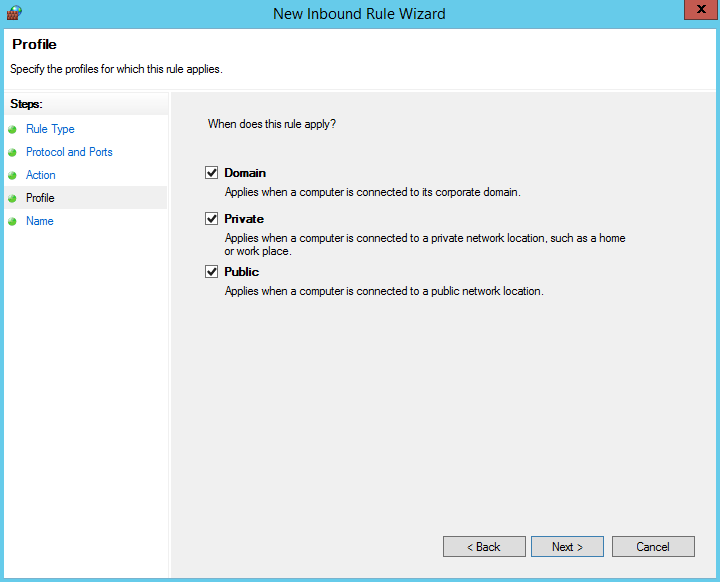
- Select all the options for Profile and click Next.
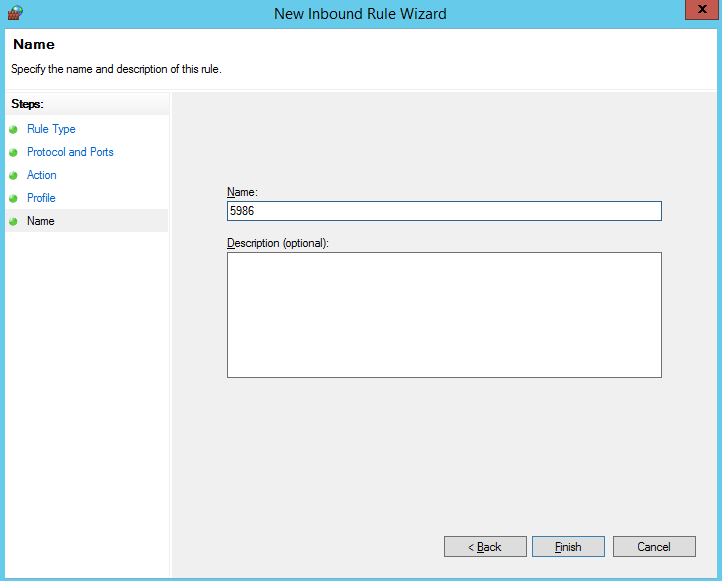
- Enter a rule name and click Finish to complete the firewall configurations.
- To connect to the target host through an agent host, repeat steps 1 to 9 to configure the firewall for the agent host. Add an inbound rule for the listening port of the proxy be referring to step 4, for example, port 54.
- (Optional) To meet higher security requirements, configure an IP address whitelist on the target host, instead of opening the preceding ports to all IP addresses.
- Choose Windows Firewall on the control panel of the Windows host.
- Click Advanced settings.

- Click Inbound Rules.

- Click New Rule.
- Set Rule Type to Custom and click Next.

- Set Program to All programs and click Next.
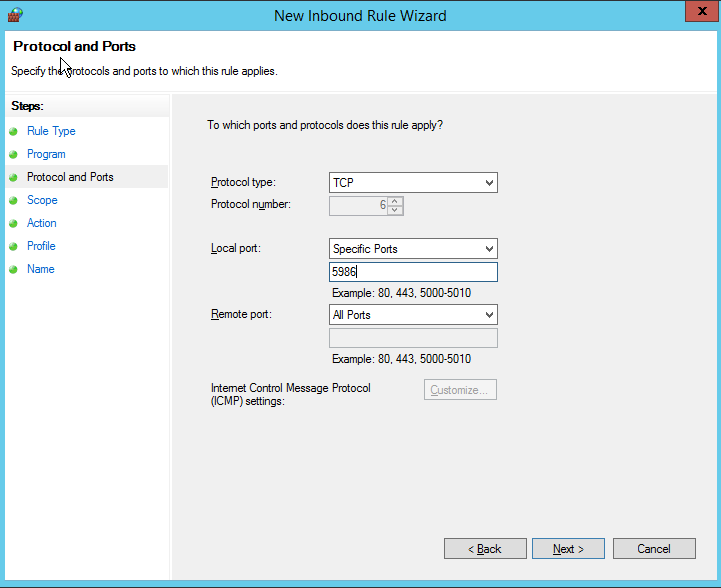
- Set Protocol type to TCP and Local port to Specific Ports, enter port 5986, and click Next.
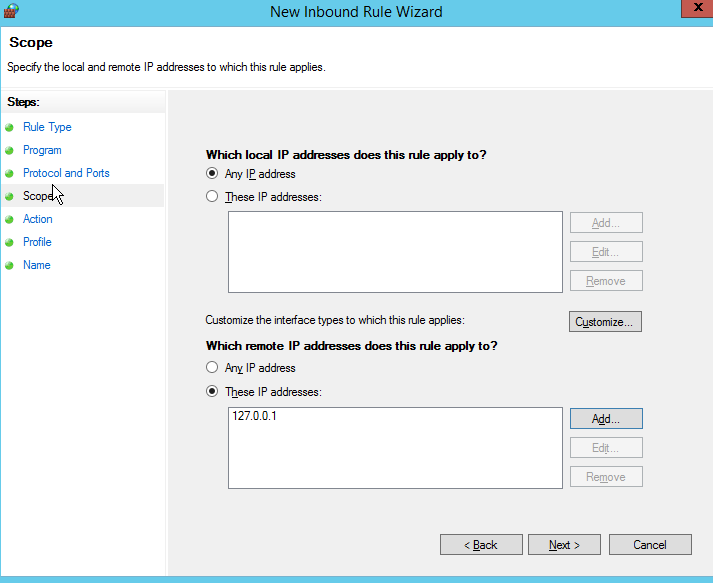
- In the Scope area, select Any IP address for Which local IP addresses does this rule apply to? and select These IP addresses for Which remote IP addresses does this rule apply to?, enter a whitelisted IP address and click Next.
- Select Allow the connection, and click Next.

- Select all the options for Profile and click Next.

- Enter a rule name and click Finish to complete the IP address access whitelist setting for the target host.

- To connect to the target host through an agent host, repeat step 1 to step 11 to configure the IP address access whitelist on the agent host and add an inbound rule for the listening port of the agent host, for example, port 54.
- Choose Windows Firewall on the control panel of the Windows host.
Feedback
Was this page helpful?
Provide feedbackThank you very much for your feedback. We will continue working to improve the documentation.See the reply and handling status in My Cloud VOC.
For any further questions, feel free to contact us through the chatbot.
Chatbot


