
Configuring kubectl
kubectl is a CLI tool provided by Kubernetes, enabling you to manage cluster resources, view cluster status, deploy applications, and debug issues through the CLI.
After kubectl is configured, you can connect it to a Lite Cluster resource pool for easy resource management by running kubectl commands.
To access a Kubernetes cluster of Lite Cluster through kubectl, use either of the following methods:
- Intranet access: Clients access the cluster's API server via an intranet IP address, keeping data traffic internal and enhancing security.
- Public access: The client's API server exposes a public API, allowing clients to access the Kubernetes cluster over the Internet.
This section describes how to configure kubectl for a Lite Cluster.
How It Works
kubectl retrieves cluster information from a kubeconfig file and communicates with the Kubernetes API server. The kubeconfig file is the identity credential for kubectl to access the Kubernetes cluster. It contains the API server address, user authentication credentials, and other configuration details. With these details, kubectl can interact with the Kubernetes cluster to perform management tasks.

Prerequisites
- You have purchased and enabled Lite Cluster resources. For details, see Enabling Lite Cluster Resources.
- If you use kubectl through the VPC intranet, ensure that the client and Lite Cluster are in the same VPC.
- If you use kubectl through the public network, obtain the EIP to be bound in advance. For details, see Assigning EIP.
Configuring Kubectl for Lite Cluster
- Log in to the ModelArts console. In the navigation pane on the left, choose Lite Cluster under Resource Management.
- Click the created Lite Cluster dedicated resource pool to access its details page.
Figure 2 Basic information
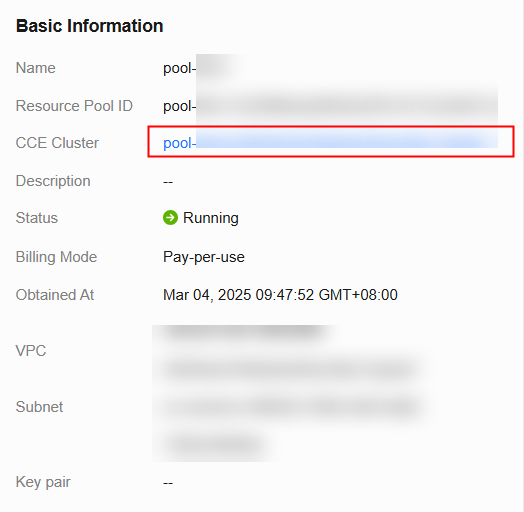
- Click the CCE cluster to access its details page. From there, locate Connection Information in the cluster information.
Figure 3 Connection Information

- Configure the kubectl tool.
- To use kubectl through the intranet, install it on a node within the same VPC as the cluster.
Click Configure next to kubectl and perform operations as prompted. For details, see Configure kubectl.Figure 4 Cluster connection information
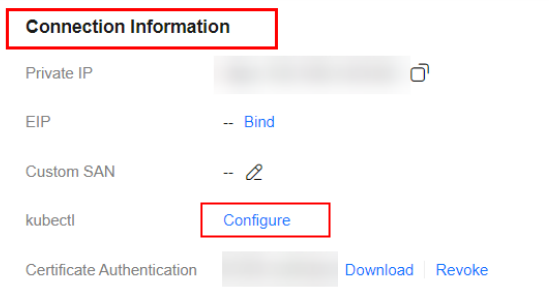 Figure 5 Using kubectl through the intranet
- To use kubectl through an EIP, install it on any client that associated with the EIP. First, you need to bind an EIP.
- Click Bind next to the EIP field.
Figure 6 Binding an EIP

- Select an existing EIP or click Create EIP to go to the EIP console and create one. For details, see Assigning an EIP.
- After the EIP is bound, locate Connection Information in the cluster information and click Configure next to kubectl.
- Perform operations as prompted. For details, see Configure kubectl.
Figure 7 Configuring kubectl

- Click Bind next to the EIP field.
- To use kubectl through the intranet, install it on a node within the same VPC as the cluster.
- Run the command below on the client where kubectl is installed. If the cluster node is displayed, kubectl is configured.
kubectl get node
Follow-Up Operation
Configuring Lite Cluster Storage: The available storage space is determined by dockerBaseSize when no external storage is mounted. However, the accessible storage space is limited. It is recommended that you mount external storage to overcome this limitation. You can mount storage to a container in various methods. The recommended method depends on the scenario, and you can choose one that meets your service needs.
Feedback
Was this page helpful?
Provide feedbackThank you very much for your feedback. We will continue working to improve the documentation.See the reply and handling status in My Cloud VOC.
For any further questions, feel free to contact us through the chatbot.
Chatbot


