ClusterIP
Escenario
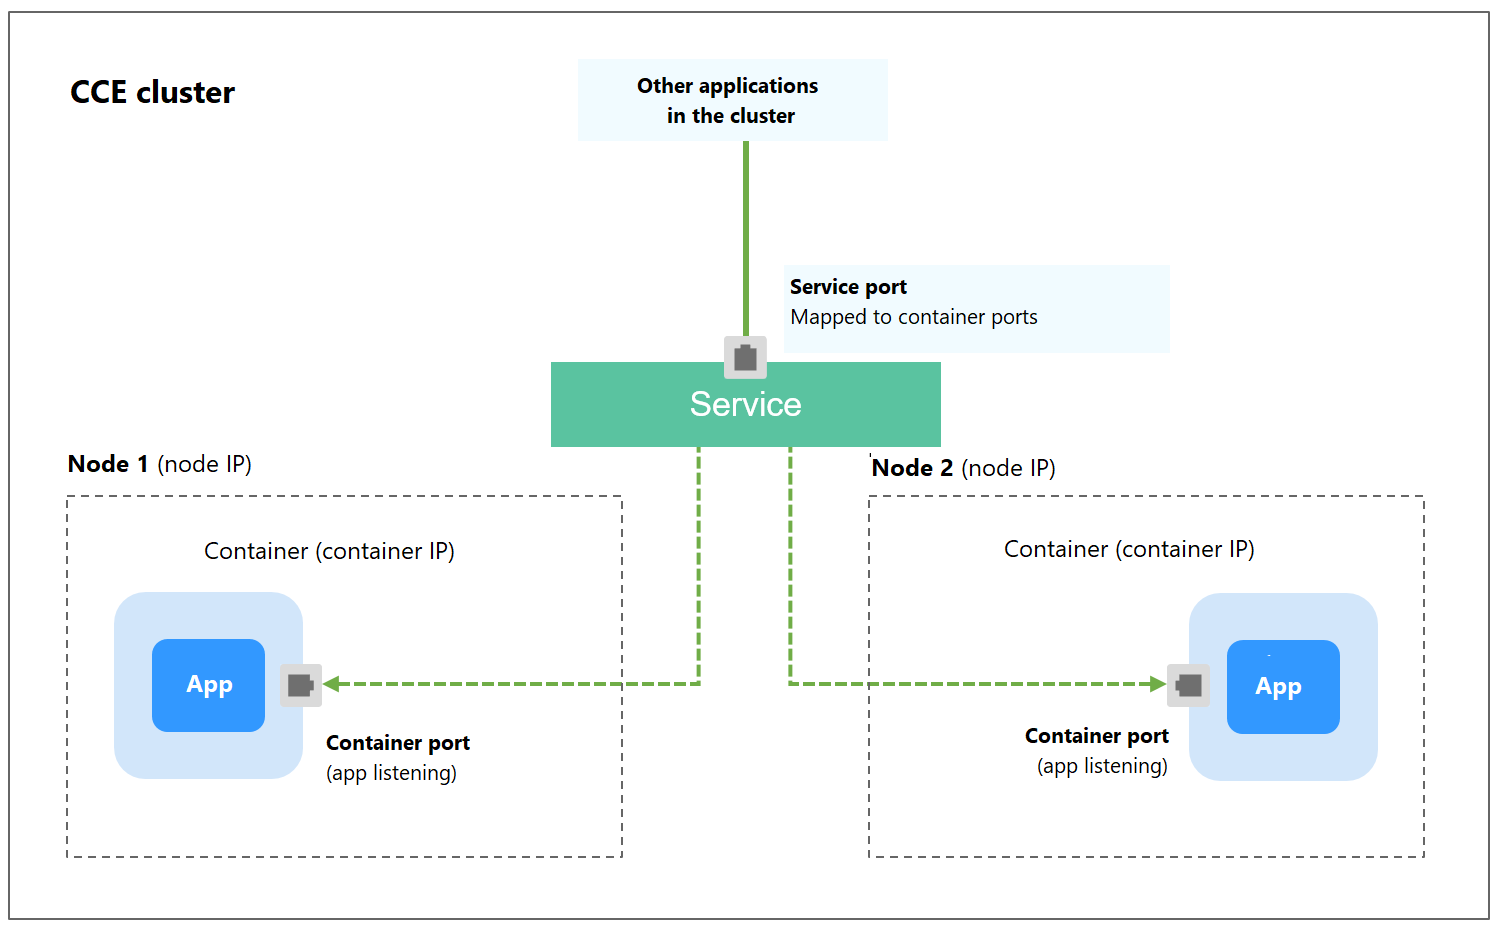
Los Services de ClusterIP permiten que las cargas de trabajo del mismo clúster utilicen sus nombres de dominio internos de clúster para tener acceso entre sí.
El formato de nombre de dominio interno de clúster es <Service name>.<Namespace of the workload>.svc.cluster.local:<Port>. Por ejemplo, nginx.default.svc.cluster.local:80.
Figura 1 muestra las relaciones de mapeo entre canales de acceso, puertos de contenedor y puertos de acceso.
Creación de un Service de ClusterIP
- Inicie sesión en la consola de CCE y acceda a la consola del clúster.
- Elija Networking en el panel de navegación y haga clic en Create Service en la esquina superior derecha.
- Establezca los parámetros de acceso dentro del clúster.
- Service Name: Nombre del Service, que puede ser el mismo que el nombre de la carga de trabajo.
- Service Type: Seleccione ClusterIP.
- Namespace: Espacio de nombres al que pertenece la carga de trabajo.
- Selector: Agregue una etiqueta y haga clic en Add. Un Service selecciona un pod basado en la etiqueta agregada. También puede hacer clic en Reference Workload Label para hacer referencia a la etiqueta de una carga de trabajo existente. En el cuadro de diálogo que se muestra, seleccione una carga de trabajo y haga clic en OK.
- IPv6: Esta función está deshabilitada por defecto. Una vez habilitada esta función, la dirección IP del clúster del Service cambia a una dirección IPv6. Para obtener más información, consulte ¿Cómo creo un clúster de doble pila IPv4/IPv6? Este parámetro solo está disponible en clústeres de v1.15 o posterior con IPv6 habilitado (establecido durante la creación del clúster).
- Configuraciones del puerto
- Protocol: protocolo utilizado por el Service.
- Service Port: puerto utilizado por el Service. El número de puerto se encuentra dentro del rango de 1 a 65535.
- Container Port: puerto en el que escucha la carga de trabajo. Por ejemplo, Nginx utiliza el puerto 80 de forma predeterminada.
- Haga clic en OK.
Configuración del tipo de acceso con kubectl
Puede ejecutar comandos de kubectl para establecer el tipo de acceso (Service). Esta sección utiliza una carga de trabajo de Nginx como ejemplo para describir cómo implementar el acceso intracluster usando kubectl.
- Utilice kubectl para conectarse al clúster. Para obtener más información, véase Conexión a un clúster con kubectl.
- Cree y edite los archivos nginx-deployment.yaml y nginx-clusterip-svc.yaml.
Los nombres de archivo están definidos por el usuario. nginx-deployment.yaml y nginx-clusterip-svc.yaml son simplemente nombres de archivo de ejemplo.
vi nginx-deployment.yamlapiVersion: apps/v1 kind: Deployment metadata: name: nginx spec: replicas: 1 selector: matchLabels: app: nginx template: metadata: labels: app: nginx spec: containers: - image: nginx:latest name: nginx imagePullSecrets: - name: default-secretvi nginx-clusterip-svc.yamlapiVersion: v1 kind: Service metadata: labels: app: nginx name: nginx-clusterip spec: ports: - name: service0 port: 8080 # Port for accessing a Service. protocol: TCP # Protocol used for accessing a Service. The value can be TCP or UDP. targetPort: 80 # Port used by a Service to access the target container. This port is closely related to the applications running in a container. In this example, the Nginx image uses port 80 by default. selector: # Label selector. A Service selects a pod based on the label and forwards the requests for accessing the Service to the pod. In this example, select the pod with the app:nginx label. app: nginx type: ClusterIP # Type of a Service. ClusterIP indicates that a Service is only reachable from within the cluster.
- Cree una carga de trabajo.
kubectl create -f nginx-deployment.yaml
Si se muestra información similar a la siguiente, se ha creado la carga de trabajo.
deployment "nginx" created
kubectl get po
Si se muestra la información similar a la siguiente, la carga de trabajo se está ejecutando.
NAME                     READY     STATUS             RESTARTS   AGE
nginx-2601814895-znhbr   1/1       Running            0          15s
- Cree un Service.
kubectl create -f nginx-clusterip-svc.yaml
Si se muestra información similar a la siguiente, se está creando el Service.
service "nginx-clusterip" created
kubectl get svc
Si se muestra información similar a la siguiente, se ha creado el Service y se ha asignado una dirección IP interna del clúster al Service.
# kubectl get svc
NAME              TYPE        CLUSTER-IP     EXTERNAL-IP   PORT(S)    AGE
kubernetes        ClusterIP   10.247.0.1     <none>        443/TCP    4d6h
nginx-clusterip   ClusterIP   10.247.74.52   <none>        8080/TCP   14m
- Acceda a un Service.
Se puede acceder a un Service desde contenedores o nodos de un clúster.
Cree un pod, acceda al pod y ejecute el comando curl para acceder a IP address:Port o al nombre de dominio del Service, como se muestra en la siguiente figura.
El sufijo del nombre de dominio se puede omitir. En el mismo espacio de nombres, puede usar directamente nginx-clusterip:8080 para el acceso. En otros espacios de nombres, puede usar nginx-clusterip.default:8080 para tener acceso.
# kubectl run -i --tty --image nginx:alpine test --rm /bin/sh
If you do not see a command prompt, try pressing Enter.
/ # curl 10.247.74.52:8080
<!DOCTYPE html>
<html>
<head>
<title>Welcome to nginx!</title>
<style>
    body {
        width: 35em;
        margin: 0 auto;
        font-family: Tahoma, Verdana, Arial, sans-serif;
    }
</style>
</head>
<body>
<h1>Welcome to nginx!</h1>
<p>If you see this page, the nginx web server is successfully installed and
working. Further configuration is required.</p>

<p>For online documentation and support please refer to
<a href="http://nginx.org/">nginx.org</a>.<br/>
Commercial support is available at
<a href="http://nginx.com/">nginx.com</a>.</p>

<p><em>Thank you for using nginx.</em></p>
</body>
</html>
/ # curl nginx-clusterip.default.svc.cluster.local:8080
...
<h1>Welcome to nginx!</h1>
...
/ # curl nginx-clusterip.default:8080
...
<h1>Welcome to nginx!</h1>
...
/ # curl nginx-clusterip:8080
...
<h1>Welcome to nginx!</h1>
...


