
Sending a Custom Event
This section describes how to send a custom event.
The custom events generated by custom event sources are sent to EG. The EG service filters and converts the custom events based on the filter rule, and triggers the event target (a function in FunctionGraph).
Prerequisites
- You have completed the operations in Enabling EG and Authorizing Permissions.
- You have obtained the permission to access FunctionGraph.
Step 1: Create a Custom Channel

Step 2: Create an Event Source
- Log in to the EG console.
- In the navigation pane, choose Event Bus > Event Sources.
- Click Create Event Source in the upper right corner.
- Set event source parameters, as shown in Figure 2.
- Type: Select a value from the drop-down list.
- Name: Enter egsdk-source.
- Description: Enter a description.
- Click OK.
View this event source on the Custom tab.

Step 3: Create an Event Target (Create a Function)
- Log in to the FunctionGraph console.
- Choose Functions > Function List in the navigation pane.
- Click Create Function.
- Set function parameters, as shown in Figure 3. For details about the function parameters, see Creating a Function.
- Function Type: Select Event Function.
- Region: Select the region as required.
- Function Name: Enter test.
- Agency: Select Use no agency.
- Runtime: Select Python 2.7.
- Click Create.
- On the Code tab page of the function details page, enter the following code and click Deploy.
# -*- coding:utf-8 -*-
import json
def handler (event, context):
    print(json.dumps(event))
    return {
        "statusCode": 200,
        "isBase64Encoded": False,
        "body": json.dumps(event),
        "headers": {
            "Content-Type": "application/json"
        }
    }

Step 4: Create an Event Subscription
Subscriptions bind event sources, channels, and targets. Events of sources are routed to targets based on specified rules.
- Log in to the EG console.
- In the navigation pane, choose Event Subscriptions.
- Click Create Event Subscription.
- Click
 next to the default subscription name.
 - Enter CustomEvent in Subscription Name, and click OK.
- Configure an event source.
- Click Event Source, and set event source parameters as shown in Figure 4.
Table 1 Custom event source parameters Parameter
Description
Channel
Select an existing custom event channel.
Event Source
Enter or select a custom event source that has been associated with the selected custom event channel.
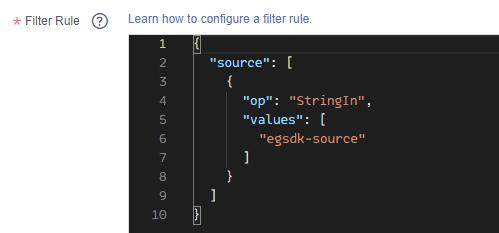
Filter Rule
Enter an event filter rule.
Only events that match these filter rules will be routed to the associated targets.
Filter Rule: Retain the default value and record the value of values, for example, egsdk-source in Figure 4.
- Click OK.
- Click Event Source, and set event source parameters as shown in Figure 4.
- Configure an event target.
- Click Event Target, and set event target parameters as shown in Figure 5.
- Provider: Select Cloud services.
- Event Target: Select FunctionGraph (function computing).
- Function: Select test (created in Step 3).
- Version: Select latest.
- Agency: Select the created agency.
- Transform Type: Select Pass-through.
- Click OK.
- Click Event Target, and set event target parameters as shown in Figure 5.
- Click Save.


Step 5: Send a Custom Event
- Configure a custom event. For details, see CloudEvents SDK.
Modify the following parameters in the sample code for publishing an event:
- NAME: IAM username.
- PASSWORD: IAM user password.
- DOMAIN_NAME: Account name.
- IAM_ENDPOINT: IAM endpoint. For details, see Regions and Endpoints.
- PROJECT_ID: The project ID. Obtain it by referring to API Credentials.
- CHANNEL_ID: Change the value to the channel ID recorded in Step 1.
- ENDPOINT: EG endpoint.
- SOURCE: Event source name. Change it to the value of values in Filter recorded in Step 4: Create an Event Subscription.
- TIME: Time when the event is generated.
- DATA: Event content that complies with the CloudEvents 1.0 specifications. Modify this parameter based on service requirements.
- Run the main function to publish the event.
Step 6: View Results
- Log in to the FunctionGraph console.
- Choose Functions > Function List in the navigation pane.
- Click the test function to go to the function details page.
- On the Metrics tab page, view the number of invocations and running duration.
Figure 6 Viewing metrics

Feedback
Was this page helpful?
Provide feedbackThank you very much for your feedback. We will continue working to improve the documentation.See the reply and handling status in My Cloud VOC.
For any further questions, feel free to contact us through the chatbot.
Chatbot


