
Help Center>
Cloud Service Engine>
Getting Started>
Exclusive ServiceComb Engine>
Connecting to ServiceComb Engines>
Connecting Spring Cloud Applications to ServiceComb Engines Using SpringCloudHuawei SDK
Updated on 2024-05-07 GMT+08:00
Connecting Spring Cloud Applications to ServiceComb Engines Using SpringCloudHuawei SDK
This section uses a demo to demonstrate how to use ServiceComb engines.

This section describes how to connect a provider service and a consumer service to a ServiceComb engine.
Prerequisites
- You have created a ServiceComb engine. For details, see Creating a ServiceComb Engine.
- You have downloaded the demo source code from GitHub to the local host and decompressed it.
- The Java JDK and Maven have been installed on the local host for compilation, building, and packaging, and the Maven central library can be accessed.
Procedure
- Logging In to the CSE Console
- Log in to the management console.
- Click
 and select a region.
 - Click
 in the upper left corner and select Cloud Service Engine in the service list. The CSE console is displayed.
- Choose Exclusive ServiceComb Engine.
- Click the ServiceComb engine created in Prerequisites.
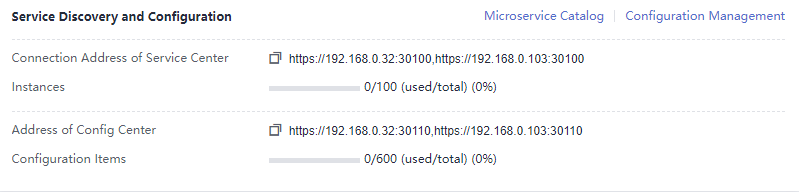
- Obtain the service center address and configuration center address of the ServiceComb engine.
In the Service Discovery and Configuration area, you can view the service center address and configuration center address of the microservice engine.
- Change the addresses of the registry center and configuration center in the demo.
- In the directory of the demo source code downloaded to the local host, find the \basic\consumer\src\main\resources\bootstrap.yml and \basic\provider\src\main\resources\bootstrap.yml files.
- Add the service center address and configuration center address of the ServiceComb engine to the project configuration file (\basic\consumer\src\main\resources\bootstrap.yml is used as an example).
spring:
  application:
    name: basic-consumer
  cloud:
    servicecomb:
      discovery:
        enabled: true
        watch: false
        # Registry center address
        address: https://192.168.0.210:30100,https://192.168.0.246:30100
        appName: basic-application
        serviceName: ${spring.application.name}
        version: 0.0.1
        healthCheckInterval: 30
      config:
        # Configuration center address
        serverType: kie
        serverAddr: https://192.168.0.210:30110,https://192.168.0.246:30110
In the ServiceStage deployment scenario, the service registry center and configuration center addresses are automatically injected during the deployment. You do not need to manually add them.
- Pack the demo source code into a JAR package.
- In the root directory of the demo source code, open the Command Prompt and run the mvn clean package command to package and compile the project.
- After the compilation is successful, two JAR packages are generated, as shown in Table 1.
- Deploy the application.
- Method 1: Deploy provider and consumer on the ECS node in the VPC where the ServiceComb engine is located.
- Create an ECS node in the VPC where the engine instance is located and log in to the ECS node. For details, see Purchasing and Logging In to a Linux ECS.
- Install JRE to provide a running environment for services.
- Upload the JAR package generated in 6 to the ECS node.
- Run the java -jar {JAR package} command to run the generated JAR package.
- Method 2: Deploy provider and consumer on ServiceStage.
- Upload the JAR package generated in 6 to OBS.
- Create a CCE cluster in the same VPC as the ServiceComb engine instance. For details, see Creating a Kubernetes Cluster.
- Create a ServiceStage environment in the VPC where the engine instance is located, and manage the ServiceComb engine and CCE resource. For details, see Creating an Environment.
- Deploy provider and consumer. For details, see Creating and Deploying a Component.
- Method 1: Deploy provider and consumer on the ECS node in the VPC where the ServiceComb engine is located.
- Confirm the deployment results.
- Optional: On the CSE console, choose Exclusive ServiceComb Engine and click the ServiceComb engine created in Prerequisites.
- Choose Microservice Catalog > Microservice List to view the number of basic-consumer and basic-provider microservice instances.
- If Instances is not 0, the demo has been connected to the microservice engine.
- If Instances is 0 or the basic-consumer and basic-provider services cannot be found, the demo fails to be connected to the microservice engine.
Parent topic: Connecting to ServiceComb Engines
Feedback
Was this page helpful?
Provide feedbackThank you very much for your feedback. We will continue working to improve the documentation.See the reply and handling status in My Cloud VOC.
The system is busy. Please try again later.
For any further questions, feel free to contact us through the chatbot.
Chatbot


