Introduction
This section describes how to use Cloud Container Engine (CCE) and provides frequently asked questions (FAQs) to help you quickly get started with CCE.
Procedure
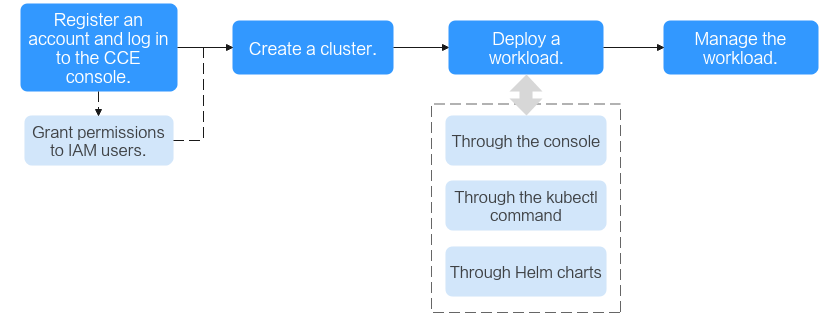
Complete the following tasks to get started with CCE.

- Register an account and grant permissions to IAM users.
An account has the permissions to use CCE. However, IAM users created by the account do not have permissions. You need to manually grant the permissions to IAM users.
- Create a cluster.
For details on how to create a Kubernetes cluster, see Creating a Kubernetes Cluster.
- Deploy a workload (application).
- View workload status and logs. Upgrade, scale, and monitor the workload.
FAQs
- Is CCE suitable for users who are not familiar with Kubernetes?
Yes. The CCE console is easy-to-use, and the Getting Started guide helps you quickly understand and use CCE.
- Is CCE suitable for users who have little experience in building images?
Yes. CCE not only helps store your own images in My Images but also allows you to create containerized applications using open source images. For details, see Deploying a Deployment (Nginx).
- How do I create a workload using CCE?
To create a workload, you need to create a cluster first. For details on how to create a workload, see Deploying a Deployment (Nginx).
- How do I create a workload accessible to public networks?
CCE provides different workload access types to address diverse scenarios.
- How can I allow multiple workloads in the same cluster to access each other?
You can create a service of the ClusterIP type. The ClusterIP Services allow workloads in the same cluster to access each other using their cluster-internal domain names.
Cluster-internal domain names are in the format of <Custom service name>.<Workload's namespace>.svc.cluster.local:<Port number>. For example, nginx.default.svc.cluster.local:80.
Feedback
Was this page helpful?
Provide feedbackThank you very much for your feedback. We will continue working to improve the documentation.See the reply and handling status in My Cloud VOC.
For any further questions, feel free to contact us through the chatbot.
Chatbot


