How Can I Create an Agency?
Background
If your enterprise has multiple tenant accounts, you can use the cross-account capability of COC to configure and deliver O&M tasks across accounts and regions in scenarios such as creating Cloud Eye alarm rules and executing jobs. During this process, you need to create and use the corresponding agency.
This section uses the scenario of creating Cloud Eye alarm rules across accounts as an example to describe how to create an agency.
Choose Overview > Quick Configuration Center > Cloud Service Configuration to use the cross-account configuration function, as shown in the following figure.

Agency Function Description
The cross-account function requires two agencies: organization administrator agency and execution account agency.
- Organization administrator agency: The organization administrator or COC delegated administrator (administrator for short) creates or trusts the COC service. The agency is used to support the COC service to switch to the administrator identity, that is, you can perform necessary management tasks as the administrator on COC.
- Execution account agency: The execution account (member tenant in the organization) trusts the COC service and administrator agency. The agency must be a trust agency of IAM 5.0. The agency is used to support the administrator to switch to the execution account identity to create a job service ticket and perform cross-account operations.
Assume that you are using the COC service of Huawei Cloud to perform cross-account operations. You need to create an execution account agency so that you can perform the following operations as an administrator:
- Create an SMN topic in the execution account.
- Add a subscription to the SMN topic to receive alarm notifications.
- Create a Cloud Eye alarm rule in the execution account to monitor and trigger alarms.
In addition, the agency should allow the administrator to switch to the execution account to create a job service ticket. This ensures that the administrator can perform necessary management tasks in the execution account while maintaining flexibility and security.
Executing an Account Authorization Policy{ "Version": "5.0", "Statement": [ { "Effect": "Allow", "Action": [ "ces:alarms:create" ] }, { "Effect": "Allow", "Action": [ "smn:topic:create", "smn:topic:subscribe" ] }, { "Effect": "Allow", "Action": [ "sts:agencies:assume", "sts::setSourceIdentity", "sts::tagSession" ] }, { "Effect": "Allow", "Action": [ "coc:instance:executeDocument", "coc:job:action", "coc:job:get", "coc:job:list" ] }, { "Effect": "Allow", "Action": [ "iam:projects:list" ] } ]}
- The operations supported by an agency represent the authorization of the agency.
- Currently, the Cloud Eye alarm rule contains the alarm notification function. The notification function is restricted by the open capabilities of peripheral services. Therefore, only the topic subscription notification mode is available.
- When configuring Cloud Eye alarm rule parameters, the selection of a notification topic is based on the notification topic owned by the administrator tenant (organization administrator or organization administrator delegated by COC) who logs in to COC. The service does not support querying the notification topics of the execution account (target cross-account tenant) in advance. Therefore, when you perform quick service ticket configuration, the service creates a topic with the same subscription method (WeLink, Lark, and DingTalk are not automatically added to the subscription of the new topic) and the same name as the notification topic selected by the administrator tenant selected when you configure Cloud Eye alarm rule parameters. Notifications may be charged based on the number of notifications. Therefore, you are advised to create a Cloud Eye alarm rule across accounts. If you do not need to send notifications, disable the notification function when configuring the Cloud Eye alarm rule.
Precautions
An organization administrator can create an agency for an account only if the two tenants (the delegator tenant and the delegated tenant) involved in the cross-account operation belong to the same organization.
Organization Administrator Agency
- Log in to IAM as an organization administrator tenant.
- Click Go to New Console.
- In the navigation pane on the left, choose Identity Policies. On the displayed page, click Create Identity Policy in the upper right corner to create an authorization policy for the agency.
Figure 2 Create Authorization Policy

- On the displayed page, specify Policy Name.
Figure 3 Custom identity policy name.

- In the Policy Content area, click Select service, search for Security Token Service (STS), and select it. Then, go to Actions.
Figure 4 Select the cloud service.

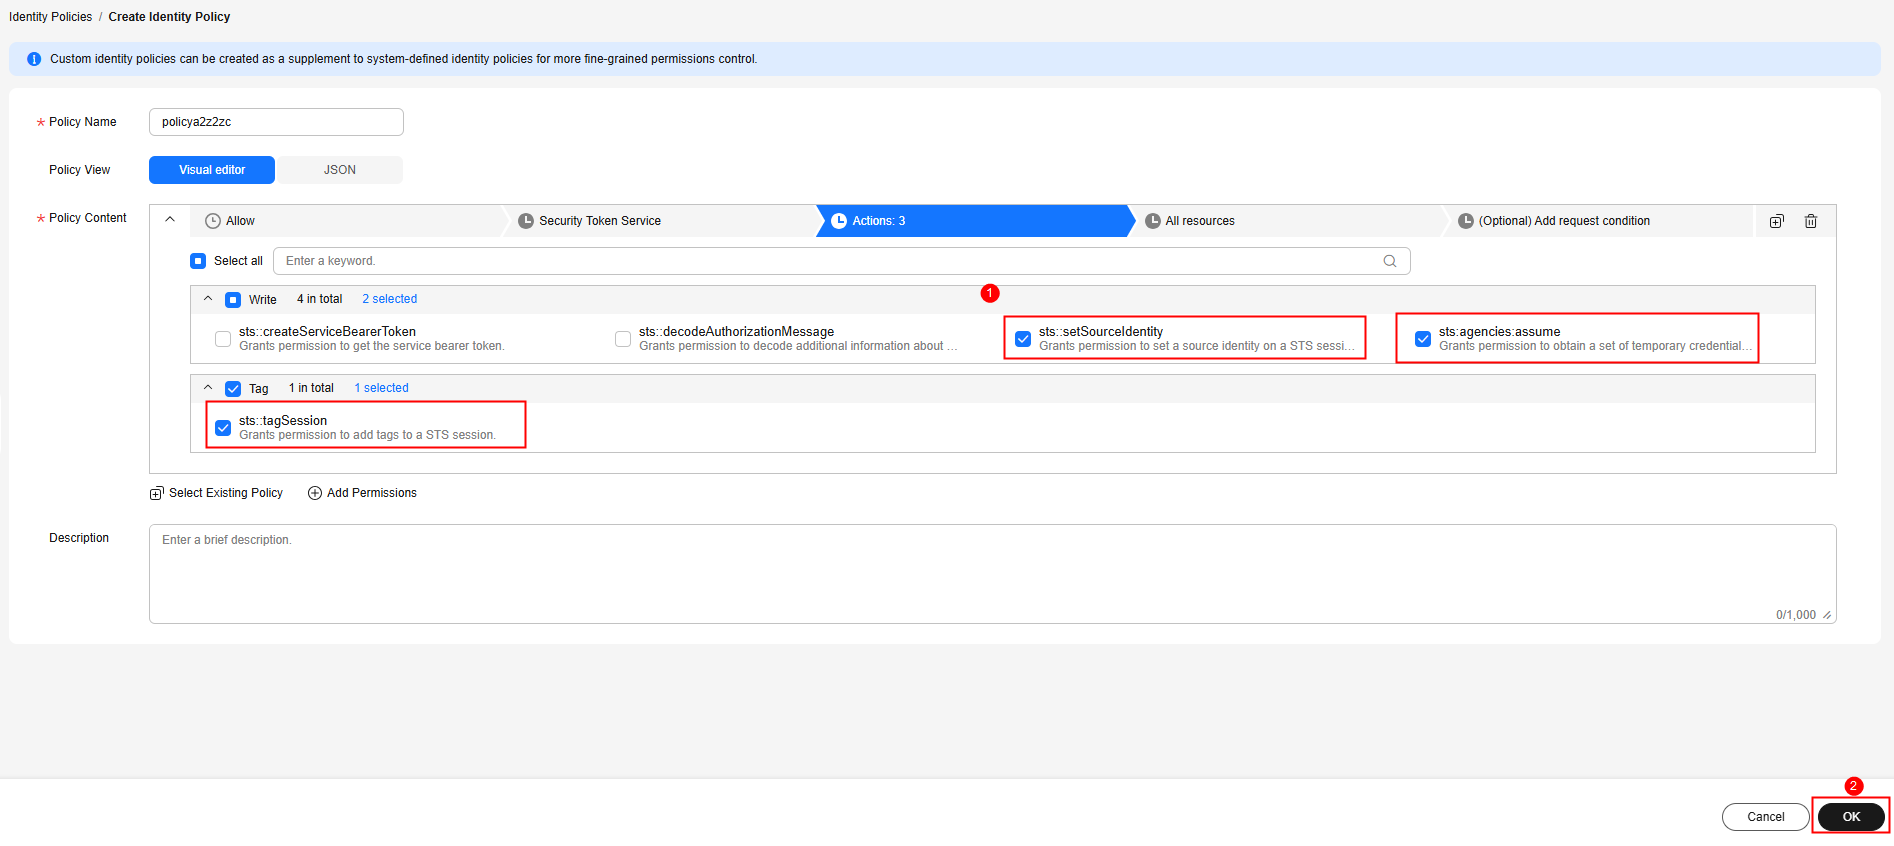
- Search for the actions sts:agencies:assume, sts::tagSession, and sts::setSourceIdentity, select them, and click OK. The policy for identity switching is created successfully.
Figure 5 Creating an identity policy for identity switching
- In the navigation pane, choose Agencies.
- On the displayed page, click Create Trust Agency.
Figure 6 Creating a trust agency

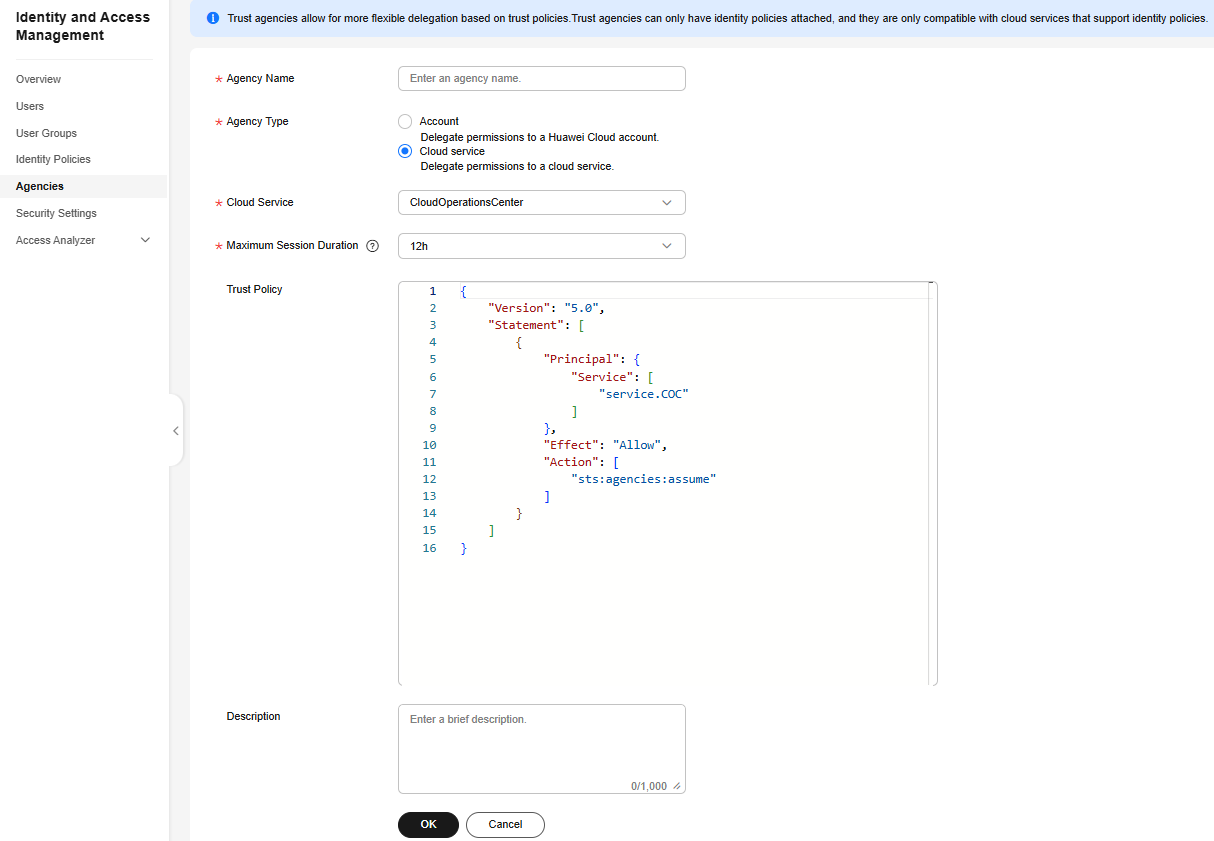
- On the displayed page, specify Agency Name. Set Agency Type to Cloud service, Cloud Service to CloudOperationsCenter, and Maximum Session Duration to 12h.
- Click OK. Then click Authorize in the displayed dialog box.
Figure 7 Completing the trust agency creation
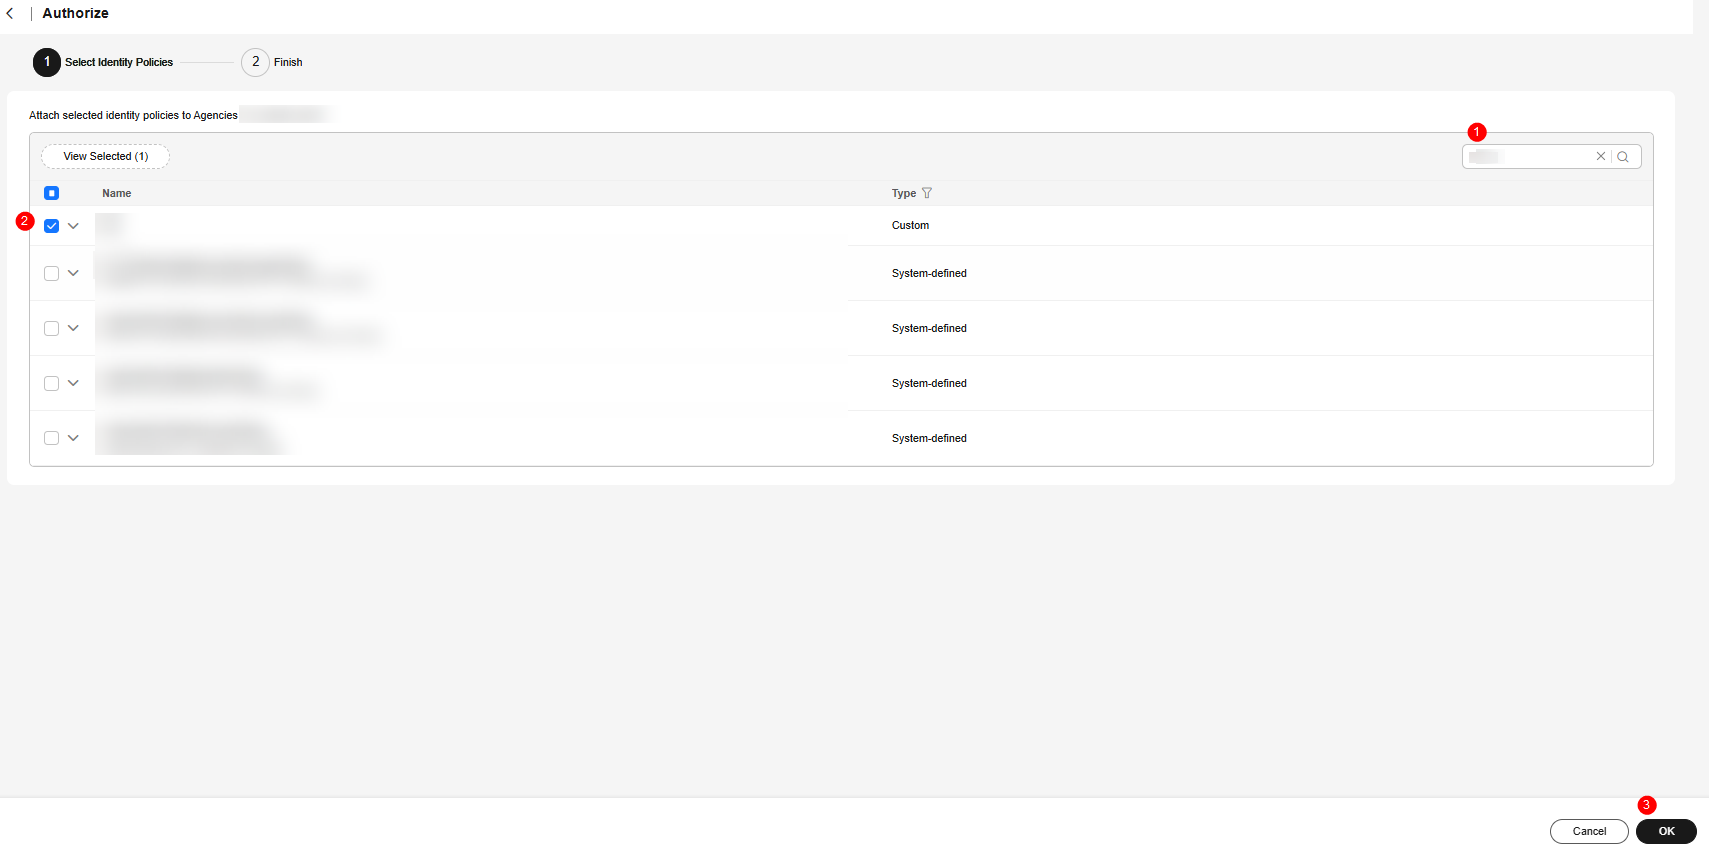
- On the displayed page, search for the policy name created in 4 and select it. Click OK.
Figure 8 Authorizing an agency
Authorizing an Account
- Log in to IAM as an organization member tenant (execution account).
- Click Go to New Console.
- In the navigation pane, choose Identity Policies.
- On the displayed page, click Create Identity Policy.
Figure 9 Create Authorization Policy

- On the displayed page, specify Policy Name.
Figure 10 Custom identity policy name.

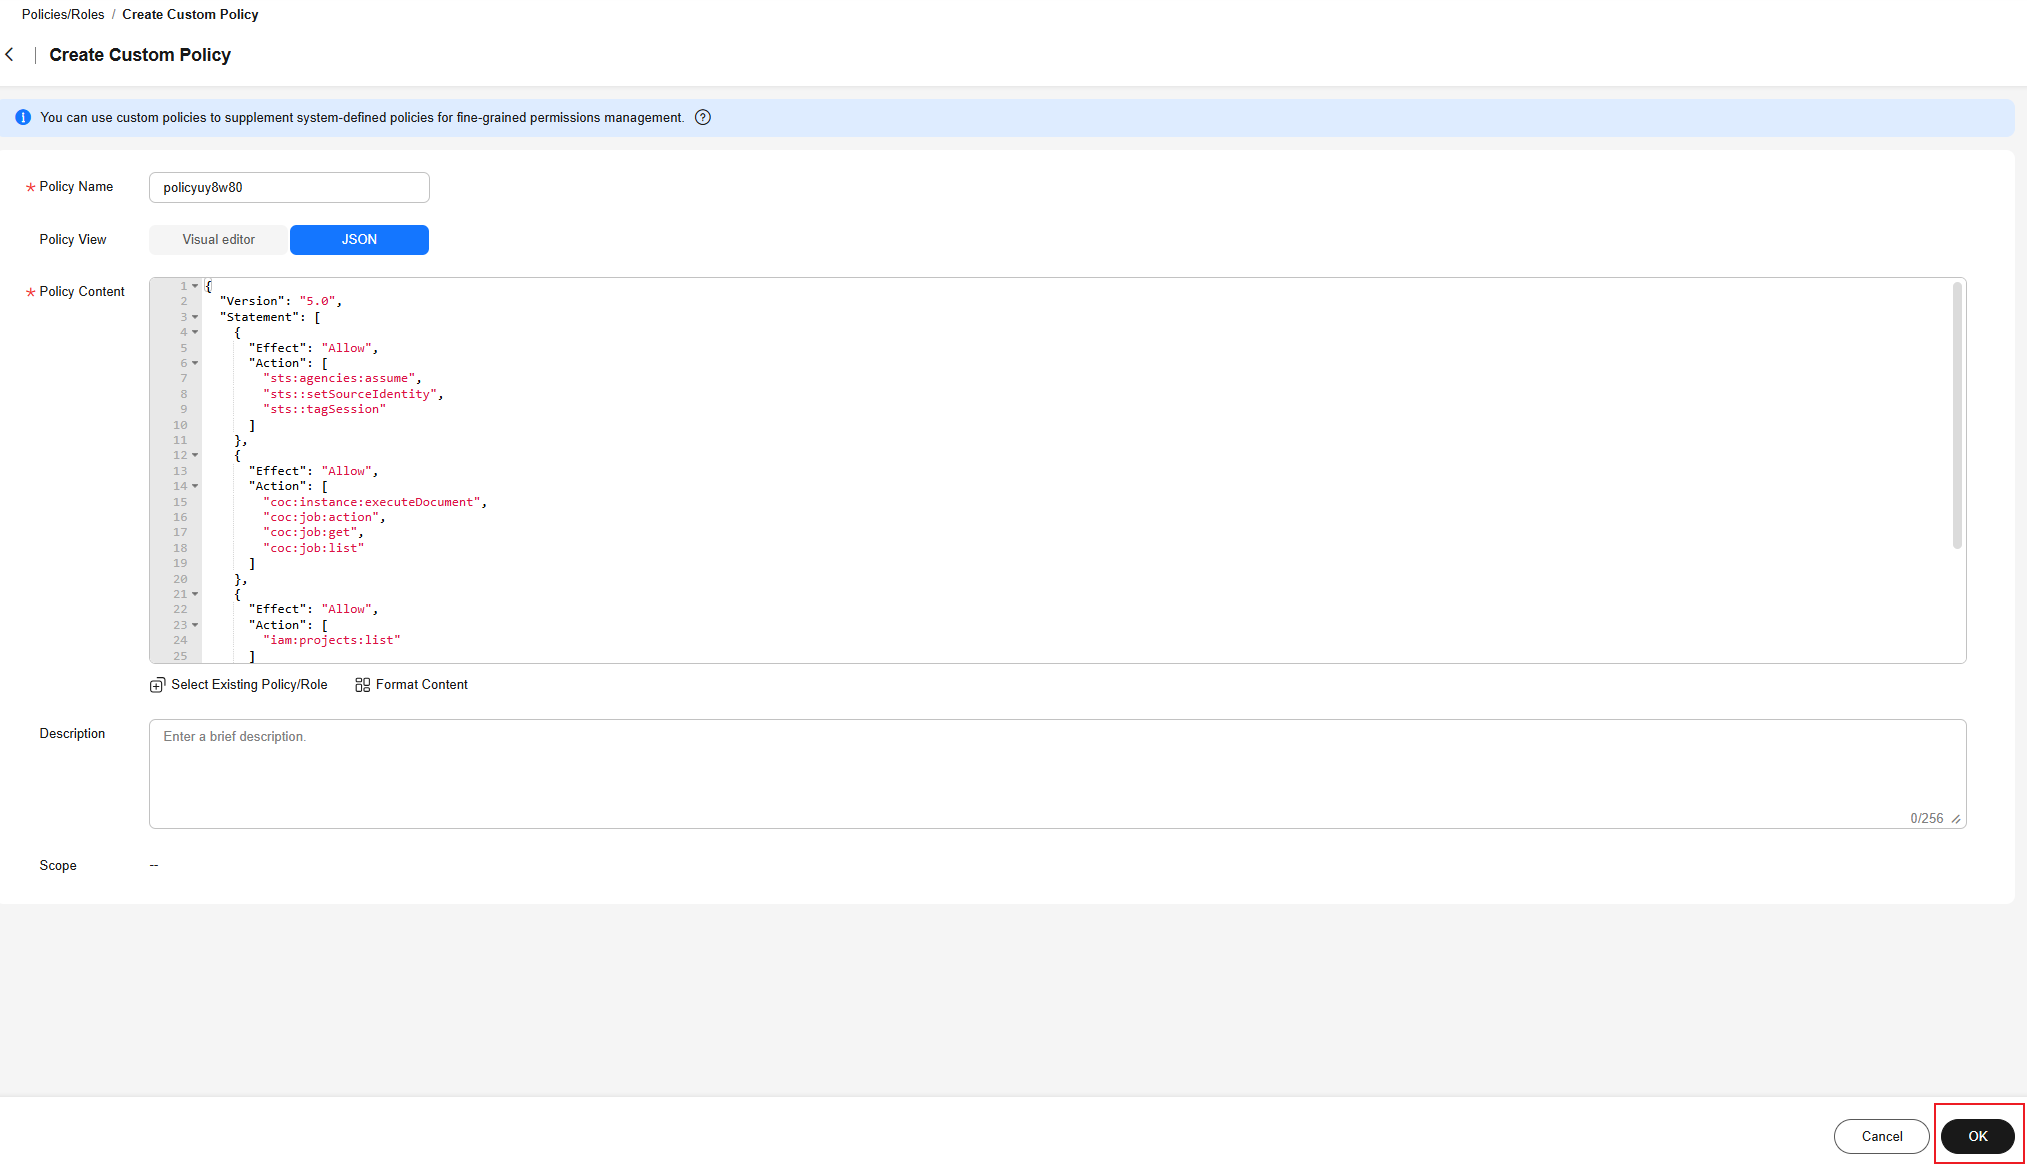
- Set Policy View to JSON and enter the following policy content in the text box.
Figure 11 Custom policy content
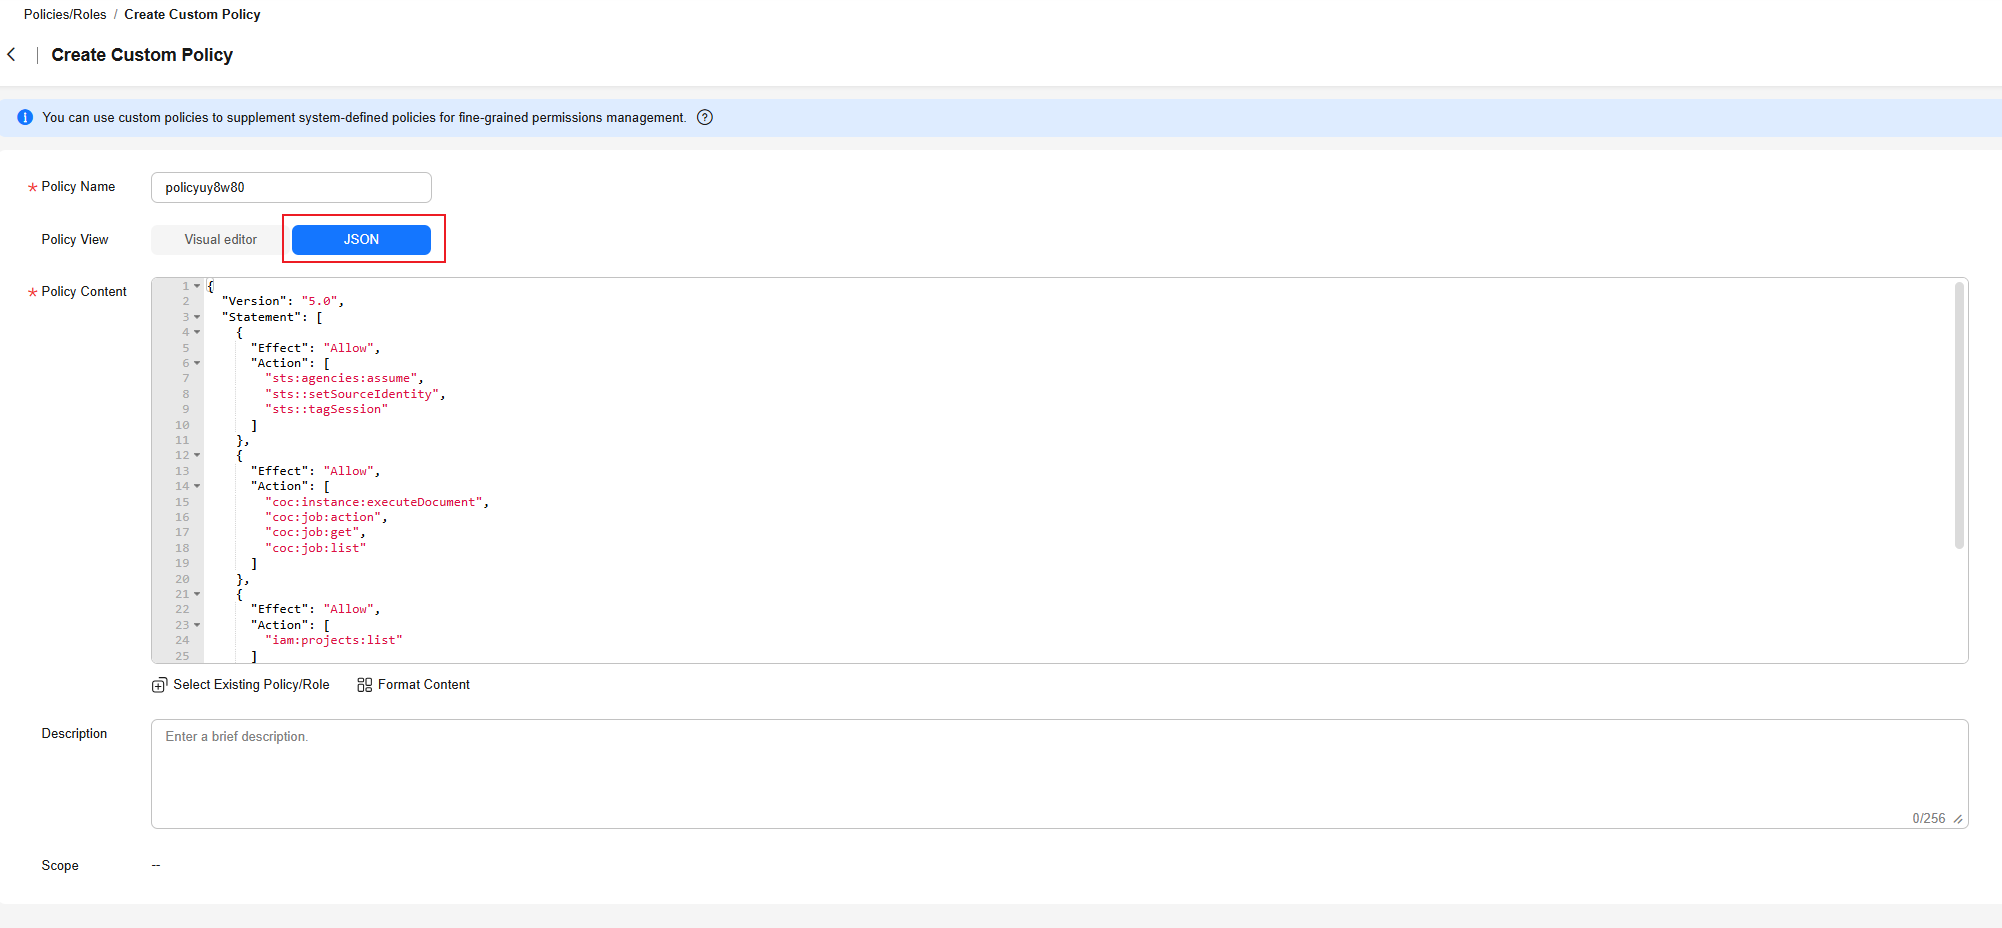
{ "Version": "5.0", "Statement": [ { "Effect": "Allow", "Action": [ "sts:agencies:assume", "sts::setSourceIdentity", "sts::tagSession" ] }, { "Effect": "Allow", "Action": [ "coc:instance:executeDocument", "coc:job:action", "coc:job:get", "coc:job:list" ] }, { "Effect": "Allow", "Action": [ "iam:projects:list" ] }, { "Effect": "Allow", "Action": [ "smn:topic:create", "smn:topic:subscribe" ] } ] } - Click OK. The identity policy of the execution account is created.
Figure 12 Creating an Identity Policy for a Tenant Agency
- In the navigation pane of the new IAM console, choose Agencies.
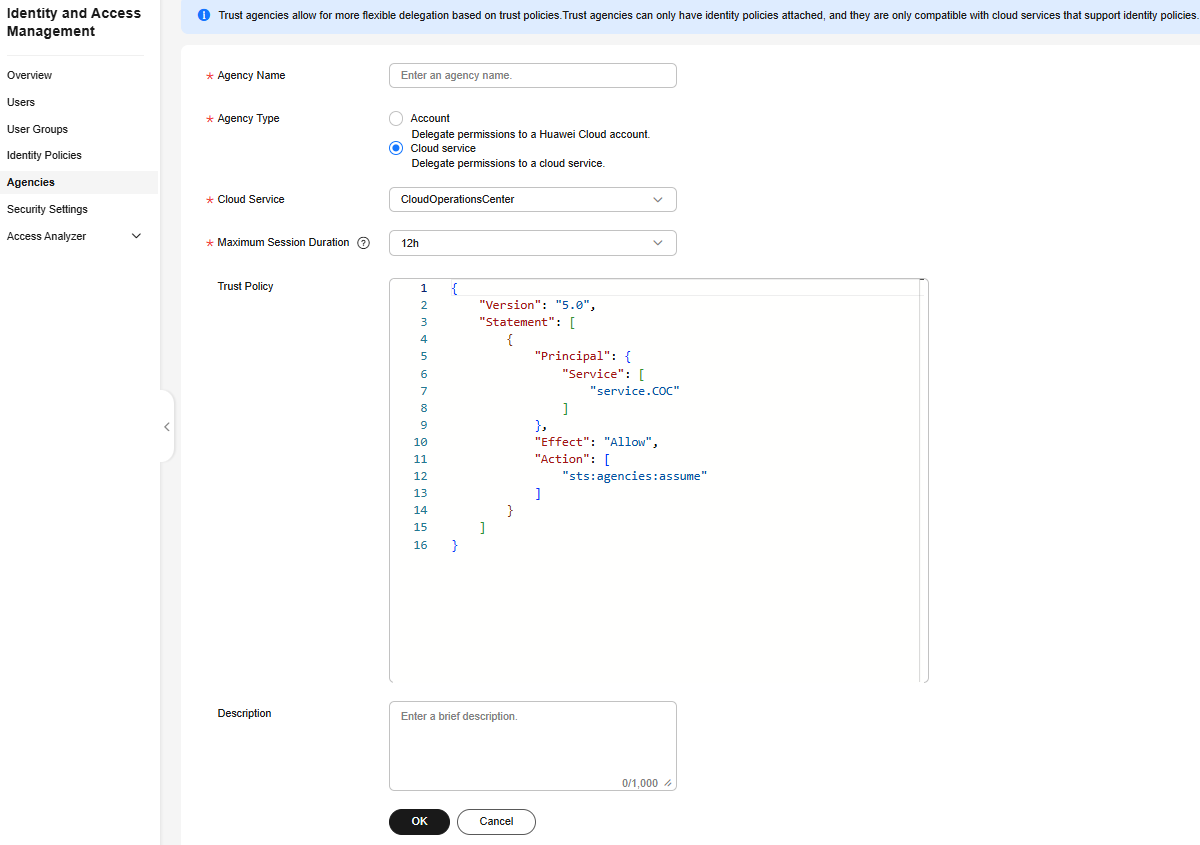
- Click Create Trust Agency in the upper right corner of the page to create an agency that grants the organization administrator permissions to the execution account.
- Specify Agency Name.
- Set Agency Type to Cloud service.
- Set Cloud Service to CloudOperationsCenter.
- Set Maximum Session Duration to 12h.
- Click OK. The agency is created.
Figure 13 Creating an Agency
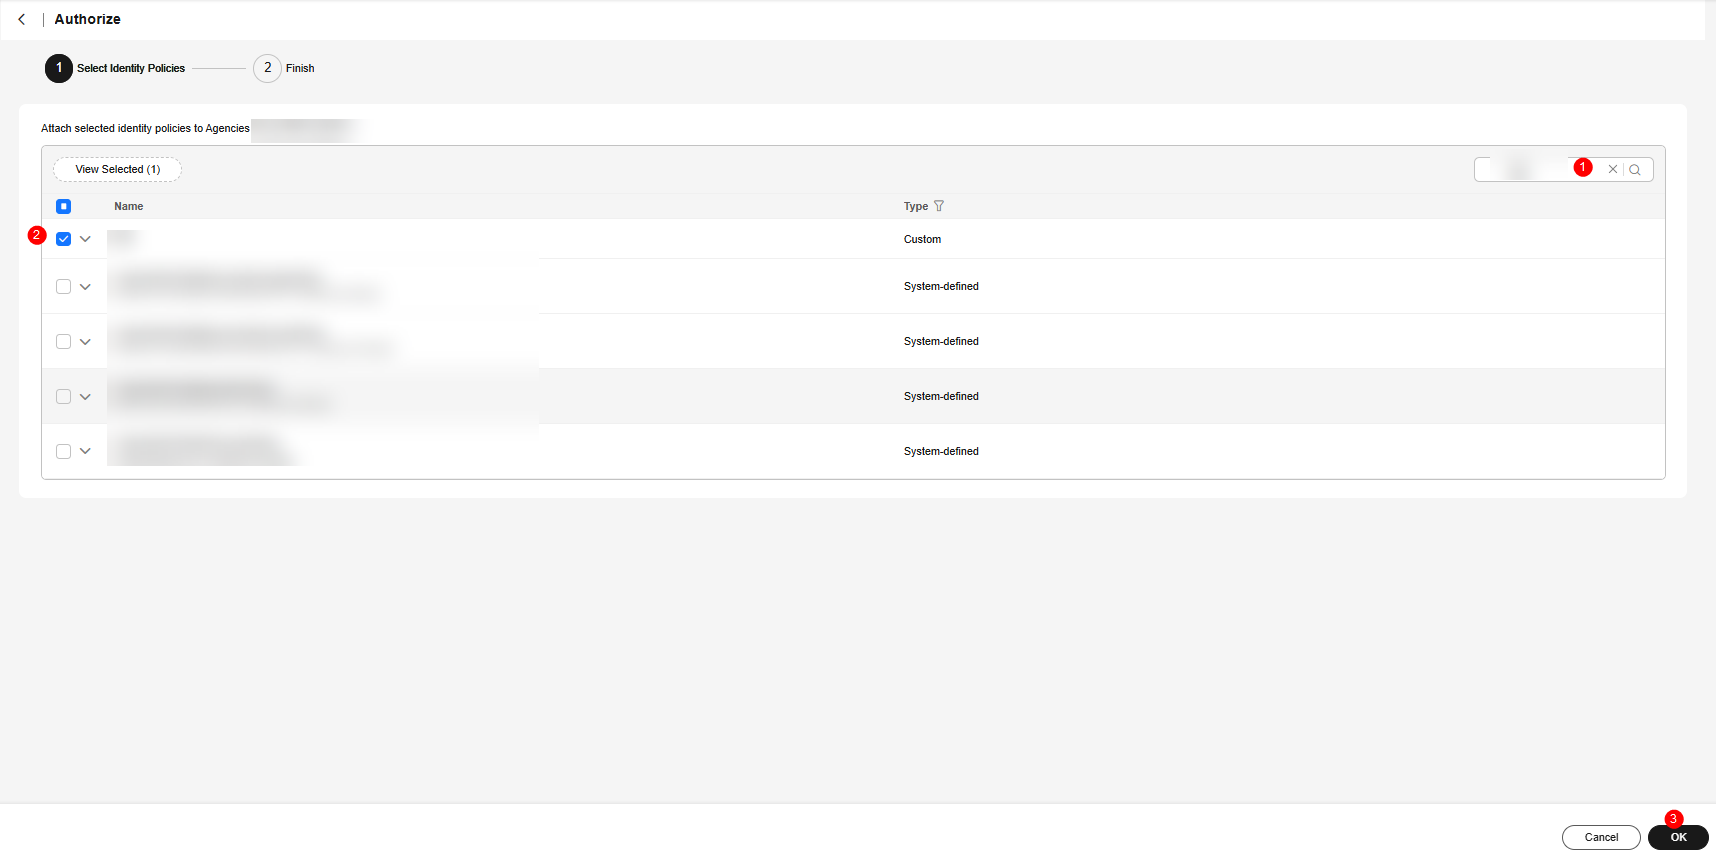
- Click Authorize in the dialog box.
- On the displayed page, search for the policy name created in 5 and select it. Click OK.
Figure 14 Authorizing an agency
- On the Agencies page, locate the agency created in 9 to 12 and click Edit in the Operation column.
Figure 15 Editing the trust policy 1 for executing the tenant agency
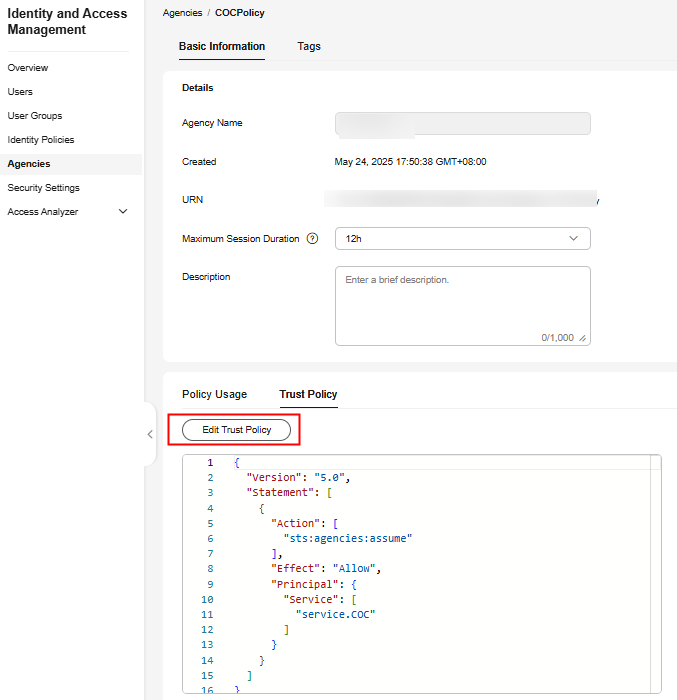
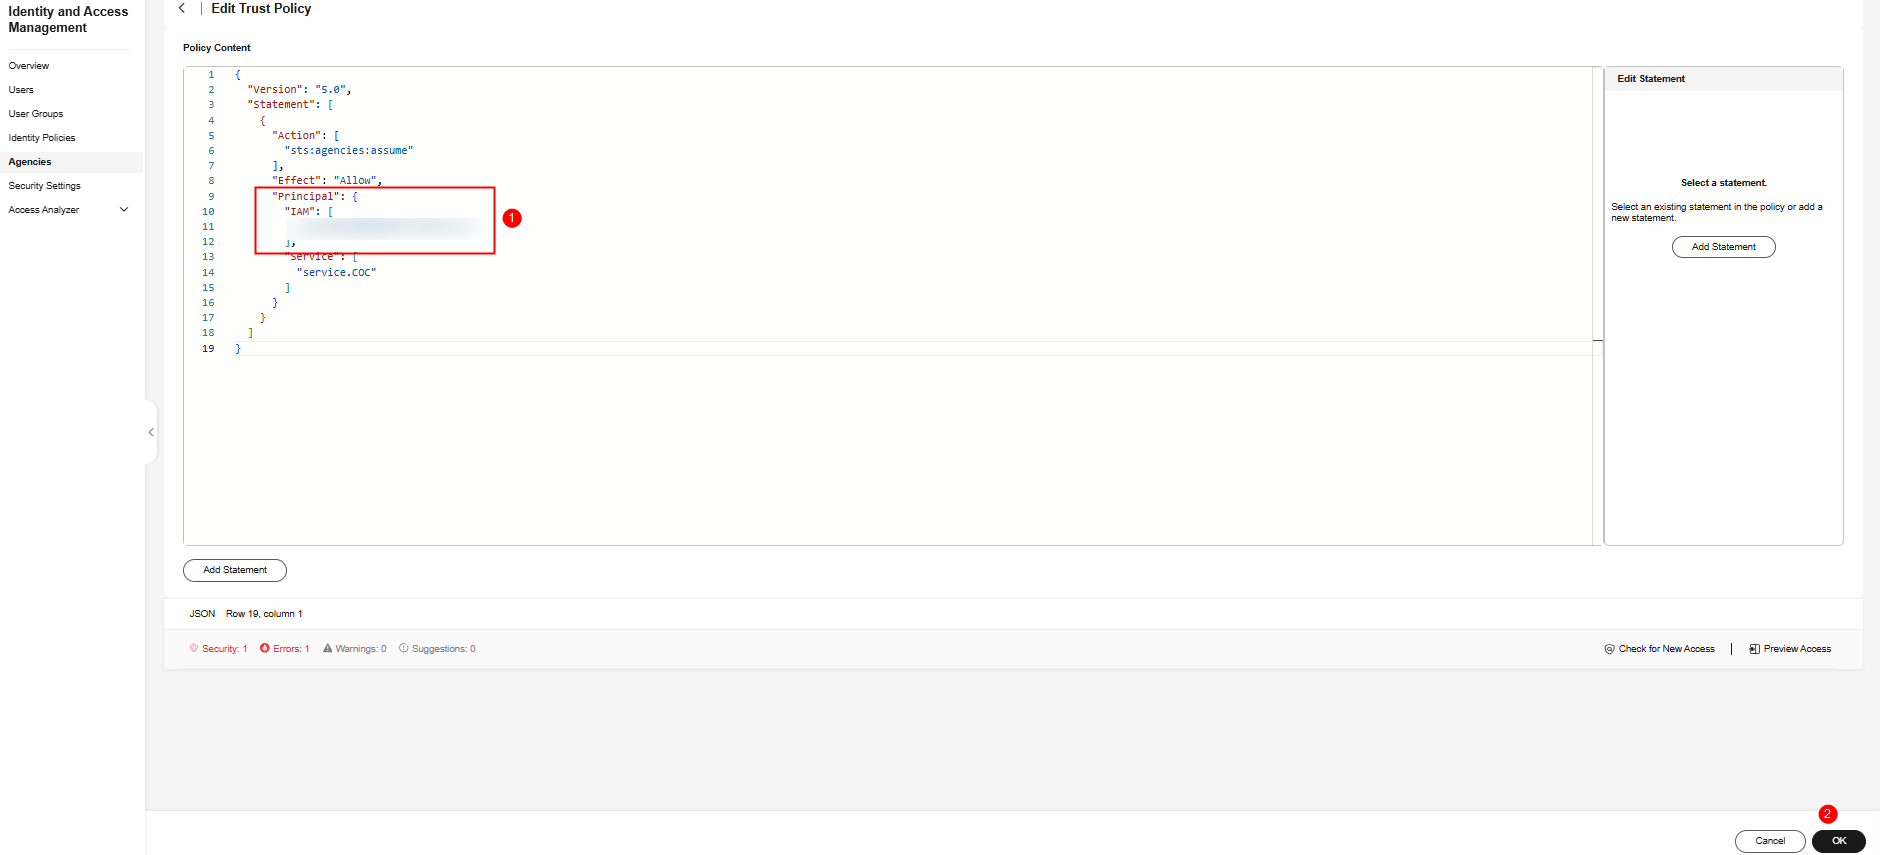
- On the Trust Policy tab page, click Edit Trust Policy and add the following JSON data to Principal:
"IAM": [ "${Tenant ID of the target organization administrator tenant}" ], - Click OK. The trust policy is edited. Click OK. The execution account trusts the COC and the organization administrator agency. The account trust policy is created.
Figure 16 Editing the trust policy 2 for executing the tenant agency
Feedback
Was this page helpful?
Provide feedbackThank you very much for your feedback. We will continue working to improve the documentation.See the reply and handling status in My Cloud VOC.
For any further questions, feel free to contact us through the chatbot.
Chatbot


