Using CDM to Migrate Data from Hologres to a DWS Cluster
This practice demonstrates how to use Cloud Data Migration (CDM) to migrate data from Hologres to DWS.
CDM is an efficient and easy-to-use service for batch data migration. For more information, see Cloud Data Migration.
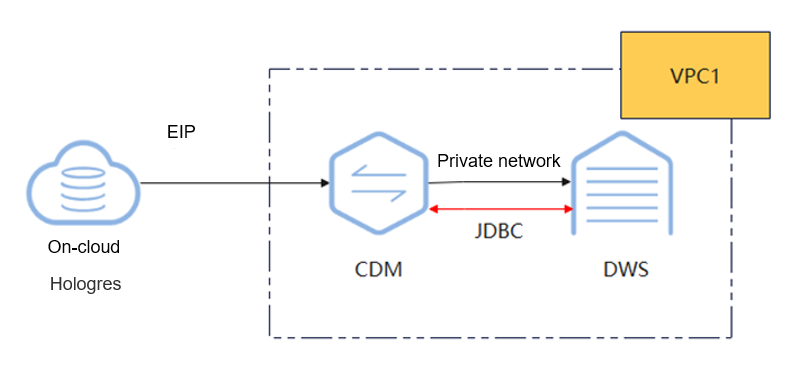
This practice takes about 90 minutes and uses cloud services such as Virtual Private Cloud (VPC) and Subnet, Elastic IP (EIP), Cloud Data Migration (CDM), and DWS. The basic process is as follows:
Notes and Constraints
- If there are many tables to migrate, it is recommended to perform the migration in batches. You can batch by service or by table data volume.
- If DELETE or UPDATE operations occur during CDM migration, data consistency cannot be guaranteed afterward. Re-migration will be required in such cases.
- For large table data, migrate the data in slices.
- A single database migration job can migrate only one database at a time. To migrate multiple databases, you need to configure multiple migration jobs.
Prerequisites
- You have purchased DWS and CDM clusters. For details, see CDM User Guide.
- The Hologres cluster and DWS cluster can communicate with CDM. In this example, DWS and CDM are created in the same region, private cloud, and subnet.
- You have the migration permission.
- The source and destination clients have been installed.
- The migration tools listed in Table 1 have been prepared: DSC and DataCheck.
- The runtime environment of DataCheck meets the following requirements:
- The server is compatible with 64-bit operating systems and can run on either Linux or Windows.
- Either JDK or JRE 1.8 has been installed on the system.
- The server where DataCheck is installed and running can communicate with the database to be connected.
|
Tool |
Description |
How to Obtain |
|---|---|---|
|
DSC |
Syntax migration tool for DWS |
Obtain the download link. |
|
DataCheck |
Data check tool |
Contact technical support. |
Step 1: Migrating Metadata
- Query user roles and permissions in Hologres:
1
2
SELECT ROLNAME FROM pg_roles;
SELECT user_display_name(ROLNAME) FROM pg_roles;
- In DWS, the separation of permissions is disabled by default after cluster creation. Database system administrators have the same permissions as object owners. By default, only the object owner or system administrator can query, modify, or destroy the object. Based on the roles and permissions queried in Hologres, create corresponding roles and permissions in DWS and grant user permissions accordingly:
- Use GRANT statements to grant object permissions to the target user.
1
2
GRANT USAGE ON SCHEMA schema TO user;
GRANT SELECT ON TABLE schema.table To user;
- Enable the user to inherit the object permissions of the role.
1
2
CREATE ROLE role_name WITH CREATEDB PASSWORD '*******';
GRANT role_name to user;
- Use GRANT statements to grant object permissions to the target user.
- Export the source syntax. Exporting the source syntax, which represents the implementation logic of customer's services, from Hologres and modifying it to be compatible with DWS can reduce the modeling workload and improve service migration efficiency.
Export all syntax:
1SELECT hg_dump_script('schema_name.table_name');

- Since the source syntax involves the identification of the service scope, operations require a DBA familiar with the service. It is recommended that the source syntax be provided by the customer's DBA.
- To export data in batches, you can use UNION ALL to associate all tables to be queried. The syntax format is as follows:
1
2
3
4
SELECT hg_dump_script('schema_name.table_name')
UNION ALL
SELECT hg_dump_script('schema_name.table_name')
...
- If the execution fails, use the command below to create an extension in the database, and then execute the preceding SQL statements.
1CREATE EXTENSION hg_toolkit;
- Connect to DWS and execute the SQL statement below to create a database. You are advised to use the MySQL-compatible mode to create the database.
1CREATE DATABASE tldg WITH ENCODING 'UTF-8' TEMPLATE template0 DBCOMPATIBILITY 'MYSQL';
- Use the DSC tool to convert the DDL syntax.
- Unzip the DSC tool package obtained in Prerequisites.
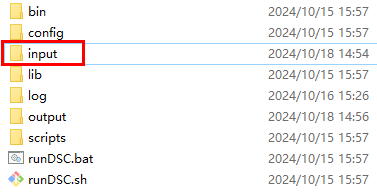
- Save the DDL syntax files to be converted into the input folder of DSC.
Figure 2 input directory
- Open the command line tool and double-click runDSC.bat in Windows. Run runDSC.sh in Linux.
- Convert the syntax:
1runDSC.bat -S Hologres
Figure 3 DDL syntax conversion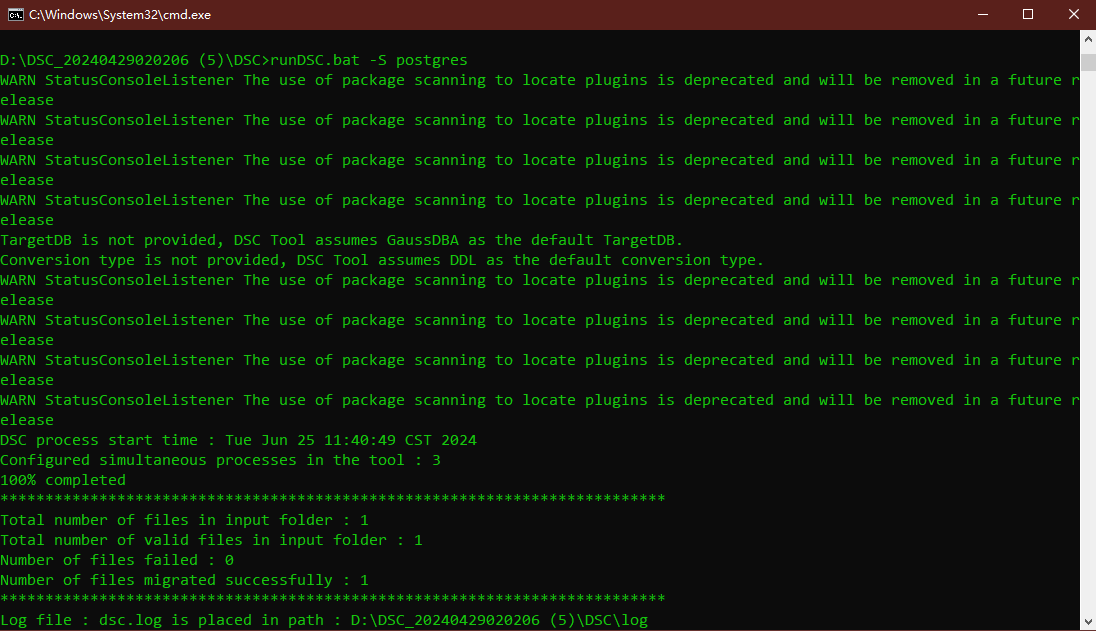
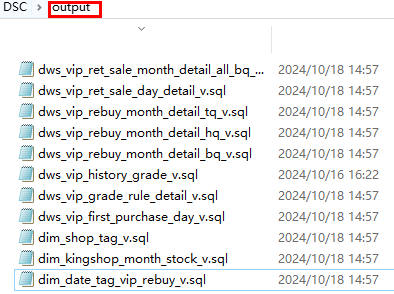
- View the conversion result in the output folder.
Figure 4 DDL conversion result
- Connect to DWS, execute the DDL statement converted in the previous step to create a table.
Step 2: Migrating Table Data
CDM supports both table-level and database-level migrations.
- Configure the source link for CDM. Since Hologres' table creation syntax is compatible with PostgreSQL, you can simply choose PostgreSQL data sources when configuring the CDM link.
- Log in to the CDM console. In the navigation pane, click Cluster Management.
- If CDM is connected to Hologres through the public network, bind an EIP. For details, see Binding or Unbinding an EIP.
- Click Job Management next to the cluster name.
Figure 5 CDM cluster management page

- Before establishing a job link for the first time, install the driver. Choose Links > Driver Management and install the PostgreSQL driver.
- After the driver installation, click Create Link on the link management page, select PostgreSQL and then click Next.
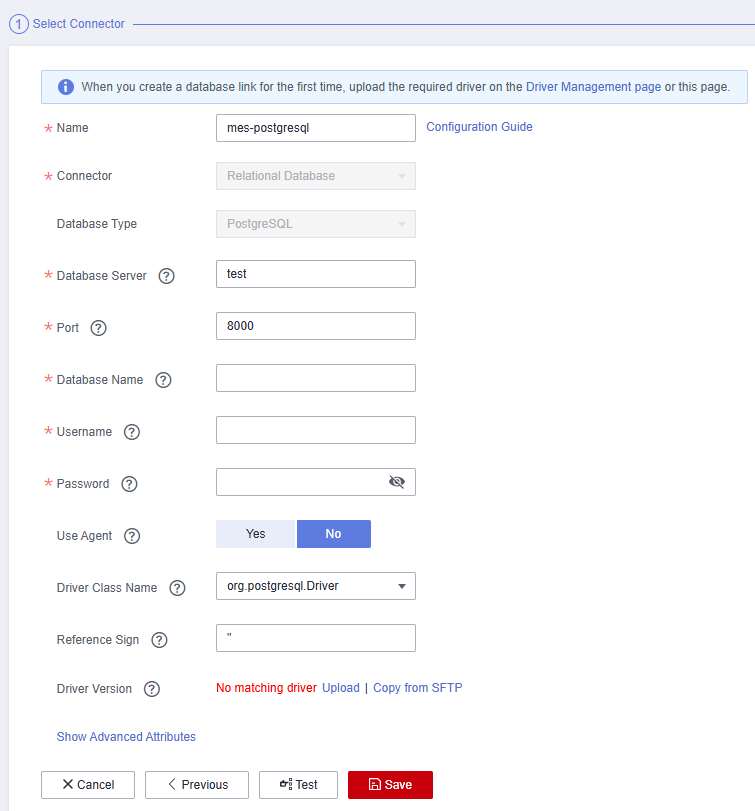
- Enter the Hologres database information.
Figure 6 Hologres connection information
- Click Test to check connectivity, and then click Save.
- Configure the destination link for CDM.
- Similarly, choose Job Management > Links and click Create Link.
- Select Data Warehouse Service and click Next.
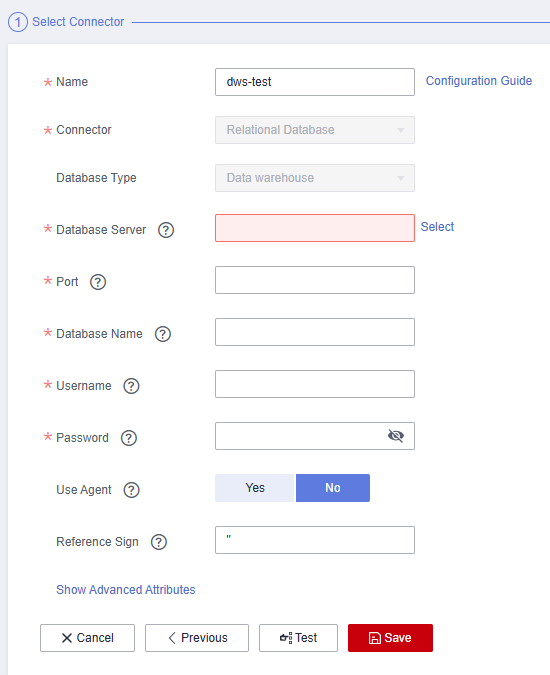
- Enter the DWS database information.
Figure 7 DWS connection information
- Click Test to check connectivity, and then click Save.
- Configure and start a table-level migration job.
- Click the Table/File Migration tab. This tab displays single-table migration jobs.
- Enter the source and destination information.
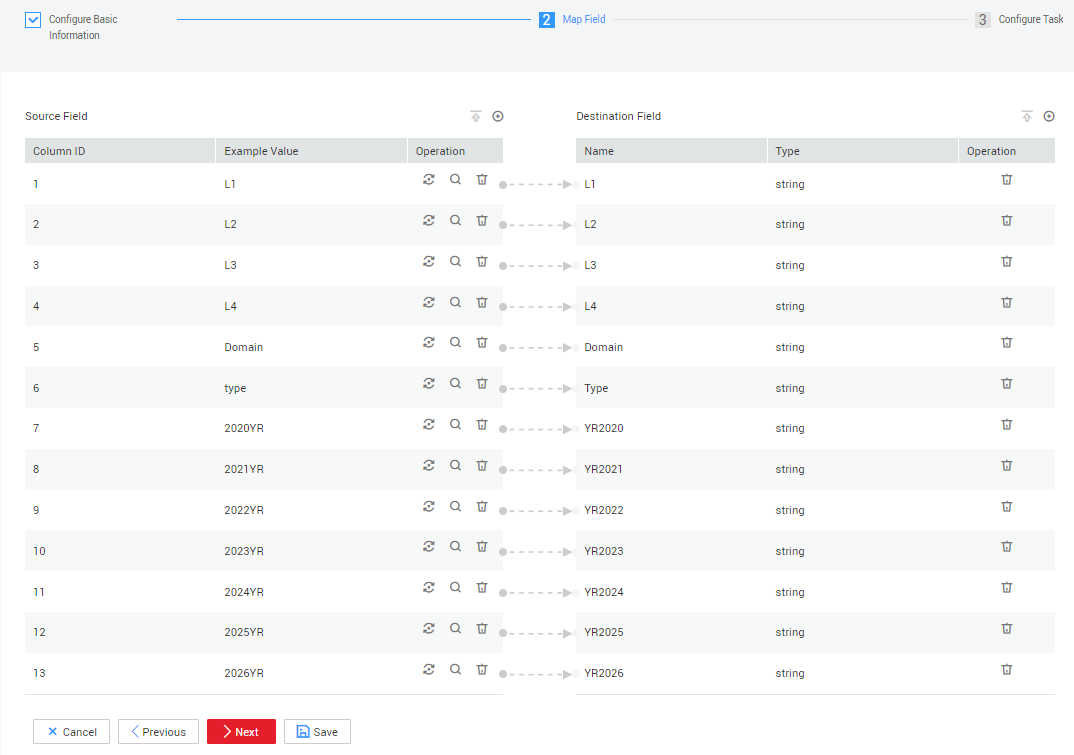
- Click Next to map fields.
Figure 8 Mapping fields for table-level migration
- Confirm the information and click Next.
- On the task configuration page, configure Concurrent Extractors (data extracted concurrently). The default value is 1, but you can increase it. However, it is recommended to keep it at or below 4. Then, click Save and Run.
After the migration job begins, you can view the status in the job list.Figure 9 Job status

- Configure and start a database-level migration job.
- Click the Entire DB Migration tab and click Create Job.
- Enter the source information on the left and the destination information on the right. Click Next.
- Select all tables or the tables to migrate, click the right arrow in the middle to move them to the right pane, and then click Next.
- Configure job parameters.
- Concurrent Subjobs: Indicates the number of tables to migrate simultaneously. The default value is 10; it is recommended to set it to a value less than 5.
- Concurrent Extractors: Indicates data extracted concurrently. The default value is 1, but you can increase it. However, it is recommended to keep it at or below 4.
Confirm the information and click Save and Run.
- Wait until the migration job is complete. Click the job name to view the migration status of each table.
Step 3: Checking Table Data
After the migration, check whether the data on the source and destination databases is consistent using DataCheck.
- Download and unzip DataCheck-*.zip, and then go to the DataCheck-* directory to use it. For details about how to use the files in the directory, see Table 2.
- Configure the tool package.
- In Windows:
Open the dbinfo.properties file in the conf folder and configure it based on your actual needs. The following figure shows the configuration of the Holo source.Figure 10 Configuring DataCheck
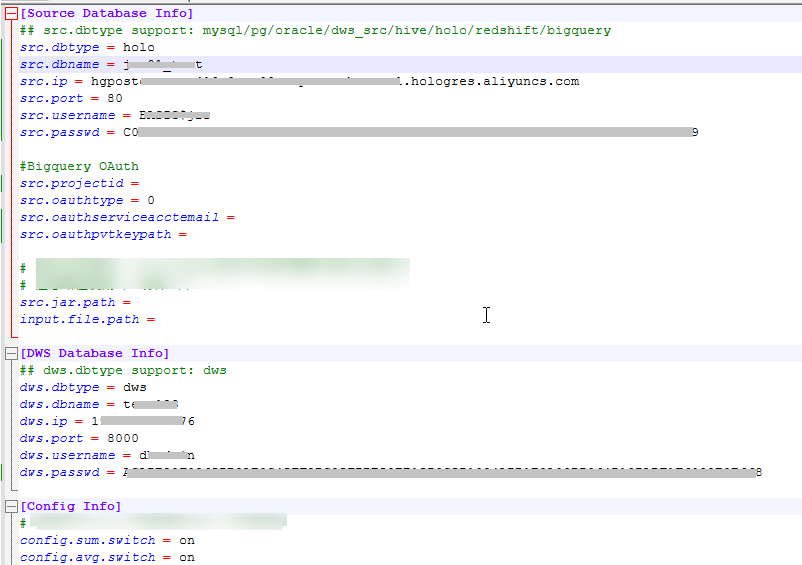

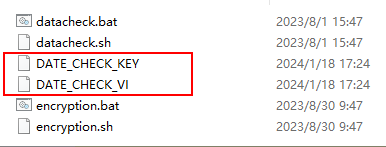
You can use the command below in the tool to generate the ciphertext of src.passwd and dws.passwd.
encryption.bat password

After the command is executed, an encrypted file is generated in the local bin directory.
- In Linux:
The method of generating the ciphertext is similar to that for Windows. The command is sh encryption.sh Password. Other steps are the same.

- In Windows:
- Check data.
In Windows:
- Open the check.input file, enter the schemas, databases, source table, and destination table to be checked, and fill in Row Range with a data query statement to specify the query scope.

- After configuring the source database name in the configuration file, the source database name in the check.input file defaults to this. However, if a different source database name is specified in the check.input file, it will take precedence.
- The Check Strategy offers three levels: high, middle, and low. If unspecified, the default is low.
- The Check Mode supports statistics (statistical value checks).
The following figure shows the check_input file for metadata comparison.
Figure 11 check_input
- Run the datacheck.bat command in the bin directory to execute the check tool.

- View the generated check result file check_input_result.xlsx.
The following figure shows the statistical value check.

In Linux:
- Edit and upload the check_input.xlsx file. Refer to the step 1 for Windows.
- Run the sh datacheck.sh command to execute the check tool.

- View the check result in the check_input_result.xlsx file. (The check result analysis is the same as that for Windows.)
- Open the check.input file, enter the schemas, databases, source table, and destination table to be checked, and fill in Row Range with a data query statement to specify the query scope.
Related Information
|
File or Folder |
Description |
|
|---|---|---|
|
DataCheck |
bin |
Saves the entry script of the check tool.
|
|
conf |
Configuration file, which is used to configure the connection between the source database and the destination database and set log printing. |
|
|
lib |
Stores JAR packages required for running the check tool. |
|
|
check_input.xlsx |
|
|
|
logs |
The package does not include this file. Once the check tool runs, it automatically generates this file to log the tool's execution process. |
|
|
check_input_result.xlsx |
The package does not include this file. Once the check tool runs, a check result file will be created in the same location as check_input.xlsx. |
|
|
DataCheck |
|---|
|
|
Check Level |
Description |
Syntax |
|---|---|---|
|
Low |
|
|
|
Middle |
|
|
|
High |
|
|
Feedback
Was this page helpful?
Provide feedbackThank you very much for your feedback. We will continue working to improve the documentation.See the reply and handling status in My Cloud VOC.
For any further questions, feel free to contact us through the chatbot.
Chatbot


