Adding Concurrency Weight Controllers and Throughput Controllers
Concurrency Weight Controller
- Log in to the CodeArts PerfTest console and choose PerfTest Projects in the left navigation pane.
- Click the name of the desired PerfTest project to go to the details page.
- On the Cases tab, select the desired case in the case list on the left.
- On the Case Script tab, choose > .
- Set parameters. Up to 10 layers of steps can be nested.
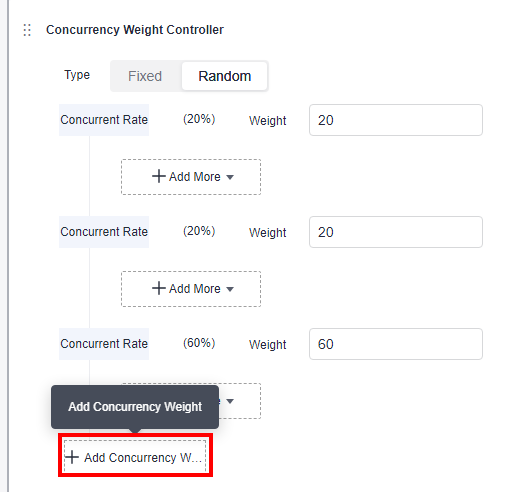
Type: The fixed branch and random branch modes are supported.
- Fixed: Randomly generates a fixed value for all concurrent executions. Subsequent executions use this fixed value to enter a fixed branch. This mode is used to group the concurrent users to simulate parallel tests in multiple scenarios in a case. Using multiple test cases for parallel testing in multiple low-concurrency scenarios requires many executors. You can group test scenarios in a case to save resources.
- Random: Generates a random value for each concurrent execution. Subsequent executions use this random value to enter a random branch. This mode is used to simulate the mixed ratio of the service interface RPS.
The concurrency weight is an integer greater than 0 and less than or equal to 10,000. If there is only one branch, the weight of the branch is 100%. You can click Add Concurrency Weight to add branches.
Figure 1 Concurrency weight controller
For example:
- Fixed: Assume that there are low-concurrency test scenarios A, B, and C, with 10, 20, and 30 concurrent users, respectively. The total number of concurrent users is 60. Create a test case with 60 concurrent users, set the concurrency weight controller to Fixed, and set the weight ratio to A:B:C = 1:2:3. In this way, the three scenarios are combined into one test case.
- Random: If the peak RPS of a service system is 1,000 (200 on interface A and 800 on interface B), perform the test by selecting Random and setting the weight ratio to A:B = 2:8. In this way, the final ratio of the RPS on interface A to that on interface B is 2:8.
- When the configuration is complete, click Save.
Throughput Controller
- Log in to the CodeArts PerfTest console and choose PerfTest Projects in the left navigation pane.
- Click the name of the desired PerfTest project to go to the details page.
- On the Cases tab, select the desired case in the case list on the left.
- On the Case Script tab, choose > . Up to 10 layers of steps can be nested.
- Set parameters. Up to 10 layers of steps can be nested.
Set the RPS upper limit. The RPS executed by the controller cannot exceed the preset value. The RPS upper limit is 100 by default. The value can be up to 10 million and accurate to two decimal places.
- When the configuration is complete, click Save.
Feedback
Was this page helpful?
Provide feedbackThank you very much for your feedback. We will continue working to improve the documentation.See the reply and handling status in My Cloud VOC.
For any further questions, feel free to contact us through the chatbot.
Chatbot


