Correcting Objects

The modified statements will run on the target database. Do not use statements that cause the drop of other tables and object types, or statements that cause malicious activities such as consuming too much CPU, memory and other side effects over the target database.
Correcting Objects That Failed to Be Converted
- Log in to the UGO console.
- In the navigation pane, choose Schema Migration > Object Migration. The migration project list is displayed.
- Locate the project to be migrated and click Migrate in the Operation column. On the displayed page, click Correct Objects.
Figure 1 Object correction

- You can view the schema name, object name, object type, conversion status, and migration status.
- You can select a filter (Object Type, Schema, Conversion Status, Migration Status, Object Name, SQL Content Includes, SQL Content Excludes, Conversion Errors Include, or Migration Errors Include) to search for objects. If you select Object Name, fuzzy search is supported. If you select SQL Content Includes or SQL Content Excludes, you can enter up to three keywords and each keyword contains up to 100 characters. If there are a large number of objects in a project, the query slows.
- If you search for the desired object by schema, the schema name cannot contain whitespace characters.
- Objects such as TABLE and INDEX may be split into multiple subobjects.
- Splitting objects can control the migration sequence of multiple features of an object.
- To view the status and content of all child objects, click View Details next to the parent object.
- Splitting objects depends on the conversion function of UGO. If an error occurs during script parsing or conversion, objects are not split.
- The statuses of subobjects and other objects are different.
- If the conversion status of a parent object is Success, the conversion status its child object is also Success.
- If the conversion status of a parent object is Failed, the conversion status of at least one child object is Failed.
- If the conversion status of a parent object is Manual, the conversion status of at least one child object is Manual.
- If the migration status of a parent object is Success, the migration status of its child objects is Success or Ignore.
- If the migration status of a parent object is Failed, the migration status of at least one child object is Failed.
- If the migration status of all child objects is Ignore, the migration status of their parent objects is also Ignore.
- Locate an object and click View Details in the Operation column.

Correct management, storage, code, and job objects in sequence.
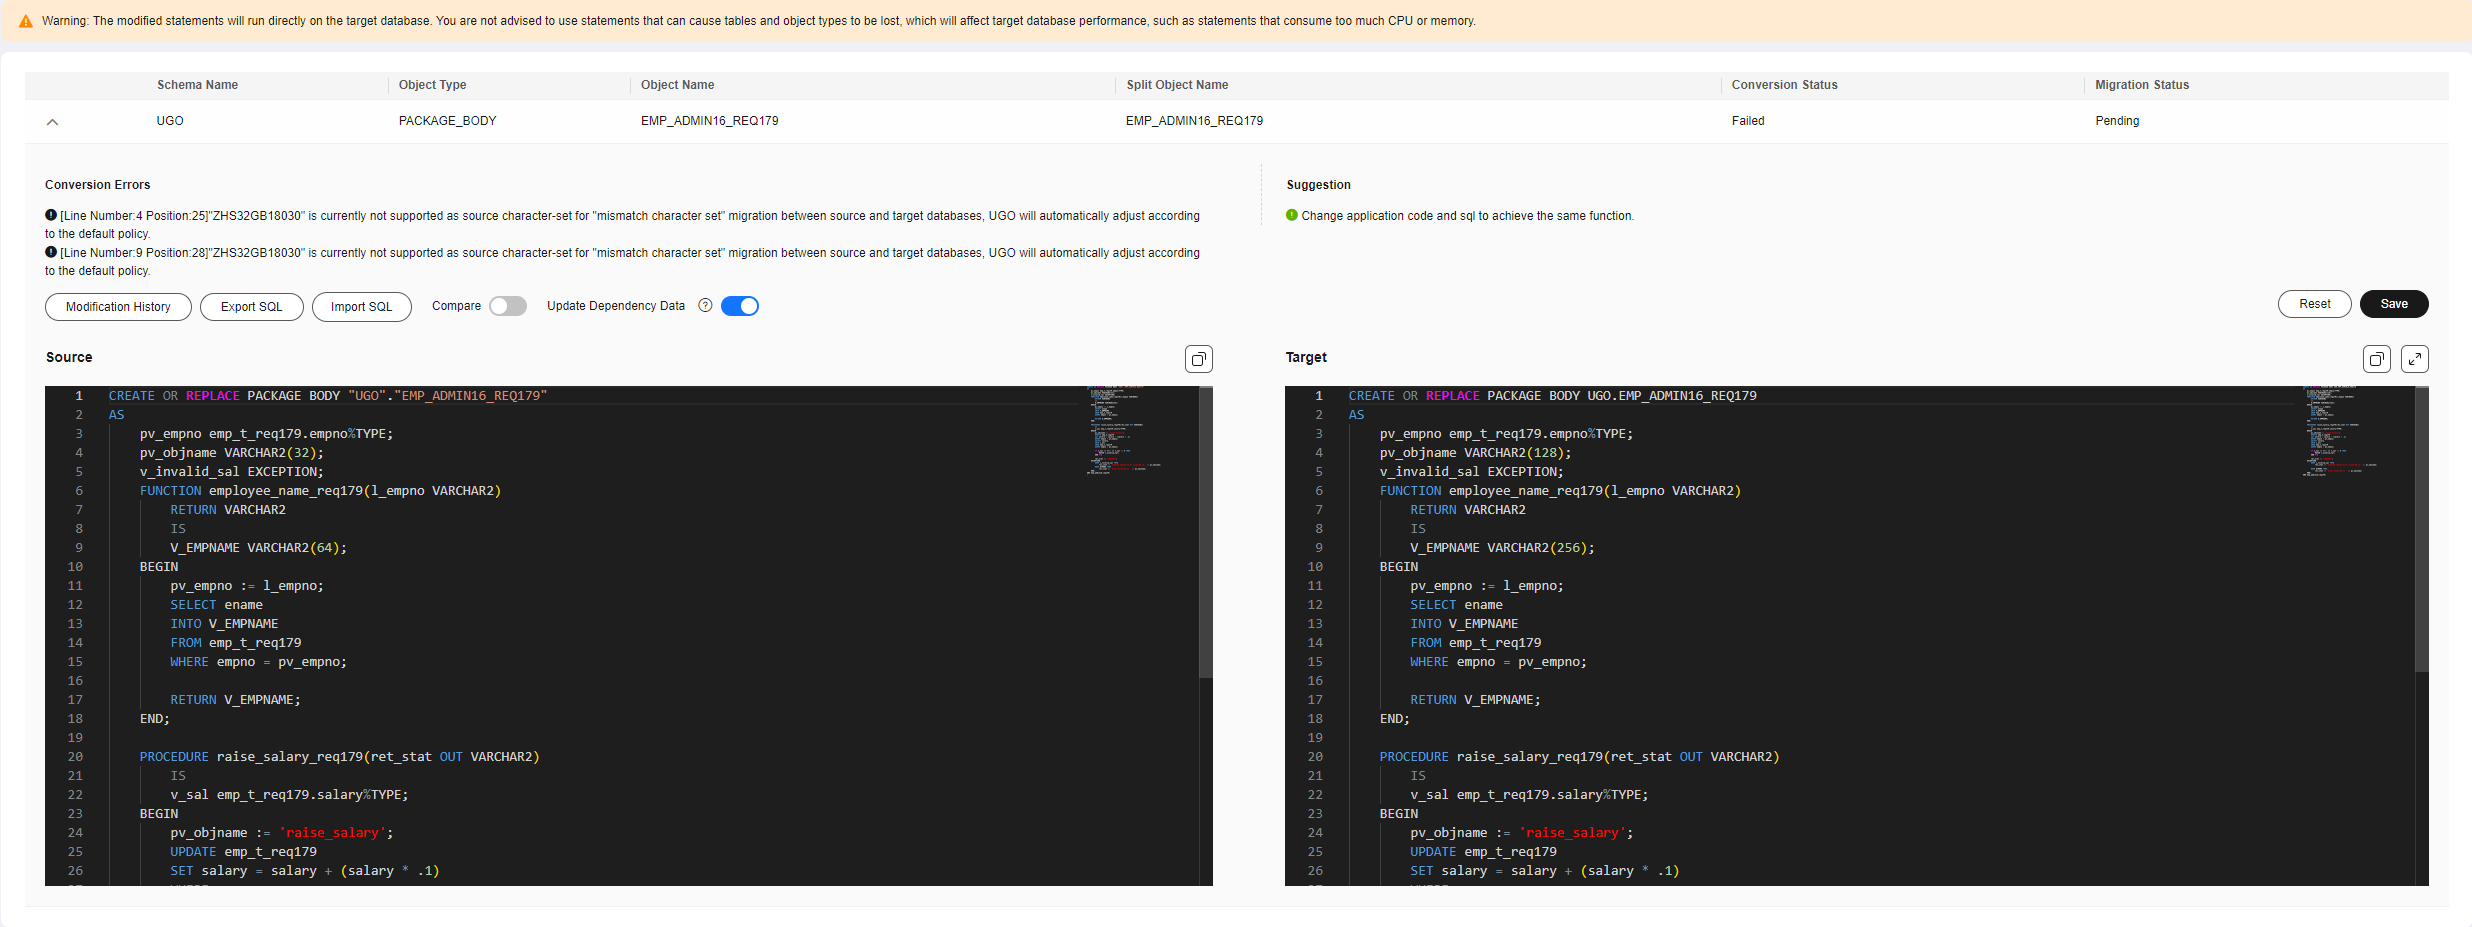
- View the conversion or migration error information. Modification suggestions are also displayed if there are any.
- Locate an object whose Conversion Status is Failed, click View Details in the Operation column to view conversion errors.
- Locate an object whose Migration Status is Failed, click View Details in the Operation column to view migration errors.

If the target database is GaussDB, database object names must meet start with a letter or underscore (_) and can contain letters, digits, underscores (_), dollar signs ($), and number signs (#). The length of a non-time series table cannot exceed 63 bytes, and the length of a time series table cannot exceed 53 characters.
Figure 2 Conversion errors on the object details page
- Modify SQL statements.
- Click Export SQL to export the SQL file of the target database. Exported file name: Object name.sql.
- Click Import SQL to directly import the modified SQL file. After the SQL file is uploaded, all changes are automatically saved.
- Compare: This switch is disabled by default. If this function is enabled, the detailed code comparison between the source and target databases is displayed. In this case, the SQL statements cannot be edited.
- Click
 next to Source or Target to copy the SQL statements to the clipboard.
 - Click
 next to Target to display the editor in full screen. To exit the full-screen editing, click
  or click the edit box and press Esc.
 - Update Dependency Data: If this switch is enabled, all dependent objects will also be verified. This function is enabled by default and can be disabled.
- Before saving the modified code, you can click Reset to clear all modifications. If the modification has been saved, you can only perform a rollback operation.
- Click Save to save the modifications for target database code. The modification records will be generated and saved on the Modification History page.
- After the modification is complete, click Save to generate a modification record. Click Modification History to view historical records.
In the Modification History area, locate the history record and click Rollback in the Operation column to roll back to the latest modification record.
- Click the drop-down icon next to History ID to compare the code before and after modification.
Figure 3 Modification history


- If you select Oracle as the source database type, DB_LINK objects can only be converted and cannot be migrated, and their migration status is Ignore by default.
- After the modification, the conversion status or migration status of the object changes from Failed to Manual.
Updating Statements in Batches
- Log in to the UGO console.
- In the navigation pane, choose Schema Migration > Object Migration. The migration project list is displayed.
- Locate the project to be migrated and click Migrate in the Operation column. On the displayed page, click Correct Objects.
- Click Batch Update Statements.
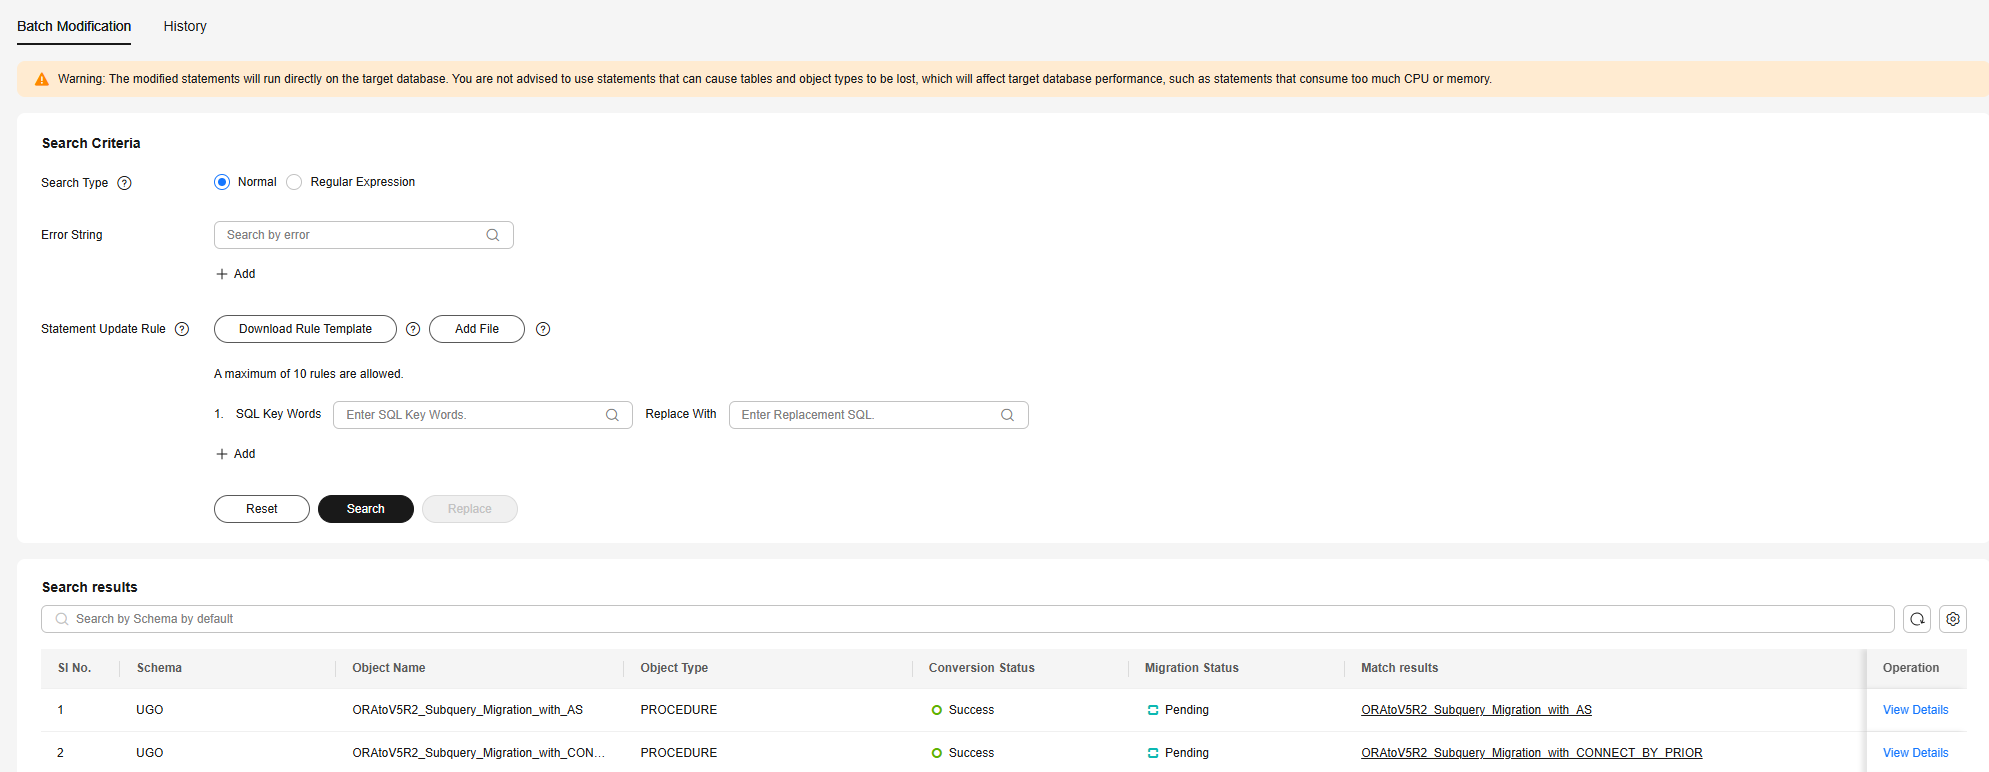
Figure 4 Updating statements in batches

- In the Search results area, locate an object and click View Details in the Operation column.
You can view the schema name, object type, object name, split object name, conversion status, and migration status.
- View the conversion or migration error information. Modification suggestions are also displayed if there are any.
- Locate an object whose Conversion Status is Failed, click View Details in the Operation column to view conversion errors.
- Locate an object whose Migration Status is Failed, click View Details in the Operation column to view migration errors.
- Copy a SQL keyword or character string, return to the batch modification page, and configure parameters as needed.
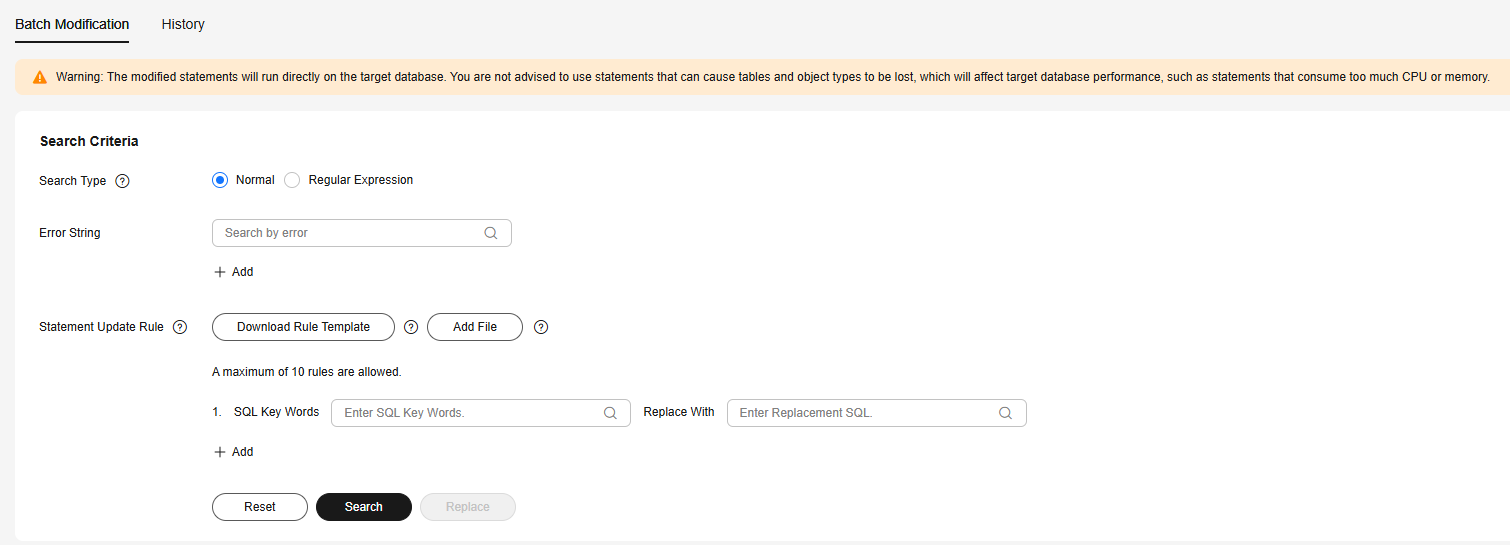
Figure 6 Batch modification

Table 1 Parameter description Parameter
Mandatory
Description
Search Type
Yes
- Normal: simple search text type
- Regular Expression: regular expression search text type
NOTE:
- Incorrect use of regular expressions may cause unpredictable changes to SQL statements.
Error String
No
Click View Details in the Operation column to view the conversion or migration errors.
- Multiple error strings will be searched at the same time.
- Each error string can contain a maximum of 255 characters.
Statement Update Rule
Yes
Rule for matching and replacing key words in a SQL statement
- Only one rule can be executed each time.
- A maximum of 60 characters can be specified for SQL Key Words and a maximum of 255 characters for Replace With.
NOTE:If you select Normal for Search Type and you need to create two statement update rules, enter CREATE TABLE in SQL Key Words and CREATE TABLE IF NOT EXISTS in Replace With for the first rule and CREATE VIEW in SQL Key Words and CREATE VIEW IF NOT EXISTS in Replace With for the second rule. UGO searches SQL statements containing CREATE TABLE or CREATE VIEW and then replaces CREATE TABLE with CREATE TABLE IF NOT EXISTS and CREATE VIEW with CREATE VIEW IF NOT EXISTS.
You can create a rule in either of the following ways:
- Method 1: Specify SQL Keyword and Replace With.
- Method 2: Click Add File to upload a rule file. You can click Download Rule Template to obtain the rule template.

- After the parameters are configured, click Search. Objects that meet search criteria are displayed in the lower part of the page.
- All error strings can be viewed in Migration Errors or Conversion Errors area, as shown in Figure 5.
- If the user connected to the target database is different from the schema owner, UGO will change the schema owner name to the username.
- Click Search. The objects that meet the search criteria are displayed.
Figure 7 Search results

You can search for objects by schema, object type, conversion status, and migration status.
Click the content in the Match Results column to view detailed matching information.
- Enter a new SQL keyword in Replace With and click Replace.

Multiple rules are executed in sequence. The SQL keyword in each rule is replaced based on the execution result of the previous rule.
- After the replacement, click Batch Update Statements and then click the History tab. On the displayed page, view the batch replacement records.
Figure 8 History

Table 2 Parameter description Parameter
Description
History ID
The number of modification times is displayed in descending order.
Started
Time when the modification started, for example, 2021/09/15 16:28:15 GMT+08:00
Ended
Time when the modification ended, for example, 2021/09/15 16:28:16 GMT+08:00
Search Type
Search type. The value can be Normal or Regular Expression.
Error Information Query Criteria
Searched error strings
Statement Update Rule
Values specified for SQL Key Words and Replace With
Operation
- Roll Back: You can roll back the last modification.
- View List: You can view the history ID, schema, object name, and object type.
Click View SQL to view the modified SQL statement.
- Click View List. On the displayed History page, click View SQL in the Operation column to view the SQL statements before and after the replacement.
Figure 9 History

Feedback
Was this page helpful?
Provide feedbackThank you very much for your feedback. We will continue working to improve the documentation.See the reply and handling status in My Cloud VOC.
For any further questions, feel free to contact us through the chatbot.
Chatbot


