Logging In to a Container
Scenario
If you encounter unexpected problems when using a container, you can log in to the container to debug it.
Constraints
- When kubectl is used in CloudShell, permissions are determined by the logged-in user.
- CloudShell does not support an account.
- When using CloudShell to access a cluster or container, you can open up to 15 instances concurrently.
- The credential for kubectl to access the cluster in CloudShell is valid for one day. You can reset its validity period by accessing CloudShell through the UCS console.
- Using CloudShell to access containers is only available in the following regions: CN North-Beijing1, CN North-Beijing4, CN North-Ulanqab1, CN East-Shanghai1, CN East-Shanghai2, CN South-Guangzhou, CN Southwest-Guiyang1, and AP-Singapore. For details, see the console.
Prerequisites
- You have connected the on-premises data center or the third party cloud to the Huawei Cloud VPC.
- VPN: See Connecting an On-Premises Data Center to a VPC Through a VPN.
- Direct Connect: See Connecting an On-Premises Data Center to a VPC over a Single Connection and Using Static Routing to Route Traffic or Connecting an On-Premises Data Center to a VPC over a Single Connection and Using BGP Routing to Route Traffic.
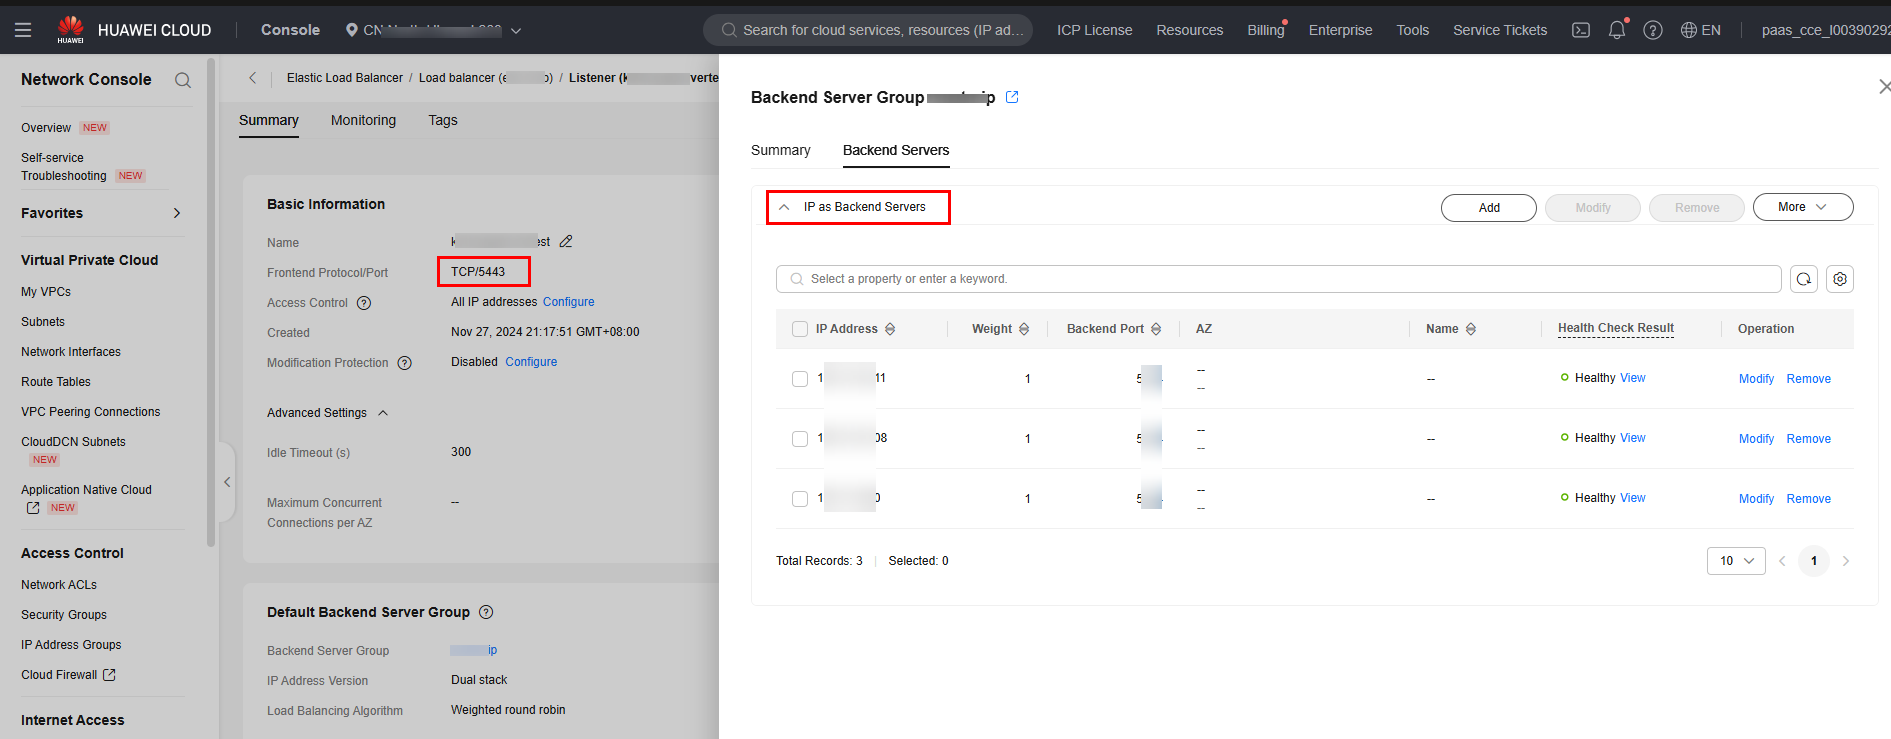
- You have created a load balancer and configure it. For details, see Creating a Dedicated Load Balancer and Creating a Shared Load Balancer.
- When specifying the network configuration, select the VPC you created.
- When adding a listener, click IP as Backend Servers on the Backend Servers tab and set the IP address to the cluster access address, which can be obtained from the server field in the kubeconfig.yaml file of the cluster.

- You have created a VPC endpoint service. For details, see Creating a VPC Endpoint Service.
- VPC: Select the VPC that you created, which is the same VPC as the load balancer.
- Connection Approval: Disable this option.
- Set Protocol to TCP, Service Port to the listening port of the load balancer (for example, 5443), and Terminal Port to the same port in the kubeconfig.yaml file of the cluster (for example, 5443).

- Load Balancer: Select the load balancer created in #ucs_01_0049__li29351730133214.
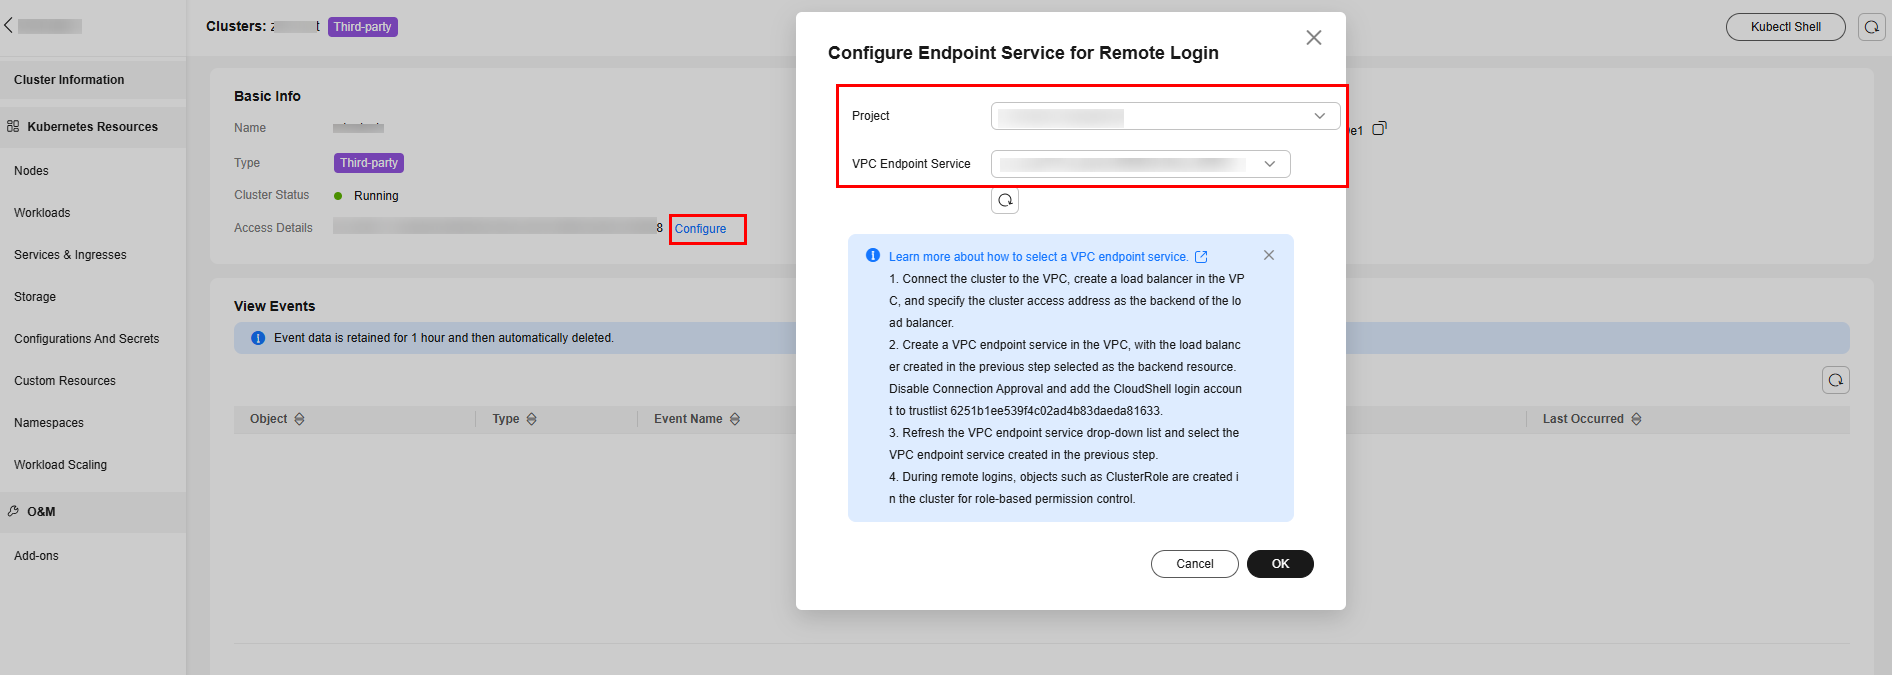
- After the VPC endpoint service is created, add the CloudShell login trustlist. The trustlist ID can be obtained from the note in Configure Endpoint Service for Remote Login.


- You have registered the cluster and connected it to the network.
If the cluster is not added to any fleet, ensure that the cluster has been registered and connected to the network. For details, see Registering an On-Premises Cluster and Attached Clusters.
Configure Endpoint Service for Remote Login
- Log in to the UCS console. In the navigation pane, choose Fleets.
- If the cluster is not added to any fleet, click the cluster name to access the cluster console.
- If the cluster has been added to a fleet, click the fleet name to access the fleet console. In the navigation pane, choose Clusters > Container Clusters. Then, click the cluster name to access the cluster console.
- On the basic cluster information page, click Configure corresponding to Access Details.
- Project: If the IAM project is enabled, you need to select a project.
- VPC Endpoint Service: You can select an existing VPC endpoint service or create a VPC endpoint service.
- Click OK.
After the cluster access details are configured, the name of the VPC endpoint service is displayed for Access Details, indicating that the endpoint service for remote login has been configured successfully.

Logging In to a Container Using CloudShell
- Log in to the UCS console. In the navigation pane, choose Fleets.
- If the cluster is not added to any fleet, click the cluster name to access the cluster console.
- If the cluster has been added to a fleet, click the fleet name to access the fleet console. In the navigation pane, choose Clusters > Container Clusters. Then, click the cluster name to access the cluster console.
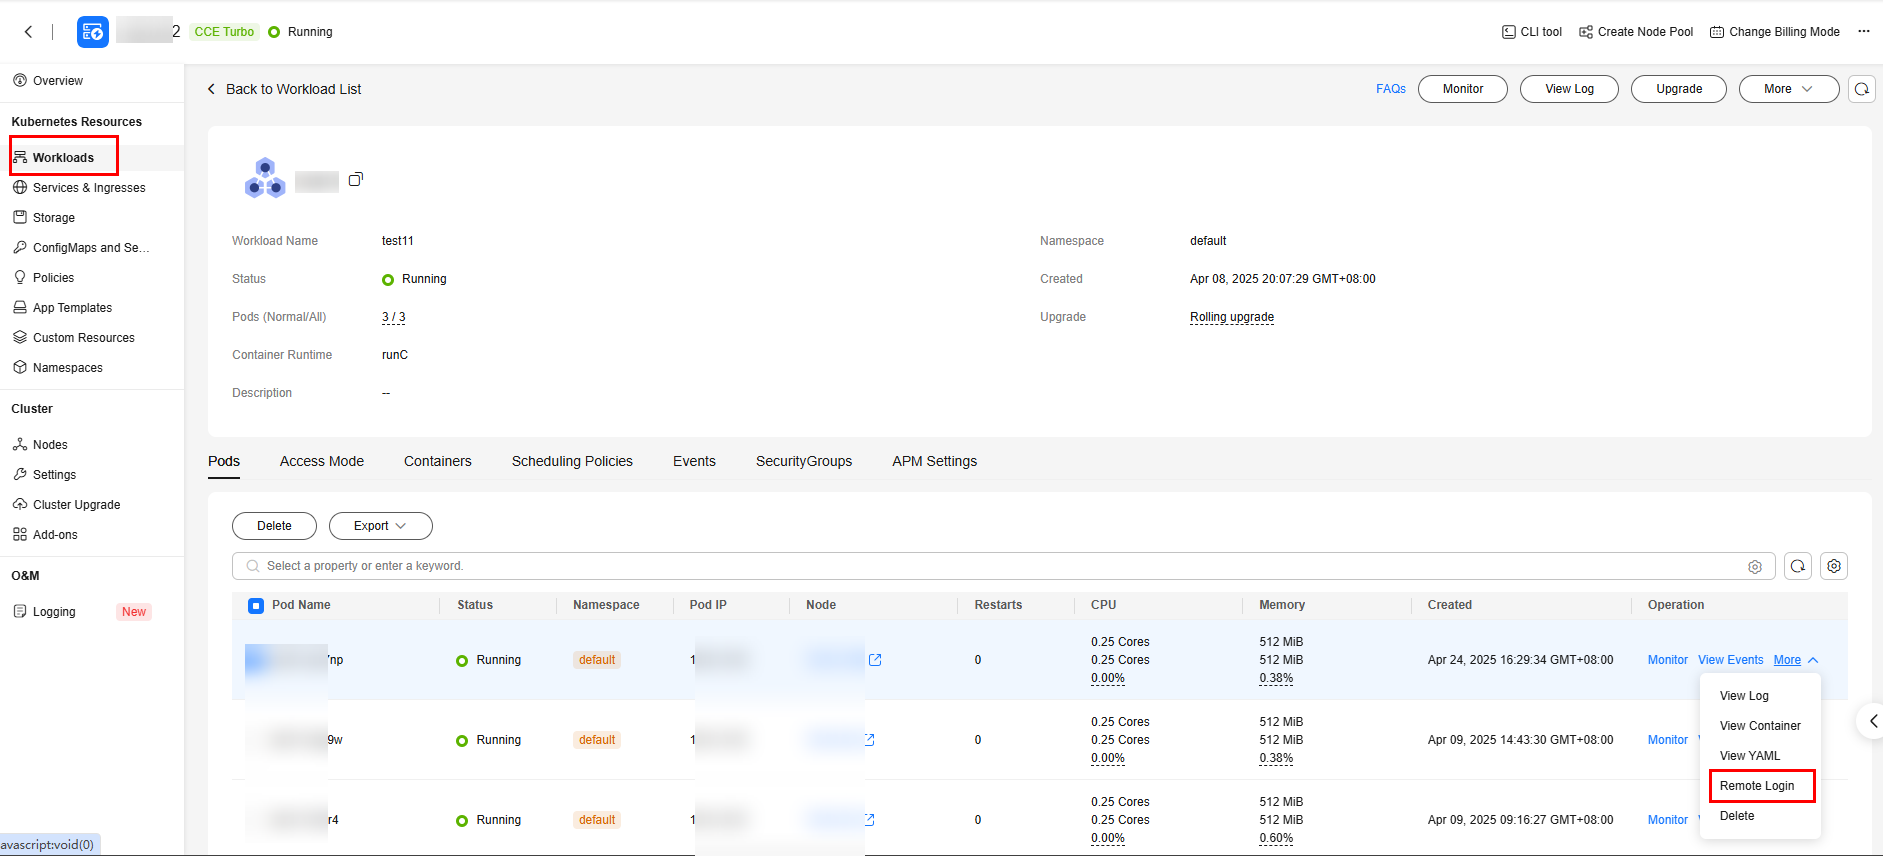
- In the navigation pane, choose Workloads. Click the name of the target workload to view its pods.
- Locate the target pod and choose More > Remote Login in the Operation column.
Figure 1 Logging in to a container


If no endpoint service is configured for the cluster where the workload is located, Remote Login in the Operation column of the pod is unavailable, and you are prompted to configure an endpoint service for remote login.
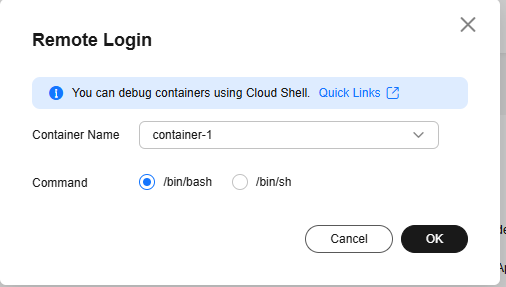
- In the displayed dialog box, select the container you want to access and the command, and click OK.
Figure 2 Selecting a container and login command

- You are automatically redirected to CloudShell. Then, the system initializes kubectl and runs the kubectl exec command to log in to the container.

Wait for 5 to 10 seconds until the kubectl exec command is automatically executed.
Figure 3 CloudShell page
Logging In to a Container Using kubectl
- Use kubectl to access the cluster. For details, see Accessing a Cluster Using kubectl.
- Run the following command to view the created pod:
kubectl get pod
Example output:NAME READY STATUS RESTARTS AGE nginx-59d89cb66f-mhljr 1/1 Running 0 11m
- Query the container name in the pod.
kubectl get po nginx-59d89cb66f-mhljr -o jsonpath='{range .spec.containers[*]}{.name}{end}{"\n"}'Example output:container-1
- Run the following command to log in to the container-1 container in the nginx-59d89cb66f-mhljr pod:
kubectl exec -it nginx-59d89cb66f-mhljr -c container-1 -- /bin/sh
- To exit the container, run the exit command.
Accessing a Cluster Using CloudShell
kubectl is pre-installed and configured in CloudShell, and connects to the target cluster by default. You can manage cluster resources by running kubectl commands directly from the CloudShell console. The process is as follows:
- Log in to the UCS console. In the navigation pane, choose Fleets.
- If the cluster is not added to any fleet, click the cluster name to access the cluster console.
- If the cluster has been added to a fleet, click the fleet name to access the fleet console. In the navigation pane, choose Clusters > Container Clusters. Then, click the cluster name to access the cluster console.
- On the basic cluster information page, click Kubectl Shell for the cluster not in a fleet or CLI tool for the cluster that has been added to a fleet in the upper right corner to use CloudShell.
Figure 4 Kubectl Shell for the cluster not in a fleet
 Figure 5 CLI tool for the cluster that has been added to a fleet
- After logging in to CloudShell, run the following command to check whether kubectl in CloudShell has been connected to the target cluster:
kubectl cluster-info # Check the cluster information.
If the following information is displayed, kubectl in CloudShell has been connected to the cluster. You can then run kubectl commands to manage cluster resources.
Kubernetes control plane is running at https://xx.xx.xx.xx:5443
CoreDNS is running at https://xx.xx.xx.xx:5443/api/v1/namespaces/kube-system/services/coredns:dns/proxy
To further debug and diagnose cluster problems, use 'kubectl cluster-info dump'.
Feedback
Was this page helpful?
Provide feedbackThank you very much for your feedback. We will continue working to improve the documentation.See the reply and handling status in My Cloud VOC.
For any further questions, feel free to contact us through the chatbot.
Chatbot


