Compute
Elastic Cloud Server
Huawei Cloud Flexus
Bare Metal Server
Auto Scaling
Image Management Service
Dedicated Host
FunctionGraph
Cloud Phone Host
Huawei Cloud EulerOS
Networking
Virtual Private Cloud
Elastic IP
Elastic Load Balance
NAT Gateway
Direct Connect
Virtual Private Network
VPC Endpoint
Cloud Connect
Enterprise Router
Enterprise Switch
Global Accelerator
Management & Governance
Cloud Eye
Identity and Access Management
Cloud Trace Service
Resource Formation Service
Tag Management Service
Log Tank Service
Config
OneAccess
Resource Access Manager
Simple Message Notification
Application Performance Management
Application Operations Management
Organizations
Optimization Advisor
IAM Identity Center
Cloud Operations Center
Resource Governance Center
Migration
Server Migration Service
Object Storage Migration Service
Cloud Data Migration
Migration Center
Cloud Ecosystem
KooGallery
Partner Center
User Support
My Account
Billing Center
Cost Center
Resource Center
Enterprise Management
Service Tickets
HUAWEI CLOUD (International) FAQs
ICP Filing
Support Plans
My Credentials
Customer Operation Capabilities
Partner Support Plans
Professional Services
Analytics
MapReduce Service
Data Lake Insight
CloudTable Service
Cloud Search Service
Data Lake Visualization
Data Ingestion Service
GaussDB(DWS)
DataArts Studio
Data Lake Factory
DataArts Lake Formation
IoT
IoT Device Access
Others
Product Pricing Details
System Permissions
Console Quick Start
Common FAQs
Instructions for Associating with a HUAWEI CLOUD Partner
Message Center
Security & Compliance
Security Technologies and Applications
Web Application Firewall
Host Security Service
Cloud Firewall
SecMaster
Anti-DDoS Service
Data Encryption Workshop
Database Security Service
Cloud Bastion Host
Data Security Center
Cloud Certificate Manager
Edge Security
Situation Awareness
Managed Threat Detection
Blockchain
Blockchain Service
Web3 Node Engine Service
Media Services
Media Processing Center
Video On Demand
Live
SparkRTC
MetaStudio
Storage
Object Storage Service
Elastic Volume Service
Cloud Backup and Recovery
Storage Disaster Recovery Service
Scalable File Service Turbo
Scalable File Service
Volume Backup Service
Cloud Server Backup Service
Data Express Service
Dedicated Distributed Storage Service
Containers
Cloud Container Engine
SoftWare Repository for Container
Application Service Mesh
Ubiquitous Cloud Native Service
Cloud Container Instance
Databases
Relational Database Service
Document Database Service
Data Admin Service
Data Replication Service
GeminiDB
GaussDB
Distributed Database Middleware
Database and Application Migration UGO
TaurusDB
Middleware
Distributed Cache Service
API Gateway
Distributed Message Service for Kafka
Distributed Message Service for RabbitMQ
Distributed Message Service for RocketMQ
Cloud Service Engine
Multi-Site High Availability Service
EventGrid
Dedicated Cloud
Dedicated Computing Cluster
Business Applications
Workspace
ROMA Connect
Message & SMS
Domain Name Service
Edge Data Center Management
Meeting
AI
Face Recognition Service
Graph Engine Service
Content Moderation
Image Recognition
Optical Character Recognition
ModelArts
ImageSearch
Conversational Bot Service
Speech Interaction Service
Huawei HiLens
Video Intelligent Analysis Service
Developer Tools
SDK Developer Guide
API Request Signing Guide
Terraform
Koo Command Line Interface
Content Delivery & Edge Computing
Content Delivery Network
Intelligent EdgeFabric
CloudPond
Intelligent EdgeCloud
Solutions
SAP Cloud
High Performance Computing
Developer Services
ServiceStage
CodeArts
CodeArts PerfTest
CodeArts Req
CodeArts Pipeline
CodeArts Build
CodeArts Deploy
CodeArts Artifact
CodeArts TestPlan
CodeArts Check
CodeArts Repo
Cloud Application Engine
MacroVerse aPaaS
KooMessage
KooPhone
KooDrive
Help Center/ TaurusDB/ User Guide/ Connecting to a DB Instance/ Connecting to a DB Instance Through MySQL-Front

Connecting to a DB Instance Through MySQL-Front

Updated on 2025-02-12 GMT+08:00

If your DB instance and ECS are not in the same region or VPC, you can connect to your DB instance using a Windows client through an EIP.

This section describes how to connect to a DB instance using a Windows ECS with the MySQL-Front client installed through an EIP.

Purchasing an ECS

Binding an EIP to a DB Instance

Querying the EIP of the DB Instance to Be Connected

Testing Connectivity and Installing MySQL-Front

Using MySQL-Front to Connect to a DB Instance

Purchasing an ECS

  1. Log in to the management console and check whether there is an ECS available.

  2. Buy an ECS and select Windows as its OS.

    To download the mysql client to the ECS, bind an EIP to the ECS.

    For details about how to purchase a Windows ECS, see Purchasing an ECS in Elastic Cloud Server Getting Started.

  3. On the ECS Information page, view the region and VPC of the ECS.

    Figure 1 Viewing ECS information

  4. On the Basic Information page of the DB instance, view the region and VPC of the DB instance.

    Figure 2 Viewing the region and VPC of the DB instance

Binding an EIP to a DB Instance

You can bind an EIP to a DB instance for public access and unbind it as required.

If an EIP has been bound to the DB instance, skip this step.

  1. Log in to the management console.
  2. Click in the upper left corner and select a region and project.
  3. Click in the upper left corner of the page, choose Databases > TaurusDB.
  4. On the Instances page, click the instance name to go to the Basic Information page.
  5. In the Network Information area, click Bind under Public IP Address (EIP).
  6. In the displayed dialog box, select an EIP and click OK.

    If no EIPs are available, click View EIP to create an EIP on the network console. After the EIP is created, go back to the Basic Information page and bind the newly created EIP to the instance.
    NOTICE:

    You need to configure security group rules and enable specific IP addresses and ports to access the DB instance. For details, see Configuring Security Group Rules.

  7. In the Network Information area, locate Public IP Address (EIP) and view the bound EIP.

Querying the EIP of the DB Instance to Be Connected

  1. Log in to the management console.
  2. Click in the upper left corner and select a region and project.
  3. Click in the upper left corner of the page, choose Databases > TaurusDB.
  4. On the Instances page, click the instance name to go to the Basic Information page.
  5. In the Network Information area, obtain the EIP and database port.

    Figure 3 Viewing the EIP and database port

Testing Connectivity and Installing MySQL-Front

  1. Open the cmd window on your local server and check whether the EIP and database port of the DB instance can be connected.

    telnet EIP port

    Example:

    telnet 192.168.0.16 3306

    NOTE:

    If the message "command not found" is displayed, install the Telnet tool based on the OS used by the ECS.

    • If yes, network connectivity is normal.
    • If no, check the security group rules.
      • If in the security group of the ECS, there is no outbound rule with Destination set to 0.0.0.0/0 and Protocol & Port set to All, add the EIP and port of the DB instance to the outbound rules.
        Figure 4 Configuring rules of an ECS security group
      • If in the security group of the DB instance, there is no inbound rule allowing the access from the EIP and port of the ECS, add the EIP and port of the ECS to the inbound rules. For details, see Configuring Security Group Rules.

  2. Open a browser, and download and install the MySQL-Front tool locally (version 5.4 is used as an example).

Using MySQL-Front to Connect to a DB Instance

  1. Start MySQL-Front.
  2. In the displayed dialog box, click New.

    Figure 5 Creating a connection

  3. Enter the information about the DB instance to be connected and click Ok.

    Figure 6 Adding an account

    Table 1 Parameter description

    Parameter

    Description

    Name

    Database connection task name. If you do not specify this parameter, it will be the same as that configured for Host by default.

    Host

    Private IP address.

    Port

    Database port. The default value is 3306.

    User

    Account name of the DB instance. The default value is root.

    Password

    Password of the account for accessing the DB instance.

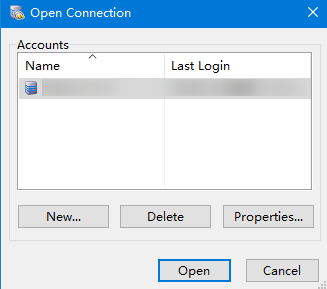
  4. In the displayed window, select the connection that you created and click Open.

    Figure 7 Opening a connection

  5. Check whether the DB instance has been connected. If the connection information is correct, the DB instance has been connected.

    Figure 8 Login succeeded

We use cookies to improve our site and your experience. By continuing to browse our site you accept our cookie policy. Find out more

Feedback

Feedback

Feedback

0/500

Selected Content

Submit selected content with the feedback