Managing Nodes and Components
Scenarios
This topic describes Viewing Node Details, Deregistering a Node, and Viewing Component Details.
Viewing Node Details
- Log in to the SecMaster console.
- Click
 in the upper left corner of the management console and select a region or project.
 - In the navigation pane on the left, choose Workspaces > Management. In the workspace list, click the name of the target workspace.
Figure 1 Workspace management page

- In the navigation pane on the left, choose .
Figure 2 Node management page

- On the Nodes tab, view the details about nodes.
If there are many nodes displayed, use filters to search for a specific one.
Table 1 Collection node parameters Parameter
Description
Node Name/ID
Name or ID of a node
Health Status
Node health status
- Disconnected: The Agent process is abnormal. If no heartbeat is detected within 15 minutes, the node is marked as Disconnected.
- Normal: The Agent process is normal.
Region
Region where the node is located
IP Address
Node IP address
CPU Usage
CPU usage of the node
Memory Usage
Memory usage of the node
Disk Usage
Node disk usage
Network Speed
Network rate of a node
Label
Label information of a node
Heartbeat Expiration Mark
Indicates whether the node is disconnected due to heartbeat expiration.
If no heartbeat message is sent within 15 minutes, the node is marked as Disconnected.
- To view details about a node, click the node name.
Deregistering a Node
- Log in to the SecMaster console.
- Click
 in the upper left corner of the management console and select a region or project.
 - In the navigation pane on the left, choose Workspaces > Management. In the workspace list, click the name of the target workspace.
Figure 3 Workspace management page

- In the navigation pane on the left, choose .
Figure 4 Node management page

- To deregister a node, perform the following operations in sequence:
- Stop or delete the collection channel corresponding to the node. For details, see Managing Collection Channels. The collection channel and the node have the same name.
- Remove the component. Operation: In the navigation pane, choose > Components and click Edit Settings. Then, select the corresponding node, click Remove in the Operation column, and click Save and Apply. Removed components are no longer displayed on the Components tab.
- Deregister the node. Operation: In the navigation pane on the left, choose to go to the Nodes tab. On the Nodes tab, locate the row that contains the target node and click Deregister in the Operation column. In the displayed dialog box, click OK.
- Confirm the result. Operation: In the navigation pane on the left, choose to go to the Nodes tab. The deregistered node is no longer displayed in the node list.

Only the node is deregistered. The ECS and endpoint interface resources are not deleted. If you no longer need the data collection function, you need to manually release those resources. For details, see Deleting ECSs and Deleting a VPC Endpoint.
Viewing Component Details
- Log in to the SecMaster console.
- Click
 in the upper left corner of the management console and select a region or project.
 - In the navigation pane on the left, choose Workspaces > Management. In the workspace list, click the name of the target workspace.
Figure 5 Workspace management page

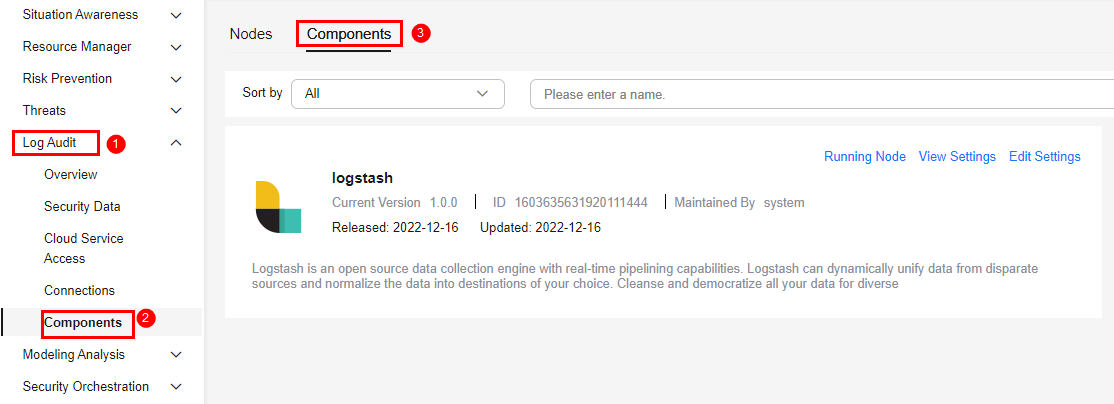
- In the navigation pane on the left, choose . Then, select the Components tab.
Figure 6 Accessing the Components tab

- On the Components page, view the component details.
- Running Node
Click Running Node in the upper right corner of a component. The running node information of the component is displayed on the right.
- View Settings
Click View Settings in the upper right corner of the component to be viewed. The configuration details about the component are displayed on the right.
- Edit Settings
- Click Edit Settings in the upper right corner of the component to be viewed. The Configuration Management panel of the component is displayed on the right.
- In the Node Configuration area, edit the node configuration information.
- Adding a node: Click Add in the upper left corner of the node list. In the Add Node dialog box displayed, select a node and click OK.
- Editing node parameters: Click
 next to the node name to expand the node configuration information and edit the node parameters.
 - Running parameters: Locate the row that contains the target node, click Run Parameter in the Operation column.
- Removing a node: Locate the row that contains the target node and click Removed in the Operation column.
- Batch deletion: Select the nodes you want to remove and click Batch Remove in the upper left corner of the list.
- Viewing historical versions: Click Historical Version in the lower right corner of the panel.
- Click Save and Apply in the lower right corner of the page.
- Running Node
Feedback
Was this page helpful?
Provide feedbackThank you very much for your feedback. We will continue working to improve the documentation.See the reply and handling status in My Cloud VOC.
For any further questions, feel free to contact us through the chatbot.
Chatbot


