Viewing Asset Information
Scenarios
On the Resource Manager page, you can view the asset name, type, and protection status. You can view assets on and off this cloud.
Prerequisites
- You have completed asset subscriptions. For details, see Configuring the Asset Subscription.
- You have purchased the SecMaster standard or professional edition.
Viewing Resource Information
- Log in to the SecMaster console.
- Click
 in the upper left corner of the management console and select a region or project.
 - Click
 in the upper left corner of the page and choose Security & Compliance > SecMaster.
 - In the navigation pane on the left, choose Workspaces > Management. In the workspace list, click the name of the target workspace.
Figure 1 Workspace management page

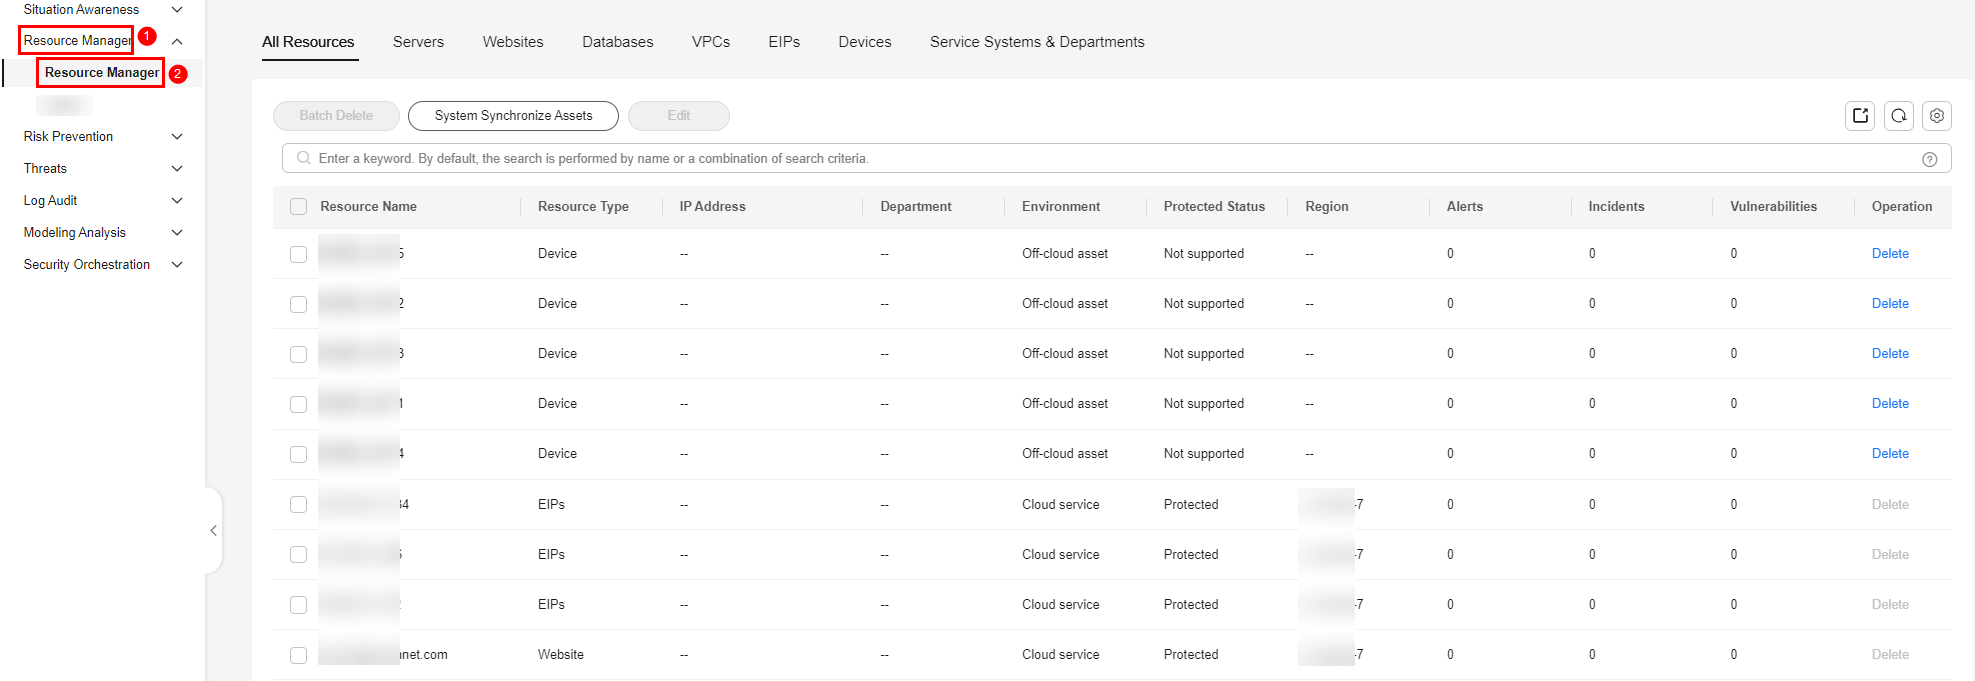
- In the navigation pane on the left, choose Resource Manager > Resource Manager.
Figure 2 Resource Manager

- (Optional) Complete the asset subscription first. If you have done this once, skip this step.
SecMaster can synchronize asset information only in the workspace where asset subscription is enabled. After the subscription, the resource information will be displayed in SecMaster within one minute.

Only cloud resources can be subscribed to and synchronized to SecMaster. Subscribing to resources in a region to multiple workspaces is not recommended.
- On the Resource Manager page, click Asset Subscription in the upper right corner.
- On the Asset Subscription page sliding from the right, locate the row that contains the region where the target resource is located, and enable subscription.
- Click OK.
After the subscription, the resource information will be displayed in SecMaster within one minute.
After asset subscription, you can click System Synchronize Assets on the Resource Manager page to synchronize asset information again. The basic edition allows you to synchronize assets one time per day, and the standard or professional edition allows you to synchronize assets 20 times per day. If you exceed this threshold, the system displays error message "Insufficient resource synchronization quota." In this case, synchronize assets again the next day.
- On the displayed page, view the resource details.
- You can view resource information by resource type. For example, you can select the Servers tab to view details about servers you have. You can view resources on the following tabs: Servers, Websites, Databases, VPCs, EIPs, and Devices. On the All Resources tab, you can view all resources.
- Departments and Service Systems: This tab displays the Department and Service System information of the assets.
- You can view the total number of assets below the asset list. You can view a maximum of 10,000 asset records page by page. To view more than 10,000 asset records, optimize the filter criteria.
- To view more details about an asset, check its asset type. Then, go to the corresponding resource tab and click the resource name of the asset to go to its details page.
For example, to view details about a server, select the Servers tab. On the displayed tab, click the resource name of the target server to go to its details page.
- On the asset details page, you can view the environment, asset, and network details related to the asset.
- Edit the owner, service system, and department of the resource. You can also bind the resources to or unbind the resources from an owner, service system, or department.
- You can click
 in the upper right corner of the asset list and select the fields you want to display in the asset list.
Table 1 Asset sources and corresponding security products Asset Type
Asset Name
Source
Security Product
Cloud asset
Servers
Elastic Cloud Server (ECS)
Host Security Service (HSS)
Cloud asset
Website
Web Application Firewall (WAF)
Web Application Firewall (WAF)
Cloud asset
Database
Relational Database Service (RDS)
Database Security Service (DBSS)
Cloud asset
VPC
Virtual Private Cloud (VPC)
Cloud Firewall (CFW)
Cloud asset
EIP
Elastic IP (EIP)
CNAD Basic (Anti-DDoS)
Off-cloud asset
Device
Off-cloud assets include on-premises servers, IDC servers, servers on third-party cloud platforms. In a word, off-cloud assets include assets that are not on Huawei Cloud.
--
NOTE:After the asset information is synchronized to SecMaster, the protection status of assets will be displayed on the SecMaster console. The protection status is as follows:
- If Protection Status for an asset is Protected, the corresponding security product has been enabled for the asset.
- If Protection Status for an asset is Unprotected, the corresponding security product has not been purchased or enabled for the asset. If you want to protect target assets, purchase corresponding security products and enable protection. For example, if you want to protect ECSs using HSS, purchase HSS and enable HSS for each ECS.
For details about security products, see HSS Operation Guide, WAF Operation Guide, DBSS Operation Guide, CFW Operation Guide, and Anti-DDoS Operation Guide.
- If protection status for an asset is --, the corresponding security product is not supported in the current region.
Feedback
Was this page helpful?
Provide feedbackThank you very much for your feedback. We will continue working to improve the documentation.See the reply and handling status in My Cloud VOC.
For any further questions, feel free to contact us through the chatbot.
Chatbot


