Creating a Plug-in Based on an API
Creating a Plug-in
To create a plug-in, perform the following steps:
- Log in to the agent development platform.
- In the navigation pane on the left, choose Workstation > Component Library. On the Plugin tab page, click Create Component > Create Plugin in the upper right corner.
- In the Create Plugin dialog box, enter the plug-in name, English name, and description, and set Only I Can See based on the actual requirement. (After it is enabled, the plug-in is visible only to the creator.) Click the image to upload the plug-in icon and click Next.
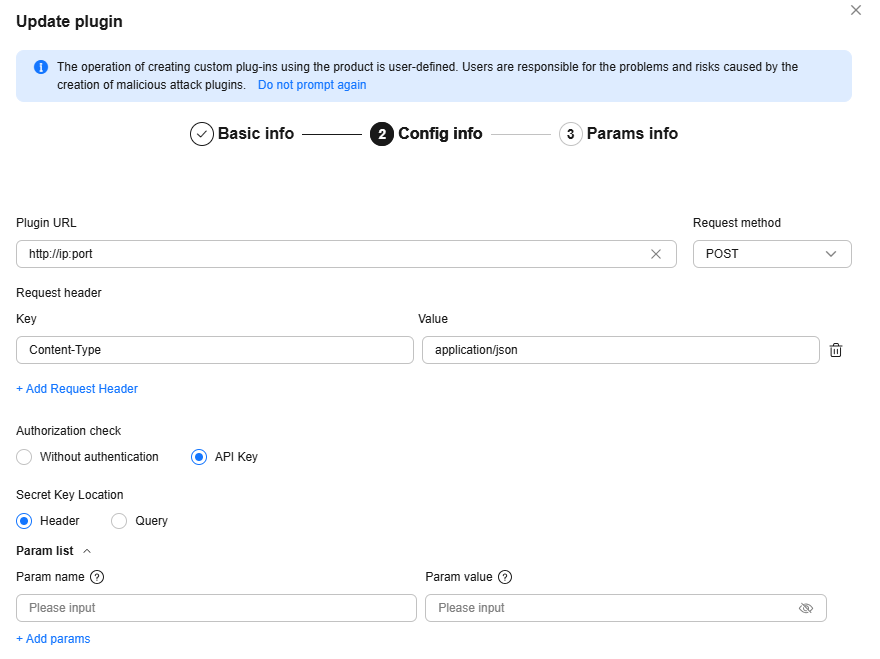
- In the Config Info step, set the parameters based on Table 1.
Table 1 Plug-in information configuration Parameter Name
Description
Plugin URL
Request URL of the plug-in service.
- The URL protocol can only be HTTP or HTTPS.
- The system checks whether the URL is in the standard format.
- By default, the IP address corresponding to the URL cannot be an intranet IP address. Otherwise, the registration fails.
Request Method
Request method of the plug-in service. The value can be POST or GET.
Authorization check
Whether an API can be called only after being authenticated.
- Without authentication: APIs can be accessed publicly without any form of authentication or authorization.
- API Key: A unique API key is provided for authentication when an API is called.
Enter the key location, that is, Header or Query. Set the key authentication parameter names and key value.
Header
Enter the request header information of the API. For example:
- Key: Content-Type
- Value: application/json
Figure 1 API request configuration example

Using HTTP for custom plug-ins or selecting the Without authentication mode can introduce security risks.
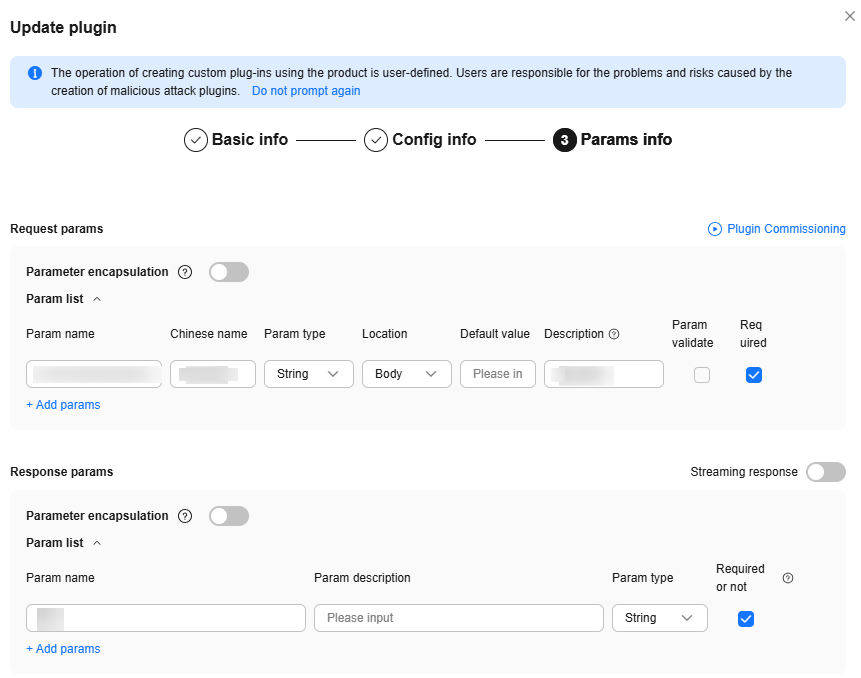
- Click Next step. In the Params Info step, set parameters based on Table 2.
Table 2 Plug-in parameter configuration Category
Parameter Name
Description
Request params
Parameter encapsulation
After this function is enabled, request parameters are encapsulated into a list (array) structure. Plug-in APIs whose input parameters are in array format can be adapted.
For example, the original parameter list is {"a":"string", "b":1}, and the parameter list after encapsulation is enabled is [{"a":"string", "b":1}].
Parameter Name
Name of a parameter. The parameter name is used by the large model to parse the parameter meaning.
Chinese name
Chinese name of the parameter.
Parameter Type
Data type of the parameter value. The options are String, Integer, Number, etc.
Secret Key Location
Location of the current parameter in the request. The value can be Body, Headers, or Query.
Default value
Default parameter value.
Description
Parameter description. The meaning and requirements of a parameter must be described as accurately as possible so that the Agent can accurately extract parameters.
Param validate
You can set the validation rule for the current parameter.
Required or not
Whether the parameter is required.
Response params
Parameter encapsulation
After this function is enabled, request parameters are encapsulated into a list (array) structure. Plug-in APIs whose input parameters are in array format can be adapted.
For example, the original parameter list is {"a":"string", "b":1}, and the parameter list after encapsulation is enabled is [{"a":"string", "b":1}].
Parameter Name
Name of a response parameter. The parameter name is used by the large model to parse its outputs.
Explanation
Description of a response parameter. The parameter description is used by the large model to parse its outputs.
Parameter Type
Data type of the parameter value. The options are String, Integer, Number, etc.
Required or not
If this function is enabled, this parameter must be extracted. If this function is disabled, this parameter can be left empty or the default value is used.
Figure 2 Configuring API request and response parameters
Feedback
Was this page helpful?
Provide feedbackThank you very much for your feedback. We will continue working to improve the documentation.See the reply and handling status in My Cloud VOC.
For any further questions, feel free to contact us through the chatbot.
Chatbot


