Configuring the Source Storage Service to Send Synchronization Requests
Scenarios
After you create a synchronization task, you need to configure the source object storage service to request OMS to migrate newly added and modified source objects. To do so, you can use a message notification or function service on the source platform.
Desired Effects
- The names of newly added and modified objects in the source bucket can be obtained in real time.
- The OMS synchronization API can be invoked to migrate the newly added and modified objects to the destination bucket.
Configuration Methods
- Using the source object storage service and the function service

On the source platform, you need to create a function and configure an event trigger for synchronizing incremental source objects through OMS.
When objects are added to or modified in the source bucket, the source object storage service will call the configured function to trigger migration of these objects to the destination bucket.
- Using a service system and a message notification service

When objects are added or modified in the source bucket, the service system captures the information about these objects through the messages received from the source object storage service or by proactively analyzing database changes. Then the system invokes the synchronization API of OMS to migrate the newly added and modified objects from the source bucket to the destination bucket.
Procedure
The following takes Huawei Cloud as the source platform and describes how to use FunctionGraph to send synchronization requests.

The created function must be in the same region as the source bucket.
- Sign in to the OMS console.
- Click Service List and choose Compute > FunctionGraph.
The FunctionGraph console is displayed.
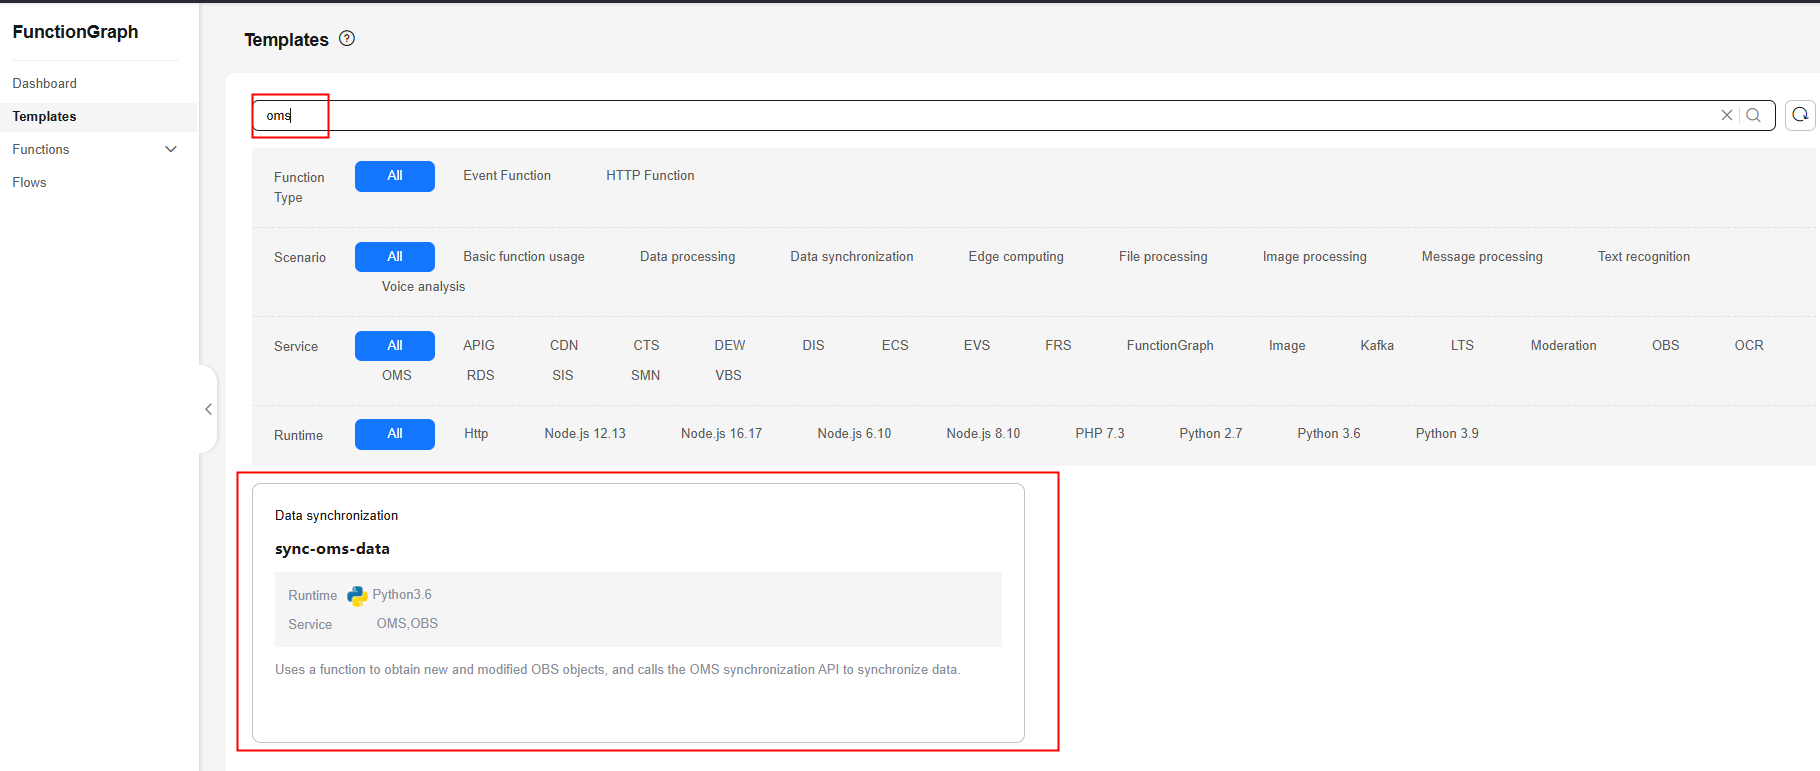
- In the navigation pane on the left, choose Templates.
- In the search box on the displayed page, enter OMS and locate the Data synchronization template, as shown in Figure 1.

Click View details to view the template details, such as template type, input parameters, output parameters, and precautions.
- Click Configure.
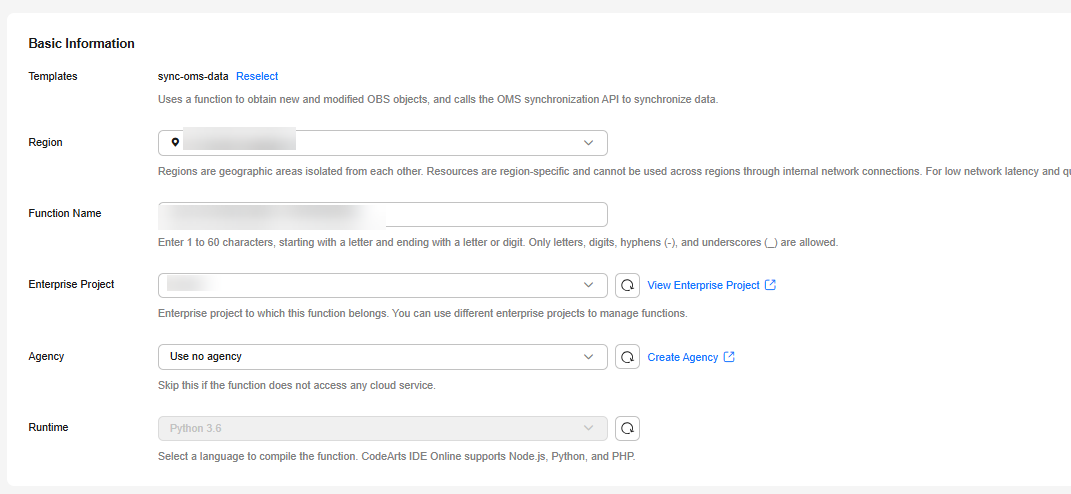
- Set parameters in the Basic Information area by referring to Table 1.
Figure 2 Setting basic parameters

Table 1 Basic parameters for creating a function Parameter
Description
Template
Retain sync-oms-data.
Region
Select the region where the source bucket is located.
Function Name
Specify a function name. The name must:
Enterprise Project
Set this parameter as needed. The value defaults to default.
Agency
Select Use no agency.
Runtime
The value defaults to Python 3.6 and cannot be modified.
- Set parameters in the Environment Variables area by referring to Table 2.
Figure 3 Setting environment variables

Table 2 Environment variables Parameter
Description
sync_url
Enter the address for receiving synchronization requests. It can be obtained from the synchronization task details.
sync_task_id
Enter the synchronization task ID, which can be obtained from the synchronization task list.
log_bucket
Enter the name of the bucket used for storing the function execution logs. Here also stores the lists of objects for which synchronization requests are sent or fail to be sent to OMS.
CAUTION:The log bucket must be in the account used to create the synchronization task.
obs_endpoint
Enter the OBS domain name in the region where the log bucket is located. For details about regions and endpoints, see Regions and Endpoints.
hw_ak
Enter the AK of the account used to create the synchronization task.
hw_sk
Enter the SK of the account used to create the synchronization task.
- Set trigger parameters. For details about the parameters, see Table 3.
Figure 4 Creating a trigger

Table 3 Parameters required for creating a trigger Parameter
Description
Trigger Type
Object Storage Service (OBS)
Bucket Name
Select the source bucket that stores the data to be synchronized.
Events
Set this parameter based on your requirements.
(Optional) Event Notification Name
An event name is automatically generated. You can specify a name as needed.
(Optional) Prefix
Enter a prefix to limit notifications to objects whose names start with the matching characters.
(Optional) Suffix
Enter a suffix to limit notifications to objects whose names end with the matching characters.
- Click Create Function.
The function details page is displayed.
- Click the Configuration tab. On the Basic Settings page, set Execution Timeout (s) to 60 and click Save.
Figure 5 Setting the execution timeout interval

- Click OK.

You need to configure a test event to verify the function.
- Click the Code tab and select Configure Test Event from the drop-down list in the Code Source area. The Configure Test Event dialog box is displayed, as shown in Figure 6. Set the parameters listed in Table 4.
Table 4 Parameters required for configuring a test event Parameter
Description
Configure Test Event
Use the default option Create new test event.
Event Template
Select obs-event-template in the event template list.
Event Name
An event name is automatically generated. You can specify a name as needed.
- Click Create.
- Click Test. The test result is displayed on the right of the page.
Figure 7 Viewing the test result


After the test succeeds, upload an object to the source bucket. Wait for 10 minutes. Then the object will be synchronized to the destination bucket.
Obtaining Object Lists
|
Object List |
Path |
|---|---|
|
List of requested objects |
oms_source_record/success_object |
|
List of unrequested objects |
oms_source_record/failed_object/ |

The objects in the lists are those to be synchronized.
Feedback
Was this page helpful?
Provide feedbackThank you very much for your feedback. We will continue working to improve the documentation.See the reply and handling status in My Cloud VOC.
For any further questions, feel free to contact us through the chatbot.
Chatbot


