
Submitting an MRS Hive Job on DataArts Studio
Hive SQL jobs are the data analytics jobs that are written and run based on the data warehouse tool Hive. They are mainly used to process large-scale structured or semi-structured data in the Hadoop distributed clusters. Hive SQL is a SQL dialect defined by Hive. Its syntax is similar to standard SQL, but it is optimized for big data scenarios. Hive SQL jobs can convert SQL statements into MapReduce or Spark jobs for execution. This enables non-programmers to quickly perform data query, statistics, and analysis.
DataArts Studio is a powerful one-stop data processing platform. It simplifies data processing and makes Hive job submission easy and efficient.
Figure 1 shows the process of submitting an MRS Hive job on DataArts Studio.

|
Phase |
Description |
|---|---|
|
Preparing an MRS cluster |
DataArts Studio can interconnect with big data components such as MRS Hive, HDFS, HBase, Spark, and ClickHouse. Select these components based on service requirements when creating an MRS cluster. |
|
Configuring DataArts Studio |
The VPC, subnet, and security group of the DataArts Studio instance must be the same as those of the MRS cluster. MRS is not a fully managed service and cannot be directly connected to DataArts Studio. You need to prepare a CDM cluster which provides a proxy for DataArts Studio to communicate with non-fully managed services. |
|
Creating data connections |
Data connections in the Management Center of DataArts Studio are used to connect to the data lake foundation for data development, governance, service, and operations. Furthermore, DataArts Studio uses data connections to access the components in the MRS cluster during job running. |
|
Developing scripts or applications |
DataArts Factory is a one-stop collaborative big data development platform that provides fully managed big data scheduling capabilities. You can develop SQL script jobs or Jar jobs based on service requirements. |
|
Orchestrating scheduling jobs |
DataArts Studio allows you to orchestrate multiple scripts into a job. You can build a workflow in a visualized manner and define node dependencies to implement serial running of multiple service scenarios, such as data collection, processing, and analysis. In addition, you can configure automatic scheduling plans to enable jobs to run periodically. With fault tolerance policies such as retry upon failure and alarm notification, services can run automatically and periodically. You can monitor job status in real time on the monitoring panel. This greatly improves data processing efficiency and stability. |
|
Running a job and checking the result |
You can check the job running result. |
This section illustrates how to develop an MRS Hive SQL job.
Step 1: Preparing an MRS Cluster
- Go to the Buy Cluster page.
- Click the Quick Config tab and set parameters.
Table 2 shows the key parameters for creating an MRS cluster with Kerberos authentication enabled and the Hive component.
For details about how to create an MRS cluster, see Quickly Buying an MRS Cluster.
Table 2 Creating an MRS cluster Parameter
Description
Example Value
Billing Mode
Billing mode of the cluster
Pay-per-use
Cluster Name
Name of the MRS cluster
MRS_demo
Cluster Type
Type of the cluster
Custom
Version Type
Version type of the MRS cluster
LTS
Cluster Version
Version of the MRS cluster
MRS 3.2.0-LTS.1
Component
Components in the MRS cluster
Hadoop Analysis Cluster
AZ
Availability zone. Select the AZ associated with the cluster's region.
AZ1
VPC
VPC of the cluster. You can click View VPC to view the name and ID. If no VPC is available, create one.
vpc-01
Subnet
Subnet of the cluster. You can access the VPC management console to view the names and IDs of existing subnets in the VPC. If no subnet is available under the VPC, click Create Subnet to create one.
subnet-01
Kerberos Authentication
Whether to enable Kerberos authentication for accessing the MRS cluster
Enabled
Password
Password of the admin user of the Manager and the root user of the ECS node in the cluster.
Test!@12345.
Enterprise Project
Enterprise project to which the cluster belongs.
default
- Click Buy Now and wait until the MRS cluster is created.
- After the cluster status changes to Running, click the cluster name. On the cluster details page, click Access Manager. Then, select an EIP, and the Manager login page is displayed.
For details about how to access MRS Manager, see Accessing MRS Manager.
- Log in to Manager as user admin using the password set in Step 2.
- Choose System > User and create a user with the Hive operation permission.
This step is required if Kerberos authentication has been enabled for the cluster. For more information, see Creating an MRS Cluster User.

- For clusters of MRS 3.1.0 or later, to create connections in Management Center, you must have permissions of the Manager_viewer role. To perform operations on databases, tables, and data of a component, you must have the user group permissions of the component.
- For clusters earlier than MRS 3.1.0, to create connections in Management Center, you must have permissions of the Manager_administrator or System_administrator role.
- You are advised to set a password that never expires. Otherwise, the connection may fail and services may be affected when the password expires. For details about how to configure a password policy, see Configuring Password Policies for MRS Cluster Users.
The following describes how to create a human-machine user testuser and associate it with the user group supergroup and role System_administrator.
Figure 2 Adding a cluster user
- After the user is created, click admin in the upper right corner and log out of Manager. Then log in to Manager as the new user and change the initial password as prompted.
Step 2: Configuring DataArts Studio
- Log in to the DataArts Studio console and buy a DataArts Studio instance.
The VPC, subnet, and security group of the DataArts Studio instance must be the same as those of the MRS cluster.
For details about how to purchase a DataArts Studio instance, see Buying a DataArts Studio Instance.
- On the DataArts Studio instance overview page, click the Workspaces tab and then Create Workspace to create a workspace.
By default, a workspace named default is available in the DataArts Studio instance and you are assigned the administrator role. Alternatively, you can create a workspace on the Workspaces page.
For details about how to create a workspace, see Creating a Workspace in Simple Mode.
- (Optional) On the DataArts Studio instance overview page, choose DataArts Migration in the current workspace and create a CDM cluster.
The free CDM cluster provided by a premium DataArts Studio instance can serve as the agent for managing data connections in Management Center. If you purchased a premium DataArts Studio instance in Step 1, skip this step.
The CDM cluster and the MRS cluster must be in the same region and AZ, use the same VPC and subnet, and share the same security group or can communicate with each other.
For how to create a CDM cluster, see Buying a DataArts Migration Incremental Package.
Figure 3 Creating a CDM cluster
Step 3: Creating an MRS Hive Data Connection
- On the DataArts Studio instance overview page, choose Management Center in the current workspace.
- On the displayed page, click Create Data Connection to create an MRS Hive data connection.
Table 3 MRS Hive connection Parameter
Description
Example Value
Name
Name of the data connection you want to create. It can contain a maximum of 100 characters. Only letters, digits, underscores (_), and hyphens (-) are supported.
mrs-hive
Applicable Modules
The modules that can use the data connection
DataArts Factory
Connection Type
- Proxy connection: The CDM cluster functions as an agent to access the MRS cluster as a cluster user. This type supports all versions of MRS clusters.
- MRS API connection: MRS APIs are used to access MRS clusters.
Select Proxy connection so that the MRS connection can be used by the DataArts Architecture, DataArts Quality, DataArts Catalog, and DataArts DataService modules.
Proxy connection
Manual
The connection mode. If you do not need to access MRS clusters in other projects or enterprise projects, select Cluster Name Mode.
- Cluster Name Mode: Select an existing MRS cluster in the same project and enterprise project as the DataArts Studio instance.
- Connection String Mode: Enable access to MRS clusters of other projects or enterprise projects. You need to enter the Manager IP address and enable communications between the CDM cluster (agent) and the target MRS cluster.
Cluster Name Mode
MRS Cluster Name
Select the MRS cluster created in Step 1: Preparing an MRS Cluster.
mrs-demo
KMS encryption key
KMS key used to encrypt and decrypt data source authentication information. Select a default or custom key.
ims/default
Agent
Select the CDM cluster mentioned in Step 2: Configuring DataArts Studio.
cdm-a123
Username
MRS cluster service user. Select the user created in Step 1: Preparing an MRS Cluster.
testuser
Password
Password of the MRS cluster service user
-
Enable ldap
Whether to enable LDAP authentication. This parameter must be enabled when MRS Hive is connected to an external LDAP server and the LDAP account and password are required for authentication. Otherwise, the connection fails.
Disabled
For more information about DataArts Studio data connection parameters and constraints, see Creating a DataArts Studio Data Connection.
- After setting the parameters, click Save. The system will automatically check the connectivity of the data connection.
Step 4: Developing a Hive SQL Script
- On the DataArts Studio instance overview page, click DataArts Factory.
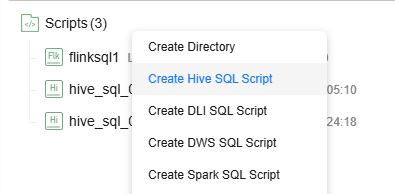
- On the Develop Script page, right-click the Scripts directory and select Create Hive SQL Script from the shortcut menu.
Figure 4 Creating a Hive SQL script
- Enter SQL statements in the editor to meet requirements.
For example, develop a script as follows:
Create a database and a data table in Hive.
-- Create a database.
CREATE DATABASE IF NOT EXISTS test_db;
-- Use the database.
USE test_db;
-- Create a data table.
CREATE TABLE IF NOT EXISTS test_table (
    id INT,
    name STRING,
    age INT,
    gender STRING
)
ROW FORMAT DELIMITED
FIELDS TERMINATED BY ',';
After developing the script, set the running parameters in the upper right corner of the development area and click Execute above the canvas. Then, view the script execution status and result.
- Connection: Select the MRS Hive connection created in Step 3: Creating an MRS Hive Data Connection.
- Database: Select a database in Hive.
- Queue: Queue used for running Hive jobs. If this parameter is not set, the default queue of the cluster is used by default.
- After developing the script is developed, click Save to save the script.
- Develop other scripts by referring to Step 3.
For example, develop a script as follows:
Insert a row of data into the Hive table and query the data.
-- Use the database.
USE test_db;
-- Insert a single row of data.
INSERT INTO test_table VALUES (1, 'Zhangsan', 30, 'Male');
-- Check the data table content.
SELECT * FROM test_table;
Step 5: Orchestrating a Scheduling Job
- On the DataArts Studio instance overview page, click DataArts Factory.
- On the Develop Job page, right-click the Jobs directory and select Create Job from the shortcut menu.
- Set job parameters and click OK to create a batch processing job.
Table 4 DataArts Studio job parameters Parameter
Description
Example Value
Job Name
The job name. Enter 1 to 128 characters. Only letters, digits, hyphens (-), underscores (_), and periods (.) are supported.
job_test
Job Type
- Batch processing: Data is processed periodically in batches based on the scheduling plan, which is used in scenarios with low real-time requirements. This type of job is a pipeline that consists of one or more nodes and is scheduled as a whole. It can only run for a period of time.
- Real-time processing: Data is processed in real time, which is used in scenarios with high real-time requirements. This type of job covers services of one or more nodes. You can configure scheduling policies for each node, and jobs started on a node can keep running. In this type of job, lines with arrows represent only service relationships, rather than task execution processes or data flows.
Batch processing
Mode
- Pipeline: You drag and drop one or more nodes to the canvas to create a job. The nodes are executed in sequence like a pipeline.
- Single task: The job contains only one node.
Pipeline
Select Directory
The directory where the job resides. The root directory is selected by default.
/Jobs/
Owner
Owner of the job
-
Priority
Priority of the job. The value can be High, Medium, or Low.
Job priority is a label attribute of the job and does not affect the scheduling and execution sequence of the job.
High
Agency
An agency that is used to interact jobs with other services.
If an agency has been configured for the workspace, the jobs in the workspace use the agency by default.
-
Log Path
Path of the OBS bucket for storing job logs
obs://test/dataarts-log/
Job Description
Job description
-
For more information about DataArts Studio job parameters and constraints, see Creating a DataArts Studio Job.
- Go to the job orchestration page.
Drag the required nodes from the node library on the left to the canvas, move the cursor to a node icon, and click the node to configure its attributes.
In this example, two MRS Hive SQL nodes are configured and connected. When the job is executed, the system executes the two specified SQL scripts in sequence.
Figure 5 Orchestrating a DataArts Studio job
Description of key properties:
- Node Name: The name of the SQL script. The value is hive_sql by default and can be changed.
- SQL script: Select the Hive SQL script developed in Step 4: Developing a Hive SQL Script.
- Data Connection: Select the MRS Hive connection created in Step 3: Creating an MRS Hive Data Connection.
- Database: Select the database configured in the SQL script by default. The value can be changed.
- Retain the default values of other job parameters or adjust them based on service requirements.
For more information about job development parameters, see DataArts Studio Job Development.
- Click Test above the canvas. In the displayed dialog box, the job variables are displayed. Click OK to test the job.
If the test fails, view the logs of the job node and locate and rectify the fault.
Figure 6 Testing a DataArts Studio job
In this example, the logs show that data has been successfully inserted into the test_table table.
...
1,Zhangsan,30,Male
- After the job is successfully executed, click the blank area in the canvas. On the Scheduling Setup page on the right sidebar, configure the scheduling policy of the job.
DataArts Studio jobs support multiple scheduling modes. For example, you can enable the current job to automatically run at a fixed time every day within a specified period.
Figure 7 Configuring DataArts Studio job scheduling
For more information about DataArts Studio job scheduling modes and restrictions, see DataArts Studio Scheduling Jobs.
- Click Submit above the canvas and select whether to use the new version in the next scheduling period.
When submitting a version, you can click Compare Version to view the differences between the current version and the last version.
Click Execute. On the DataArts Factory page, choose Monitoring > Job Monitoring to check the scheduling status and historical execution results of the job.
Figure 8 Viewing the job status
Helpful Links
- For more data development practices on DataArts Studio, see DataArts Studio Advanced Data Development Practices.
- For more information about how to develop jobs on DataArts Studio, see Job Development Process.
- For more MRS application development sample programs, see MRS Developer Guide.
Feedback
Was this page helpful?
Provide feedbackThank you very much for your feedback. We will continue working to improve the documentation.See the reply and handling status in My Cloud VOC.
For any further questions, feel free to contact us through the chatbot.
Chatbot


