Viewing and Exporting Verification Results
After the verification tasks on the source and the target are executed, you can view and export the verification results of tables by batch. A batch is a group of verification tasks executed on the same day. If a task is executed multiple times on a single day, only the latest verification results are included in the statistics. Its previous results will be overwritten.
Prerequisites
You have created and executed verification tasks.
Precautions
- When sum operations (like sum or allsum) are performed, if the results exceed the valid digit limit of the Double type, the precision is lost. Additionally, when very large floating-point numbers are verified, the actual differences may not be detected if they exceed the significant digits that the Double type can represent. In such cases, the calculated differences may erroneously appear as 0.
- Task execution batches are named based on the time zone of the MgC Agent currently in use.
Viewing Verification Results
- Sign in to the MgC console. In the navigation pane, under Project, select your big data migration project from the drop-down list.
- In the navigation pane, choose Migrate > Big Data Verification.
- In the Features area, click Verification Results.
- Select a task batch (date). Batches are named based on the time zone of the MgC Agent currently in use.

- In the list, perform the following operations on a table:
- View the verification details of table partitions by clicking the View in the Partitions column. Then click View Details to view the verification results of a table partition.
- View the historical verification results by clicking View History in the Operation column.
Recording Inconsistency Causes
On the Verification Results page, you can specify the types of inconsistency causes and record specific causes for tables that fail verification. The system pre-defines 10 types of common inconsistency causes.
- On the Verification Results page, you can filter the execution results for each verification batch (date).
- Locate the table that fails the verification and click Analyze Cause under Fail in the Verification Result column.

- Select a cause type from the Cause Type drop-down list. If the pre-defined types cannot meet your requirements, you can select Custom and enter a cause type in the text box.
- In the Processing Status drop-down list, specify whether the inconsistencies have been addressed. This setting affects the calculation of post-processing verification pass rate. The rules are as follows:
- If you select Processed or Processing not required, the table will be counted toward the post-processing pass rate. If you select Processing not required and enable Propagate processing status, the table's processing status will be inherited in future verification results.
- If you select Not processed, the table will be considered a failed table in the post-processing statistics.
- Record the inconsistency cause and click Confirm. You can view the inconsistency cause in the Cause Type column.
Then you can perform the following operations:
- Click View History in the Operation column to view the historical execution batches, verification results, and inconsistency causes of each table.
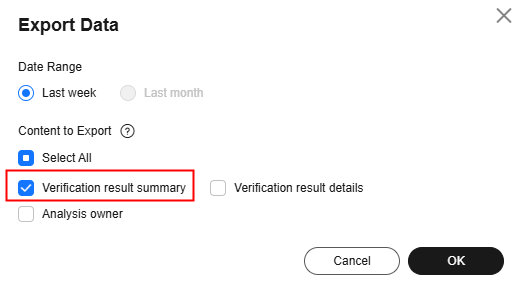
- Export the verification results and inconsistency causes for further analysis. For details, see Exporting Data. Select Verification result summary for Content to Export.

 In the exported file:
- For each table, the same cause types are combined and displayed, and different cause types are separated by semicolons (;).
- The cause descriptions are displayed based on execution batches and are separated by semicolons (;).
Exporting Verification Results
- On the Verification Results page, choose Export > Export Verification Results.
- Select a batch and table group, and then click Confirm.
- After the export is complete, click Manage Exports.
- Click Download in the Operation column to download the verification results.
Exporting Data
- On the Verification Results page, choose Export > Export Data.
Figure 1 Export Data

- Select the date range and content to be exported, and click OK. The system starts to export the data.
Figure 2 Selecting the scope of data to be exported

- After the export is complete, click Manage Exports.
- Click Download in the Operation column to download the verification results.
Feedback
Was this page helpful?
Provide feedbackThank you very much for your feedback. We will continue working to improve the documentation.See the reply and handling status in My Cloud VOC.
For any further questions, feel free to contact us through the chatbot.
Chatbot


