
Using KooSearch APIs to Provide Search and Q&A
KooSearch APIs can be published to different environments, where they can be called to access the corresponding KooSearch services.
Scenarios
After a KooSearch service is enabled, related KooSearch APIs are automatically created. On the API Management tab of the KooSearch service details page, you can see two types of APIs: Knowledge Bases and Document Parsing.
- Knowledge Bases: This type of APIs is used for knowledge base management, such as uploading and querying documents.
- Document Parsing: This type of APIs is used to process documents, for example, parsing documents.
Users can access KooSearch services by calling the corresponding KooSearch APIs deployed in their environments. The procedure is as follows:
- Configure an API gateway using the APIG service: Configuring an API Gateway.
- Publish KooSearch APIs on the CSS management console: Publishing a KooSearch API.
- Call the published KooSearch APIs in your service environment: Calling a Published KooSearch API.
To change the user authentication method for a published KooSearch API, perform Editing an API.
To cancel a published KooSearch API, making it unavailable, perform Taking an API Offline.
Configuring an API Gateway
- Create an API gateway. For details, see Creating a Gateway.

The gateway must be in the same VPC and subnet as KooSearch.
- Create an API group. For details, see Creating an API Group. An API group contains APIs used for the same service. You must create a group before creating an API.
- Create the environment where the API can be called. For details, see Configuring the Environment and Environment Variables. APIs can be published in different customized environments, such as development and testing environments. RELEASE is the default environment provided by APIG.
Publishing a KooSearch API
Publish a KooSearch API in a target environment.
- Go to the details page of a KooSearch service.
- Log in to the CSS management console.
- In the navigation pane on the left, choose KooSearch > KooSearch Document Q&A.
- Click the name of the target service to go to the service details page.
- Click the API Management tab.
- Select the API you want to publish and click Publish in the Operation column.
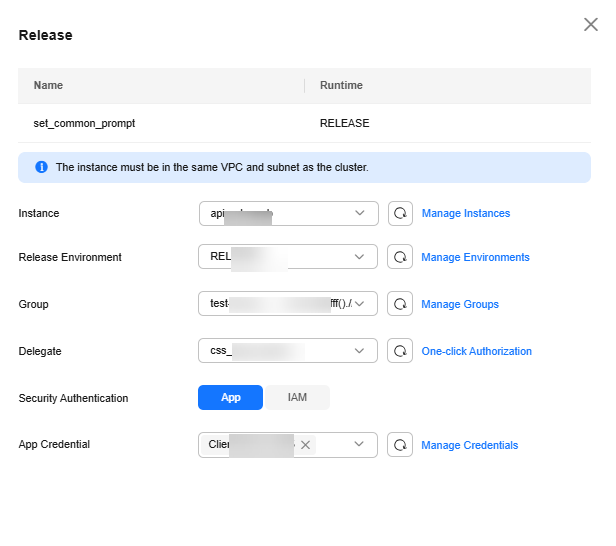
- On the displayed page, configure the API gateway information.
Table 1 Publishing a KooSearch API Parameter
Description
Instance
To use APIG, you need to buy an instance first. To do that, click Manage Instances on the right. For details, see Creating a Gateway.
NOTE:The gateway must be in the same VPC and subnet as KooSearch.
Release Environment
An API can be called in different scenarios, such as the production environment (RELEASE) or other custom environments.
For this parameter, you are advised to select RELEASE, which is the default online environment for official APIs. Only the APIs released in RELEASE can be made available for sales.
For how to create a custom environment, see Configuring the Environment and Environment Variables.
Group
An API group contains different APIs used for the same service.
You are advised to select the default group DEFAULT, which is automatically generated by the system. All APIs in the group can be accessed via an EIP or private IP address.
For how to create a custom group, see Creating an API Group.
Agency Name
Select an IAM agency to grant the current account the permission to access and use APIG.- If you are configuring an agency for the first time, click Automatically Create IAM Agency to create css-apig-agency.
- If there is an IAM agency automatically created earlier, you can click One-click authorization to have the permissions associated with the APIG Administrator role or the APIG FullAccess system policy deleted automatically, and have the following custom policies added automatically instead to implement more refined permissions control.
"apig:vpcChannels:*",
"apig:apis:*",
"apig:instances:*",
"apig:envs:*",
"apig:groups:*",
"apig:apps:*"
- To use Automatically Create IAM Agency and One-click authorization, the following minimum permissions are required:
"iam:agencies:listAgencies",
"iam:roles:listRoles",
"iam:agencies:getAgency",
"iam:agencies:createAgency",
"iam:permissions:listRolesForAgency",
"iam:permissions:grantRoleToAgency",
"iam:permissions:listRolesForAgencyOnProject",
"iam:permissions:revokeRoleFromAgency",
"iam:roles:createRole"
- To use an IAM agency, the following minimum permissions are required:
"iam:agencies:listAgencies",
"iam:agencies:getAgency",
"iam:permissions:listRolesForAgencyOnProject",
"iam:permissions:listRolesForAgency"
Security Authentication
Two authentication methods are available: App authentication (recommended) and IAM authentication.
- App: Requests for the API will be authenticated by APIG. App authentication has multiple authentication paths. AppCode authentication is recommended.
- An AppCode is part of a credential used to call APIs in simple authentication mode. In this mode, the X-Apig-AppCode parameter (whose value is an AppCode on the credential details page) is added to the HTTP request header for quick response. APIG verifies only the AppCode, yet the request content does not need to be signed. The procedure is as follows:
- Choose Cloud Secret Management Service > Secrets.
Figure 1 Cloud Secret Management Service
- On the Credentials page, click Create Credential. On the displayed page, specify the necessary parameters.
Name: credential name, which can contain 3 to 64 characters and must start with a letter. Only letters, digits, and underscores (_) are allowed.
Description: credential description; length: 1 to 255 characters.

- Click OK.
- Click the name of the newly created credential to go to the credential details page.
- Click Add AppCode.

- Set AppCode Type to Automatically generated, and click OK.
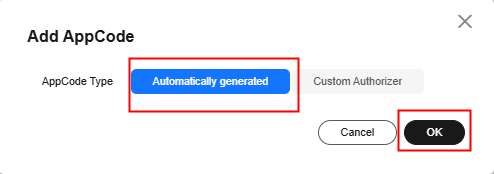
- The generated AppCode is displayed in the list.
After the AppCode is added, you can use it for simple authentication of API requests.
When sending a request, add the X-Apig-AppCode parameter to the request header and omit the request signature.
For example, when using curl, add the X-Apig-AppCode parameter to the request header and set the parameter value to the generated AppCode.
curl -X GET "https://api.exampledemo.com/testapi" -H "content-type: application/json" -H "host: api.exampledemo.com" -H "X-Apig-AppCode: xhrJVJKABSOxc7d***********FZL4gSHEXkCMQC"
- After the credential is created, return to the Publish Credential page, select the newly created credential, and go to the next step.
- Choose Cloud Secret Management Service > Secrets.
- Use a key pair (key and secret) for authentication. You need to create a credential on APIG to generate a credential ID and key pair. Then, bind the created credential to your API. This will allow access to your API while using App authentication. When you call an API, the client replaces the key pair in the SDK with your own key pair so that APIG can authenticate your identity. For how to create a credential, see Configuring Authentication Credentials.
- An AppCode is part of a credential used to call APIs in simple authentication mode. In this mode, the X-Apig-AppCode parameter (whose value is an AppCode on the credential details page) is added to the HTTP request header for quick response. APIG verifies only the AppCode, yet the request content does not need to be signed. The procedure is as follows:
- IAM: Requests for the API will be authenticated by IAM.
NOTE:
If you set the authentication mode of an API to Huawei IAM, any APIG user can access the API, which can result in excessive charges if the API is attacked by malicious traffic.
- Click OK.
When the API status changes to Published (or Released), the API has been published to the target environment and is now callable.

Calling a Published KooSearch API
Call a published KooSearch API in your environment.
For details, see .
Editing an API
The authentication mode can be changed for a published API.
- Go to the details page of a KooSearch service.
- Log in to the CSS management console.
- In the navigation pane on the left, choose KooSearch > KooSearch Document Q&A.
- Click the name of the target service to go to the service details page.
- Click the API Management tab.
- Select a published API and click Edit in the Operation column.
- On the Edit page, change the API's authentication mode.
- IAM: Requests for the API will be authenticated by IAM.
If you set the authentication mode of an API to Huawei IAM, any APIG user can access the API, which can result in excessive charges if the API is attacked by malicious traffic.
- IAM: Requests for the API will be authenticated by IAM.
- Click OK.
Taking an API Offline
You can remove APIs that you do not need from the environments where the APIs have been published.
This operation will make the APIs inaccessible in these environments. Ensure that you have notified the users before performing this operation.
- Go to the details page of a KooSearch service.
- Log in to the CSS management console.
- In the navigation pane on the left, choose KooSearch > KooSearch Document Q&A.
- Click the name of the target service to go to the service details page.
- Click the API Management tab.
- Select an API and click Offline in the Operation column.
- On the displayed page, set Instance, Offline Environment, and Agency Name, and then click OK.
- The API is successfully taken offline when its status changes to Not Released.
Feedback
Was this page helpful?
Provide feedbackThank you very much for your feedback. We will continue working to improve the documentation.See the reply and handling status in My Cloud VOC.
For any further questions, feel free to contact us through the chatbot.
Chatbot


