Enabling Application Protection
Scenario
To protect Java applications, enable protection for the applications. To apply protection settings, HSS will install the RASP probe on your applications.
How to Enable
|
How to Enable |
Advantage |
Restriction |
Operation |
|---|---|---|---|
|
Automatically |
|
|
|
|
Manually |
Java applications without listening ports can be accessed. |
You need to manually configure application protection startup parameters for applications. |
Automatically Enabling Application Protection
- Log in to the HSS console.
- Click
 in the upper left corner and select a region or project.
 - Choose . Click the Servers tab.
Figure 1 Viewing protected assets

- (Optional) If you have enabled the enterprise project function, select an enterprise project from the Enterprise Project drop-down list in the upper part of the page to view its data.
- Click Add Server. The Add Server slide-out panel is displayed.
- Select the OS type and assets to be protected, and click Next.
Figure 2 Selecting assets to be protected
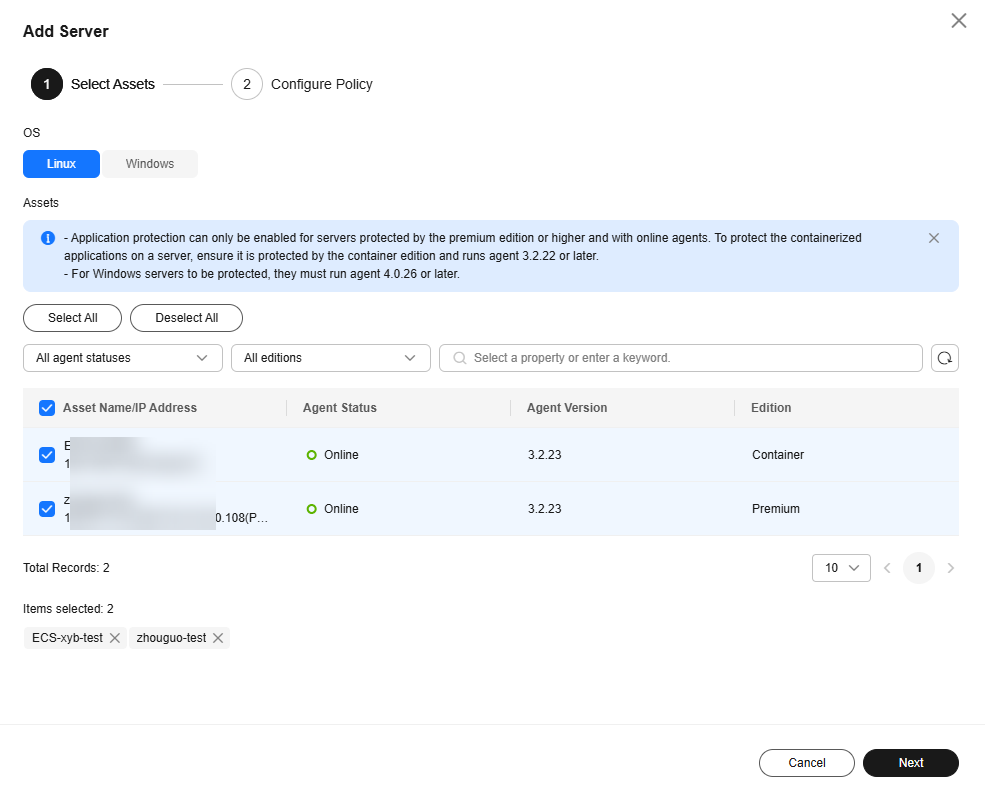
- Configure a protection policy. For more information, see Table 1.
Figure 3 Configuring a protection policy
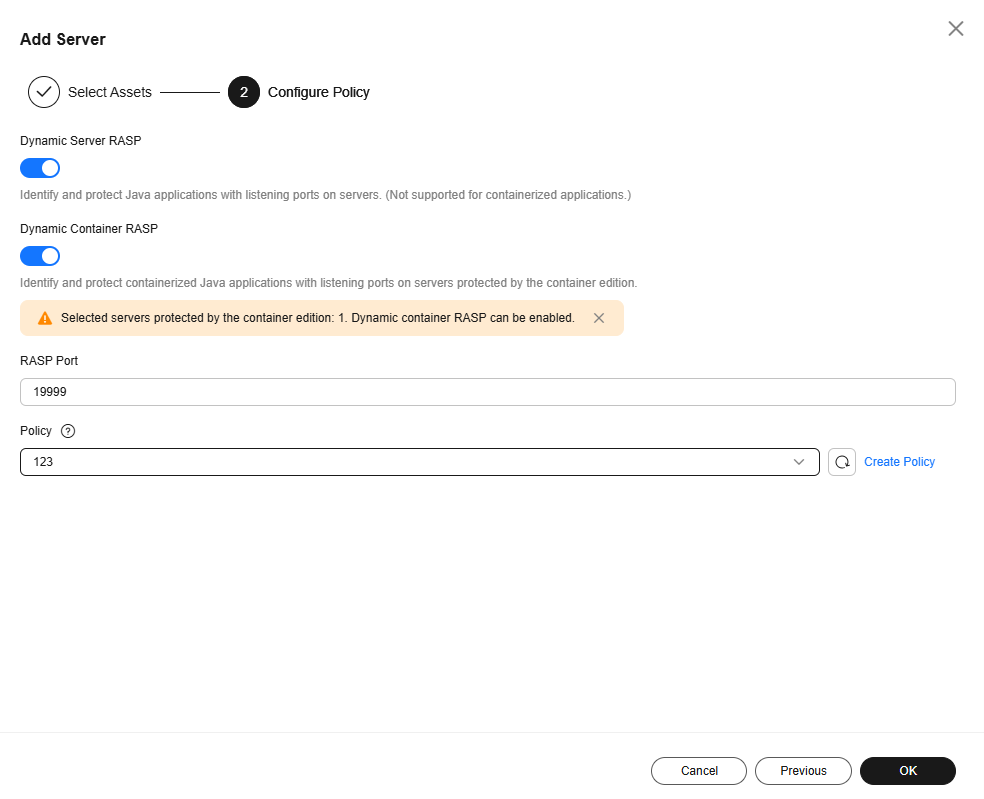
Table 1 Protection policy parameters Parameter
Description
Example Value
Dynamic Server RASP
Whether to automatically enable dynamic protection for server applications.
If this function is enabled, the system uses the JVM Attach mechanism to automatically identify Java applications that have listening ports on servers and dynamically enable protection for the applications. In this way, RASP probes can be dynamically installed and uninstalled when Java applications are running. No application restarts are required, and service continuity remains unaffected.
NOTE:This function is in the OBT phase. To use it, submit a service ticket.
 , enabled
Dynamic Container RASP
Whether to automatically enable dynamic protection for container applications.
If this function is enabled, the system uses the JVM Attach mechanism to automatically identify Java applications that have listening ports on containers and dynamically enable protection for the applications. In this way, RASP probes can be dynamically installed and uninstalled when Java applications are running. No application restarts are required, and service continuity remains unaffected.
NOTE:This function is in the OBT phase. To use it, submit a service ticket.
 , enabled
RASP Port
Port used by the RASP probe to communicate with HSS.
19999
Policy
Application protection policy.
The system provides the default policy. For details about the detection rules in the default policy, see Default Policies.
If the default policy does not apply to your protection scenario, you can click Create Policy and create a custom policy. For details, see Adding a Policy.
default policy
- Click OK.
- On the Servers tab page, check whether the RASP Status of the server is Protected. If yes, RASP has been enabled for all the Java applications on the server.
Manually Enabling Application Protection for a Server
- Log in to the HSS console.
- Click
 in the upper left corner and select a region or project.
 - Choose . Click the Servers tab.
Figure 4 Viewing protected assets

- (Optional) If you have enabled the enterprise project function, select an enterprise project from the Enterprise Project drop-down list in the upper part of the page to view its data.
- Click Add Server. The Add Server slide-out panel is displayed.
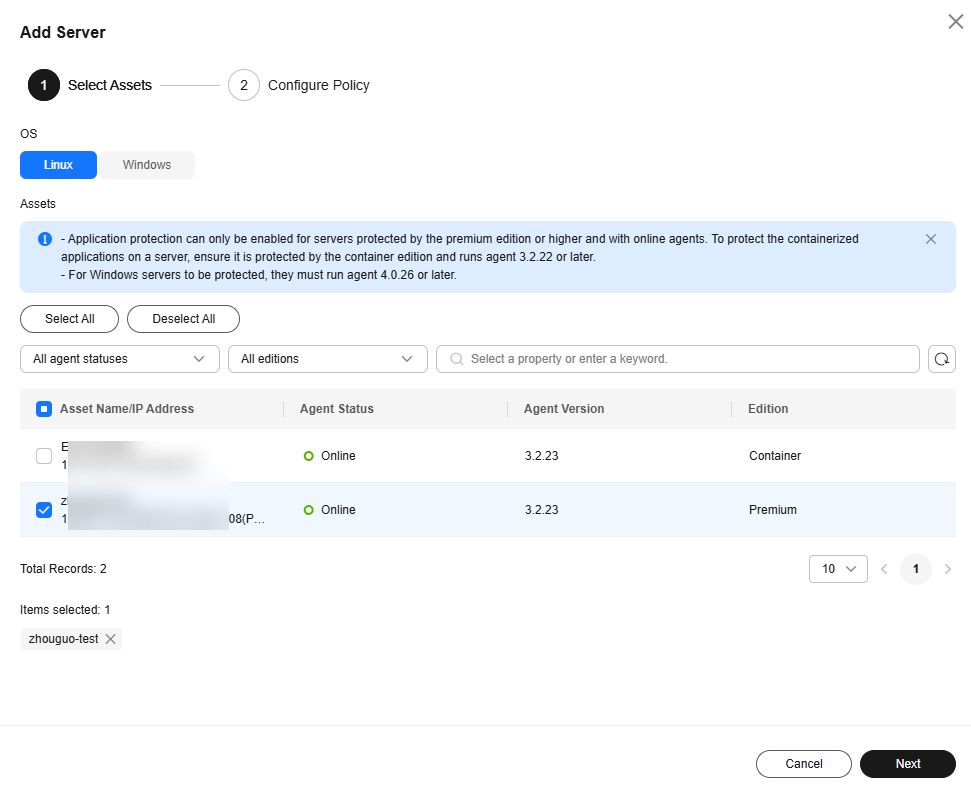
- Select the OS type and assets to be protected, and click Next.
Figure 5 Selecting assets to be protected
- Configure a protection policy. For more information, see Table 2.
Figure 6 Configuring a protection policy
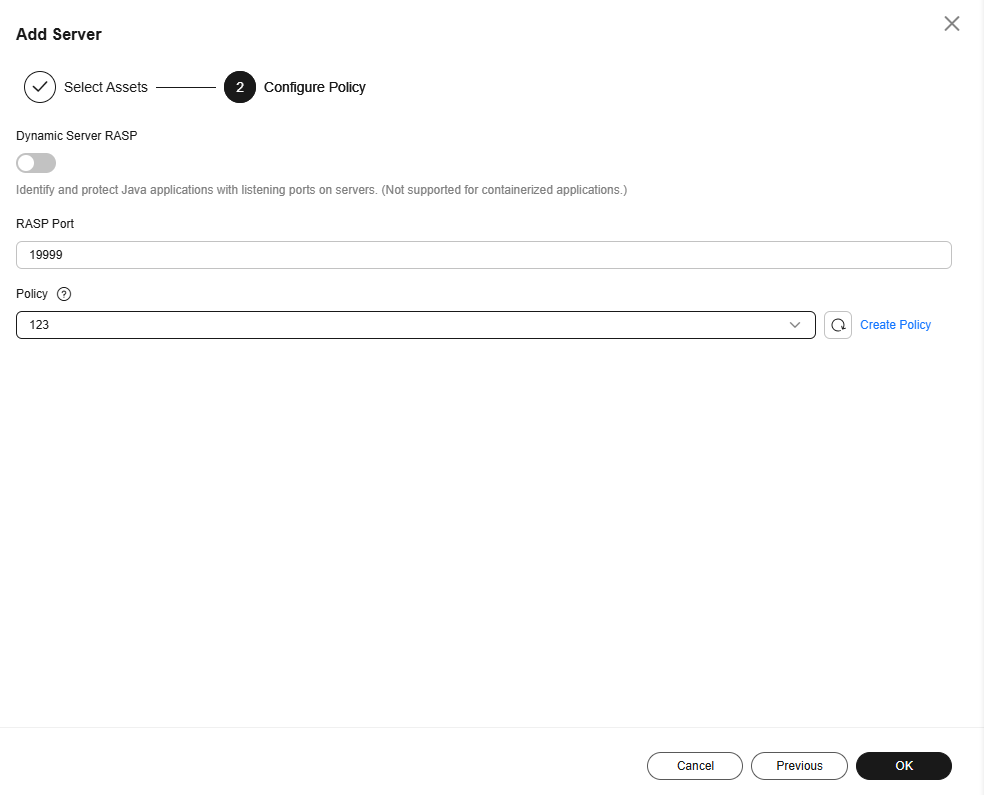
Table 2 Protection policy parameters Parameter
Description
Example Value
Dynamic Server RASP
NOTE:This function is in the OBT phase. To use it, submit a service ticket.
Java applications without listening ports do not support RASP dynamic protection. Keep it disabled.
 , disabled
RASP Port
Port used by the RASP probe to communicate with HSS.
19999
Policy
Application protection policy.
The system provides the default policy. For details about the detection rules in the default policy, see Default Policies.
If the default policy does not apply to your protection scenario, you can click Create Policy and create a custom policy. For details, seeAdding a Policy.
default policy
- Click OK.
- On the Servers tab page, check the RASP Status of the server and wait until its status changes to Unprotected.
- Click Manual Configuration. The Configure Microservice RASP page is displayed.
- Refer to the Servers page or the following description to configure startup parameters for Java applications.
- Tomcat (Windows)
Perform the following operations on each application one by one to enable RASP:
- Copy the following parameters to the setenv.bat startup script in the Tomcat bin directory. If the script does not exist, create one.
call "C:\Program Files\HostGuard\rasp\secRASP\slave_agent\bin\set_java_opts.bat"
Figure 7 shows the parameter location. - Restart the application. After the restart succeeds, return to the HSS console.
- In the Operation column of the server, click View Details. On the application protection details page, check whether the RASP Status of the application is Protected. If yes, RASP has been enabled.
- Copy the following parameters to the setenv.bat startup script in the Tomcat bin directory. If the script does not exist, create one.
- Tomcat (Linux)
Perform the following operations on each application one by one to enable RASP:
-
Copy the following parameters to the setenv.sh startup script in the Tomcat bin directory. (If the script does not exist, create one.)
SEC_RASP_HOME=/usr/local/rasp/secRASP
if [ -f "$SEC_RASP_HOME/slave_agent/bin/set_java_opts.sh" ]; then
. $SEC_RASP_HOME/slave_agent/bin/set_java_opts.sh
fi
Figure 8 shows the parameter location.
- Restart the application. After the restart succeeds, return to the HSS console.
- In the Operation column of the server, click View Details. On the application protection details page, check whether the RASP Status of the application is Protected. If yes, RASP has been enabled.
-
- Weblogic (Linux)
Perform the following operations on each application one by one to enable RASP:
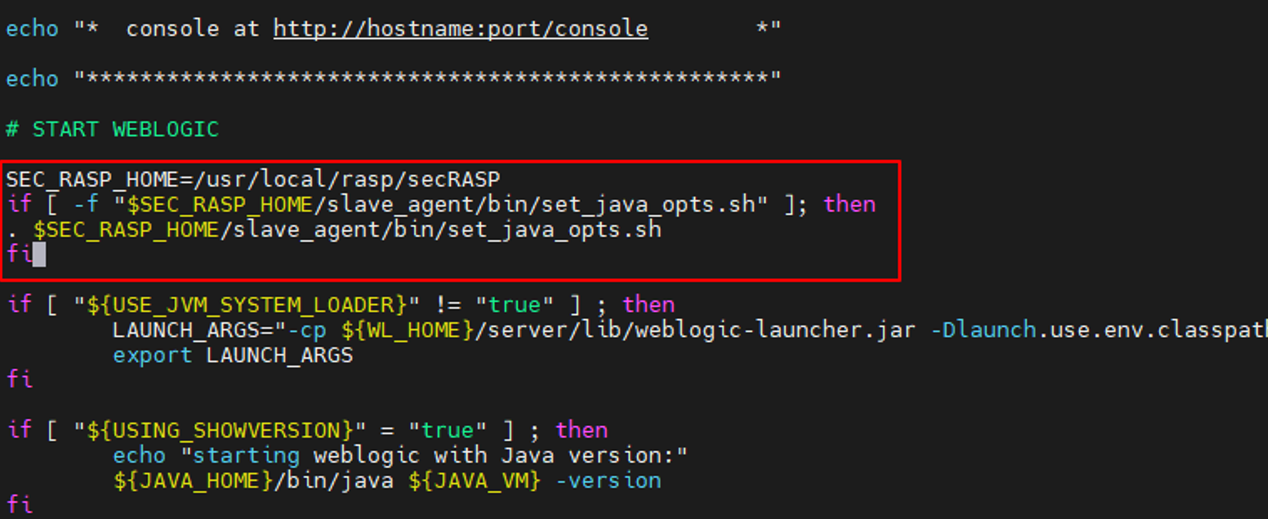
- Copy the following parameters to the startWebLogic.sh script in the bin directory of WebLogic:
SEC_RASP_HOME=/usr/local/rasp/secRASP
if [ -f "$SEC_RASP_HOME/slave_agent/bin/set_java_opts.sh" ]; then
. $SEC_RASP_HOME/slave_agent/bin/set_java_opts.sh
fi
Figure 9 shows the parameter location.
- Restart the application. After the restart succeeds, return to the HSS console.
- In the Operation column of the server, click View Details. On the application protection details page, check whether the RASP Status of the application is Protected. If yes, RASP has been enabled.
- Copy the following parameters to the startWebLogic.sh script in the bin directory of WebLogic:
- Netty (Linux)
Perform the following operations on each application one by one to enable RASP:
- Create a start.sh file in the Netty directory (the directory that contains the *netty-xxx.jar file). Copy and paste the following configuration to the file, and change the name of the Netty program (the .jar file) to the actual program name.
#!/bin/bash

SEC_RASP_HOME=/usr/local/rasp/secRASP
if [ -f "$SEC_RASP_HOME/slave_agent/bin/set_java_opts.sh" ]; then
. $SEC_RASP_HOME/slave_agent/bin/set_java_opts.sh
fi

java ${JAVA_OPTS} -jar netty-target-1.0-SNAPSHOT.jar
Figure 10 shows the parameter location.
- Restart the application. After the restart succeeds, return to the HSS console.
- In the Operation column of the server, click View Details. On the application protection details page, check whether the RASP Status of the application is Protected. If yes, RASP has been enabled.
- Create a start.sh file in the Netty directory (the directory that contains the *netty-xxx.jar file). Copy and paste the following configuration to the file, and change the name of the Netty program (the .jar file) to the actual program name.
- Jetty (Linux)
Perform the following operations on each application one by one to enable RASP:
- Create a start.sh file in the Jetty directory (the directory that contains start.jar) and copy the following configuration to the file:
#!/bin/bash

SEC_RASP_HOME=/usr/local/rasp/secRASP
if [ -f "$SEC_RASP_HOME/slave_agent/bin/set_java_opts.sh" ]; then
. $SEC_RASP_HOME/slave_agent/bin/set_java_opts.sh
fi

java ${JAVA_OPTS} -jar start.jar
Figure 11 shows the parameter location.
- Restart the application. After the restart succeeds, return to the HSS console.
- In the Operation column of the server, click View Details. On the application protection details page, check whether the RASP Status of the application is Protected. If yes, RASP has been enabled.
- Create a start.sh file in the Jetty directory (the directory that contains start.jar) and copy the following configuration to the file:
- Tomcat (Windows)
Manually Enabling Application Protection for a Container
- Log in to the HSS console.
- Click
 in the upper left corner and select a region or project.
 - Choose . Click the Servers tab.
Figure 12 Viewing protected assets

- (Optional) If you have enabled the enterprise project function, select an enterprise project from the Enterprise Project drop-down list in the upper part of the page to view its data.
- Click Add Server. The Add Server slide-out panel is displayed.
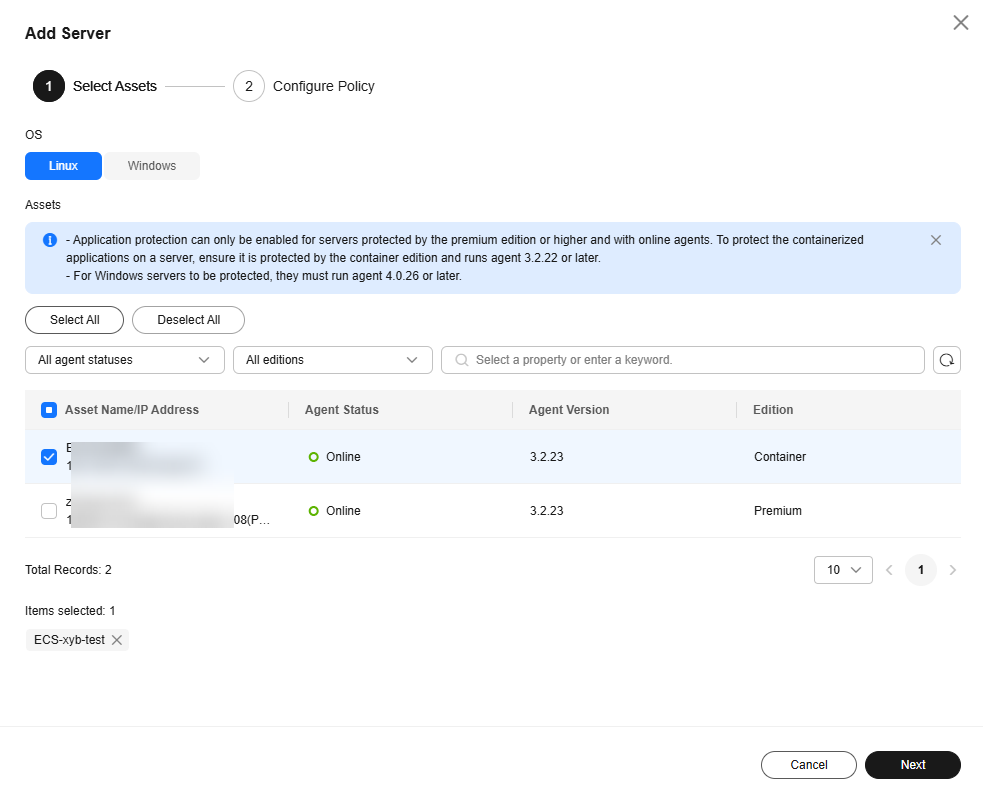
- Select the OS type and assets to be protected, and click Next.
Figure 13 Selecting assets to be protected
- Configure a protection policy. For more information, see Table 3.
Figure 14 Configuring a protection policy
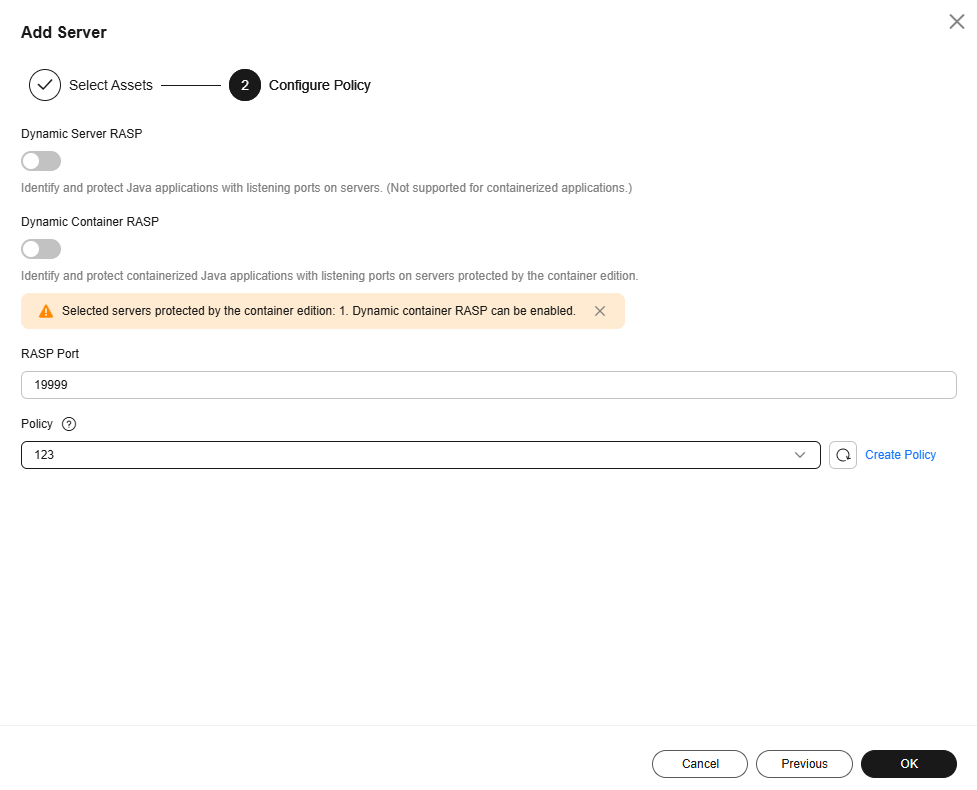
Table 3 Protection policy parameters Parameter
Description
Example Value
Dynamic Server RASP
NOTE:This function is in the OBT phase. To use it, submit a service ticket.
Java applications without listening ports do not support RASP dynamic protection. Keep it disabled.
 , disabled
Dynamic Container RASP
NOTE:This function is in the OBT phase. To use it, submit a service ticket.
Java applications without listening ports do not support RASP dynamic protection. Keep it disabled.
 , disabled
RASP Port
Port used by the RASP probe to communicate with HSS.
19999
Policy
Application protection policy.
The system provides the default policy. For details about the detection rules in the default policy, see Default Policies.
If the default policy does not apply to your protection scenario, you can click Create Policy and create a custom policy. For details, seeAdding a Policy.
default policy
- Click OK.
- On the Servers tab page, check the RASP Status of the server and wait until its status changes to Unprotected.
- Click Manual Configuration. The Configure Microservice RASP page is displayed.
- Refer to the Containers page or the following description to configure startup parameters for Java applications.
- Starting a container using Docker
Perform the following operations on each application one by one to enable RASP:
- Add JVM startup parameters using either of the following methods:
- Method 1: Modify the parameters in the application startup script, as shown in Table 4.
Table 4 Modifying application startup script parameters Environment
Parameter Configuration
Tomcat (Linux)
Copy the following parameters to the setenv.sh startup script in the Tomcat bin directory. (If the script does not exist, create one.)SEC_RASP_HOME=/usr/local/rasp/secRASP if [ -f "$SEC_RASP_HOME/slave_agent/bin/set_java_opts.sh" ]; then . $SEC_RASP_HOME/slave_agent/bin/set_java_opts.sh fi
Figure 15 shows the parameter location.
Weblogic (Linux)
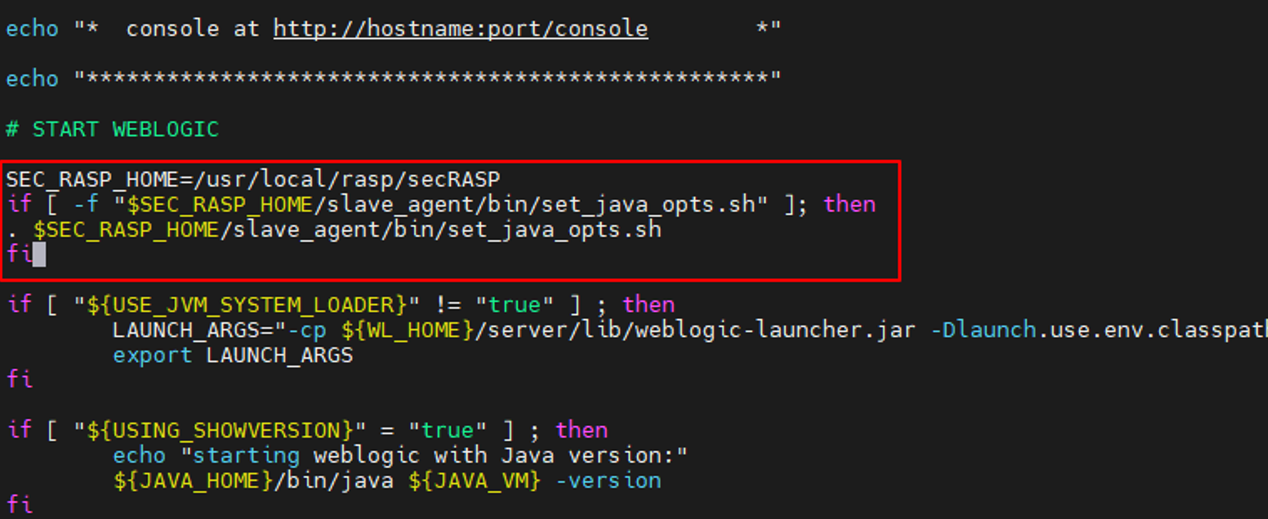
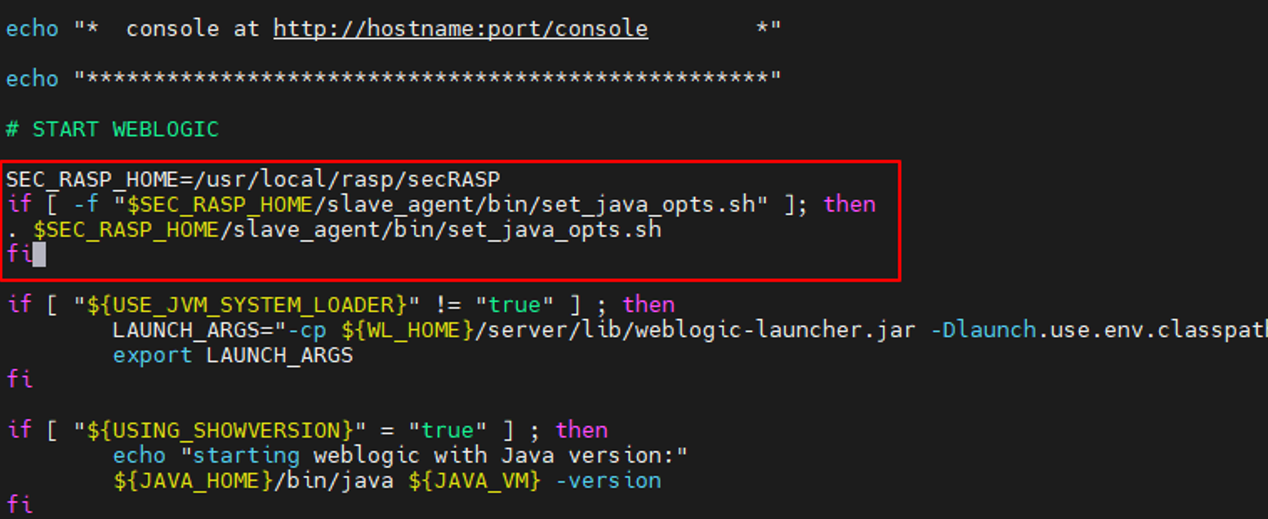
Copy the following parameters to the startWebLogic.sh script in the bin directory of WebLogic:SEC_RASP_HOME=/usr/local/rasp/secRASP if [ -f "$SEC_RASP_HOME/slave_agent/bin/set_java_opts.sh" ]; then . $SEC_RASP_HOME/slave_agent/bin/set_java_opts.sh fi
Figure 16 shows the parameter location.
Netty (Linux)
Create a start.sh file in the Netty directory (the directory that contains the *netty-xxx.jar file). Copy and paste the following configuration to the file, and change the name of the Netty program (the .jar file) to the actual program name.#!/bin/bash SEC_RASP_HOME=/usr/local/rasp/secRASP if [ -f "$SEC_RASP_HOME/slave_agent/bin/set_java_opts.sh" ]; then . $SEC_RASP_HOME/slave_agent/bin/set_java_opts.sh fi java ${JAVA_OPTS} -jar netty-target-1.0-SNAPSHOT.jarFigure 17 shows the parameter location.
Jetty (Linux)
Create a start.sh file in the Jetty directory (the directory that contains start.jar) and copy the following configuration to the file:#!/bin/bash SEC_RASP_HOME=/usr/local/rasp/secRASP if [ -f "$SEC_RASP_HOME/slave_agent/bin/set_java_opts.sh" ]; then . $SEC_RASP_HOME/slave_agent/bin/set_java_opts.sh fi java ${JAVA_OPTS} -jar start.jarFigure 18 shows the parameter location.
- Method 2: Add the following parameters to the Docker startup command to add environment variables:
--env JAVA_OPTS="-javaagent:/usr/local/rasp/secRASP/slave_agent/lib/secsoter.jar=socketType=0,socketFile=/usr/local/rasp/raspSocket/hss.rasp.socket,productScenario=HSS_Container,iVersion=V2"
- Method 1: Modify the parameters in the application startup script, as shown in Table 4.
- Add the following parameters to the Docker startup command to mount the RASP directory.
-v /usr/local/rasp:/usr/local/rasp
- Start the container. After the startup succeeds, return to the HSS console.
- In the Operation column of the server, click View Details. On the application protection details page, check whether the RASP Status of the application is Protected. If yes, RASP has been enabled.
- Add JVM startup parameters using either of the following methods:
- Starting a container using Dockerfile
Perform the following operations on each application one by one to enable RASP:
- During image packaging, modify the application startup script and add JVM startup parameters. See Table 5.
Table 5 Modifying the application startup script Environment
Parameter Configuration
Tomcat (Linux)
Copy the following parameters to the setenv.sh startup script in the Tomcat bin directory. (If the script does not exist, create one.)SEC_RASP_HOME=/usr/local/rasp/secRASP if [ -f "$SEC_RASP_HOME/slave_agent/bin/set_java_opts.sh" ]; then . $SEC_RASP_HOME/slave_agent/bin/set_java_opts.sh fi
Figure 19 shows the parameter location.
Weblogic (Linux)
Copy the following parameters to the startWebLogic.sh script in the bin directory of WebLogic:SEC_RASP_HOME=/usr/local/rasp/secRASP if [ -f "$SEC_RASP_HOME/slave_agent/bin/set_java_opts.sh" ]; then . $SEC_RASP_HOME/slave_agent/bin/set_java_opts.sh fi
Figure 20 shows the parameter location.
Netty (Linux)
Create a start.sh file in the Netty directory (the directory that contains the *netty-xxx.jar file). Copy and paste the following configuration to the file, and change the name of the Netty program (the .jar file) to the actual program name.#!/bin/bash SEC_RASP_HOME=/usr/local/rasp/secRASP if [ -f "$SEC_RASP_HOME/slave_agent/bin/set_java_opts.sh" ]; then . $SEC_RASP_HOME/slave_agent/bin/set_java_opts.sh fi java ${JAVA_OPTS} -jar netty-target-1.0-SNAPSHOT.jarFigure 21 shows the parameter location.
Jetty (Linux)
Create a start.sh file in the Jetty directory (the directory that contains start.jar) and copy the following configuration to the file:#!/bin/bash SEC_RASP_HOME=/usr/local/rasp/secRASP if [ -f "$SEC_RASP_HOME/slave_agent/bin/set_java_opts.sh" ]; then . $SEC_RASP_HOME/slave_agent/bin/set_java_opts.sh fi java ${JAVA_OPTS} -jar start.jarFigure 22 shows the parameter location.
- Add the following parameters to the Docker startup command to mount the RASP directory.
-v /usr/local/rasp:/usr/local/rasp
- Start the container. After the startup succeeds, return to the HSS console.
- In the Operation column of the server, click View Details. On the application protection details page, check whether the RASP Status of the application is Protected. If yes, RASP has been enabled.
- During image packaging, modify the application startup script and add JVM startup parameters. See Table 5.
- Starting a container using Docker Compose
Perform the following operations on each application one by one to enable RASP:
- Add the following setting to the docker-compose configuration file to configure JVM startup parameters:
environment:
   JAVA_OPTS: "-javaagent:/usr/local/rasp/secRASP/slave_agent/lib/secsoter.jar=socketType=0,socketFile=/usr/local/rasp/raspSocket/hss.rasp.socket,productScenario=HSS_Container,iVersion=V2"
- Add the following setting to the Docker Compose configuration file to mount the RASP directory:
   volumes:
   - /usr/local/rasp:/usr/local/rasp
- Start the container. After the startup succeeds, return to the HSS console.
- In the Operation column of the server, click View Details. On the application protection details page, check whether the RASP Status of the application is Protected. If yes, RASP has been enabled.
- Add the following setting to the docker-compose configuration file to configure JVM startup parameters:
- Managing containers through a Kubernetes cluster
Perform the following operations on each application one by one to enable RASP:
- Add the following setting to the Kubernetes configuration file to specify JVM startup parameters.
env: - name: JAVA_OPTS value: "-javaagent:/usr/local/rasp/secRASP/slave_agent/lib/secsoter.jar=socketType=0,socketFile=/usr/local/rasp/raspSocket/hss.rasp.socket,productScenario=HSS_Container,iVersion=V1" - Add the following setting to the Kubernetes configuration file to mount the RASP directory:
volumeMounts: - name: rasp-volume mountPath: /usr/local/rasp - Update the cluster. After the update succeeds, return to the HSS console.
- In the Operation column of the server, click View Details. On the application protection details page, check whether the RASP Status of the application is Protected. If yes, RASP has been enabled.
- Add the following setting to the Kubernetes configuration file to specify JVM startup parameters.
- Starting a container using Docker
Related Operations
To change a protected RASP port, click Edit Port in the Operation column of a server. After the port is changed, the system will restart the RASP plug-in. It will take several minutes.
References
- For details about how to adjust application protection policies, see Managing Application Protection Policies.
- After application protection is enabled, check and handle reported events in time to harden application security. For details, see Viewing Application Protection.
Feedback
Was this page helpful?
Provide feedbackThank you very much for your feedback. We will continue working to improve the documentation.See the reply and handling status in My Cloud VOC.
For any further questions, feel free to contact us through the chatbot.
Chatbot


