
Modifying FlexusX Instance Specifications
Scenarios
If the vCPU and memory specifications of your FlexusX instance do not meet service requirements, you can modify them.
Notes
- Downgrading FlexusX instance specifications (vCPU or memory) will reduce performance.
- The specifications of a FlexusX instance cannot be modified when the instance is in an intermediate state, such as starting, stopping, resetting the OS, or migrating, or when the capacity of EVS disks used by the instance is being expanded.
- Before modifying the specifications of a Windows instance, modify the SAN policy by following the instructions provided in What Should I Do If a Disk Is Offline? to prevent offline disks after the specifications are modified.
- A specification change failure may result in data loss for the FlexusX instance. Back up the data before the change. For details, see Backing Up a FlexusX Instance.
Constraints
The selected instances must use the same billing mode, use the same flavor, and be in the same AZ.
Billing
Modifying specifications will change how much you are billed for the instances. For details, see Pricing of a Changed Specification.
Preparations
If the NIC retaining is enabled in the OS, NIC flapping may happen after the instance specifications are modified. To prevent such issues, perform the following operations before modifying the specifications:
- Linux
Run the following commands on the ECS to delete the files with persistent and net included in their names in the network rule directory:
rm -fr /etc/udev/rules.d/*net*persistent*.rules
rm -fr /etc/udev/rules.d/*persistent*net*.rules
- Windows
Delete the following directories in the registry on the ECS:
HKEY_LOCAL_MACHINE\SOFTWARE\Microsoft\Windows NT\CurrentVersion\NetworkList\Profiles
HKEY_LOCAL_MACHINE\SOFTWARE\Microsoft\Windows NT\CurrentVersion\NetworkList\Signatures\Unmanaged
Figure 1 Registry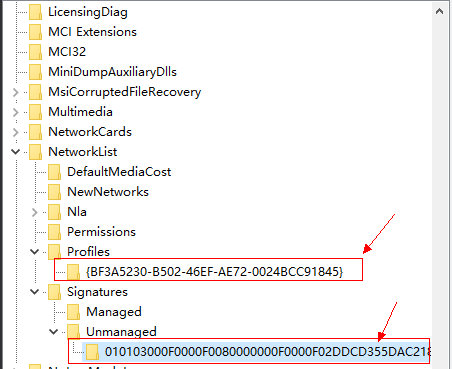
For more information about NIC flapping, see What Should I Do If NIC Flapping Occurs After My ECS Specifications Are Modified?
Procedure
You can change the specifications of a FlexusX instance to other FlexusX specifications, or you can change a FlexusX instance to an ECS for even more options.
- Log in to the FlexusX console, in the upper left corner, click
 , and select a region and project.
 - Locate the row that contains the target FlexusX instance and choose More > Modify Specifications in the Operation column.
- On the displayed page, select desired instance specifications.

- Read and agree to the agreement, and click Submit.
Wait until the modification is complete and check whether the specifications have been modified.
- Log in to the FlexusX console, in the upper left corner, click , and select a region and project.
- Select the Flexus X instances whose specifications you want to modify, choose More > Modify Specifications above the list, and click For Pay-per-Use FlexusX Instances or For Yearly/Monthly FlexusX Instances.
- On the displayed page, select desired instance specifications.
- Read and agree to the agreement, and click Submit.
Wait until the modification is complete and check whether the specifications have been modified.
- Log in to the FlexusX console, in the upper left corner, click , and select a region and project.
- Locate the row that contains the target FlexusX instance and choose More > Change to ECS in the Operation column.
- On the displayed page, select desired instance specifications.
- Before modifying the specifications, manually stop the FlexusX instance or select Authorize ECS Auto-stop.
- Select the new ECS type and specifications.
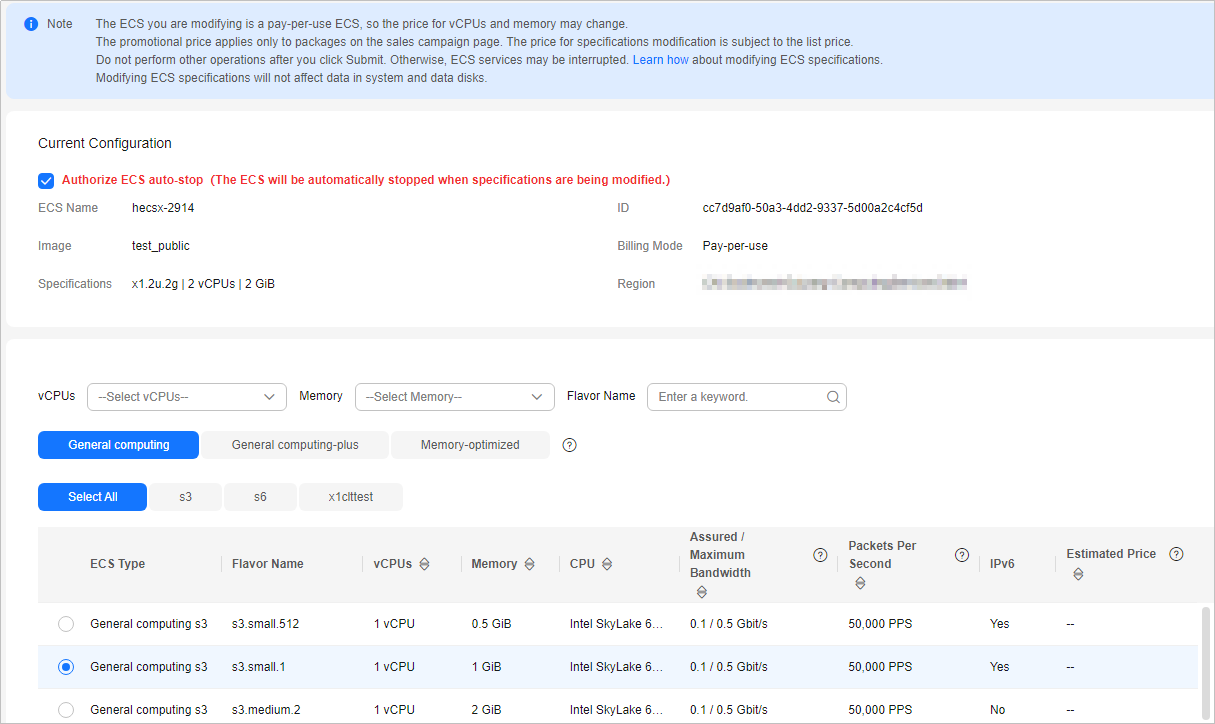
- Click Next.
- Confirm the settings, read and select the disclaimer, and then click Submit.
Wait until the modification is complete and check whether the specifications have been modified.
Follow-Up Operations
After the specifications of an instance are modified, disks may fail to be mounted. Check disk statuses after the specifications are modified.
- Linux: For details, see Why Does Disks Fail to Be Mounted After I Modify the Specifications of a Linux ECS?
Feedback
Was this page helpful?
Provide feedbackThank you very much for your feedback. We will continue working to improve the documentation.See the reply and handling status in My Cloud VOC.
For any further questions, feel free to contact us through the chatbot.
Chatbot


