Binding and Unbinding an EIP for a GaussDB Instance
Scenarios
You can bind an EIP to a GaussDB instance for public access and can unbind the EIP from an instance as required.
Precautions
- To ensure that the DB instance can be accessed, the security group used by the DB instance must allow access to the database port. For example, if the database port is 1611, ensure that the security group allows access to the port 1611.
- If a DB instance has already been bound with an EIP, you must unbind the EIP from the instance first before binding a new EIP to it.
- An EIP can be bound to only one node IP address of a DB instance.
- Security risks may arise after an EIP is bound to an instance. To enhance database security, set strict inbound and outbound rules for the security group. For details about how to configure a security group, see Configuring Security Group Rules.
Procedure
- Log in to the management console.
- Click
 in the upper left corner and select a region and project.
 - Click
 in the upper left corner of the page and choose .
 - On the Instances page, click the name of the target instance to go to the Basic Information page.
- In the Node List area, click Bind EIP in the Operation column.
For a distributed instance, switch to CN in the filter area first and then bind an EIP.Figure 1 Binding an EIP (distributed instance)
 Figure 2 Binding an EIP (centralized instance)
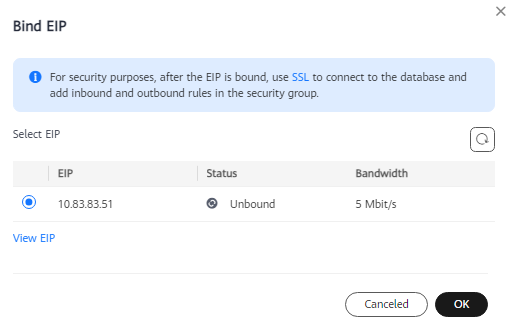
- In the displayed dialog box, all available unbound EIPs are listed. Select the required EIP and click OK.
If no available EIPs are displayed, click View EIP and obtain an EIP.
Figure 3 Binding an EIP
- In the Node List area, check the operation result in the EIP column.
Figure 4 Checking the binding result

To unbind the EIP from the instance, see Unbinding an EIP.
- Log in to the management console.
- Click
 in the upper left corner and select a region and project.
 - Click
 in the upper left corner of the page and choose .
 - On the Instances page, click the instance that has been bound with an EIP.
- In the Node List area, click Unbind EIP in the Operation column.
- For a distributed instance, switch to CN in the filter area first and then click Unbind EIP in the Operation column.
- For a centralized instance, click More and choose Unbind EIP in the Operation column.
Figure 5 Unbinding an EIP (distributed instance) Figure 6 Unbinding an EIP (centralized instance)
- In the displayed dialog box, click OK to unbind the EIP.
- If you have enabled operation protection, click Send Code in the displayed Identity Verification dialog box and enter the obtained verification code. Then, click OK.
Two-factor authentication improves the security of your account. For details about how to enable operation protection, see Identity and Access Management User Guide.
- In the Node List area, check the operation result in the EIP column.
To bind an EIP to the instance again, see Binding an EIP.
Feedback
Was this page helpful?
Provide feedbackThank you very much for your feedback. We will continue working to improve the documentation.See the reply and handling status in My Cloud VOC.
For any further questions, feel free to contact us through the chatbot.
Chatbot


