Configuring a Job for Synchronizing Data from MySQL to Elasticsearch (Internal Test)
Supported Source and Destination Database Versions
|
Source Database |
Destination Database |
|---|---|
|
MySQL database (5.6, 5.7, and 8.x) |
Elasticsearch database (7.x and 6.x) |
Database Account Permissions
Before you use DataArts Migration for data synchronization, ensure that the source and destination database accounts meet the requirements in the following table. Different types of synchronization tasks require different permissions. For details, see Table 2.
|
Type |
Required Permissions |
|---|---|
|
Source database connection account |
The source database account must have the following minimal permissions required for running SQL statements: SELECT, SHOW DATABASES, REPLICATION SLAVE and REPLICATION CLIENT. GRANT SELECT, SHOW DATABASES, REPLICATION SLAVE, REPLICATION CLIENT ON *.* TO 'Username'@'%'; |
|
Destination database connection account |
CSS clusters in security mode are not supported. HTTPS access cannot be enabled for CSS. |

- You are advised to create independent database accounts for DataArts Migration task connections to prevent task failures caused by password modification.
- After changing the account passwords for the source or destination databases, modify the connection information in Management Center as soon as possible to prevent automatic retries after a task failure. Automatic retries will lock the database accounts.
Supported Synchronization Objects
Table 3 lists the objects that can be synchronized in different scenarios.
|
Type |
Note |
|---|---|
|
Synchronization objects |
|
Notes
In addition to the constraints on supported data sources and versions, connection account permissions, and synchronization objects, you also need to pay attention to the notes in Table 4.
|
Type |
Constraint |
|---|---|
|
Database |
|
|
Usage |
General:
Full synchronization phase: During task startup and full data synchronization, do not perform DDL operations on the source database. Otherwise, the task may fail. Incremental synchronization phase:
Extraction from the standby database: Before extracting data from the standby database, ensure that a value can be returned after the SHOW MASTER STATUS command is executed on the standby database node. Otherwise, data jobs may be abnormal and data may be lost when the jobs are suspended and then resumed. Troubleshooting: If any problem occurs during task creation, startup, full synchronization, incremental synchronization, or completion, rectify the fault by referring to FAQs. |
|
Other |
Tables in the destination database can contain more columns than those in the source database. The following failures must be avoided: Assume that extra columns in the destination database cannot be null and have no default values. If newly inserted data records are synchronized from the source database to the destination database, the extra columns will become null, which does not meet the requirements of the destination database and will cause the task to fail. |
Procedure
This section uses real-time synchronization from RDS for MySQL to Elasticsearch as an example to describe how to configure a real-time data migration job. Before that, ensure that you have read the instructions described in Check Before Use and completed all the preparations.
- Create a real-time migration job by following the instructions in Creating a Real-Time Migration Job and go to the job configuration page.
- Select the data connection type. Select MySQL for Source and Elasticsearch for Destination.
Figure 1 Selecting the data connection type

- Select a job type. The default migration type is Real-time. The migration scenarios include Entire DB and Database/Table partition.
Figure 2 Setting the migration job type

- Configure network resources. Select the created MySQL and Elasticsearch data connections and the migration resource group for which the network connection has been configured.
Figure 3 Selecting data connections and a migration resource group


If no data connection is available, click Create to go to the Manage Data Connections page of the Management Center console and click Create Data Connection to create a connection. For details, see Configuring DataArts Studio Data Connection Parameters.
If no migration resource group is available, click Create to create one. For details, see Buying a DataArts Migration Resource Group Incremental Package.
- Check the network connectivity. After the data connections and migration resource group are configured, perform the following operations to check the connectivity between the data sources and the migration resource group.
- Click Source Configuration. The system will test the connectivity of the entire migration job.
- Click Test in the source and destination and migration resource group.

If the network connectivity is abnormal, see How Do I Troubleshoot a Network Disconnection Between the Data Source and Resource Group?
- Configure source parameters.
Select the databases and tables to be synchronized based on Table 5.
Table 5 Selecting the databases and tables to be synchronized Synchronization Scenario
Configuration Method
Entire DB
Select the MySQL databases and tables to be migrated.Figure 4 Selecting databases and tables
Both databases and tables can be customized. You can select one database and one table, or multiple databases and tables.
- Configure destination parameters.
- Set Database and Table Matching Policy.
For details about the matching policy between source and destination databases and tables in each synchronization scenario, see Table 6.
Table 6 Database and table matching policy Synchronization Scenario
Configuration Method
Entire DB
- Index matching policy
- Same name as the source table: Data will be synchronized to the Elasticsearch table with the same name as the source MySQL table.
- Custom: Data will be synchronized to the Elasticsearch table you specify.
Figure 5 Index matching policy in the entire DB migration scenario
 NOTE:
NOTE:When customizing an index matching policy, you can use built-in variable #{source_table_name} to identify the source table name. The table name must contain #{source_table_name}.
- Data source configuration at the destination
- Elasticsearch Version: 7.x and 6.x
- Configure Global Index Attributes: Global index attributes apply to all indexes. The attributes you configure here have a lower priority than those defined in Edit Index Attribute.
Supported attributes include sink.server.timezone (time zone), es.num.shards (number of shards), and es.num.replicas (number of replicas).
- Index matching policy
- Set Database and Table Matching Policy.
- Refresh and check the mapping between the source and destination tables. In addition, you can modify table attributes, add additional fields, and use the automatic table creation capability to create tables in the destination Elasticsearch database.
Figure 6 Mapping between source and destination tables

- Edit additional fields: Click Additional Field in the Operation column to add custom fields to the destination Elasticsearch index. The additional fields are also added to the table created for the Elasticsearch index. For a new table, you can add additional fields to the existing fields in the source table. You can customize the field name, select the field type, and enter the field value.
- Field Name: name of the new field in the destination Elasticsearch index
- Field Type: type of the new field in the destination Elasticsearch index
- Field Value: value source of the new field in the destination Elasticsearch index
Table 7 Additional field value obtaining mode Type
Example
Constant
Digits, letters, and special characters are supported. Color emoticons may cause a job submission failure.
Built-in variable
- Source host IP address: source.host
- Source schema name: source.schema
- Source table name: source.table
- Destination schema name: target.schema
- Destination table name: target.table
Source table field
Any field in the source table
Do not change the name of the source table field when the job is running. Otherwise, the job may be abnormal.
UDF
- substring(#col, pos[, len]): obtains a substring of a specified length from the source column name. The substring range is [pos, pos+len).
- date_format(#col, time_format[, src_tz, dst_tz]): formats the source column name based on a specified time format. The time zone can be converted using src_tz and dst_tz.
- now([tz]): obtains the current time in a specified time zone.
- if(cond_exp, str1, str2): returns str1 if the condition expression cond_exp is met and returns str2 otherwise.
- concat(#col[, #str, ...]): concatenates multiple parameters, including source columns and strings.
- from_unixtime(#col[, time_format]): formats a Unix timestamp based on a specified time format.
- unix_timestamp(#col[, precision, time_format]): converts a time into a Unix timestamp of a specified time format and precision. time_format must be the same as that in the source data.
- Edit index attributes.
Click Edit Index Attribute in the Operation column to configure Elasticsearch index attributes, including the index name, dynamic index name suffix, and index attributes.
Figure 7 Configuring Elasticsearch index attributes
- Index Name: The default value is the source table name, which cannot be changed.
- Custom Dynamic Index Name Suffix: UDFs are supported.
- Time format: date_format(#col_name, format, time zone), for example, date_format(#ts, yyyyMMdd, +8)
- Hash: hash(#col_name, algorithm_name, hash function input parameters...), for example, hash(#id, simple_hash, 5)
- Week in a year: week_in_year(#col_name), for example, week_in_year(#ts)
- Index Attributes: You can configure some advanced functions for a single table through parameters.
- Edit additional fields: Click Additional Field in the Operation column to add custom fields to the destination Elasticsearch index. The additional fields are also added to the table created for the Elasticsearch index. For a new table, you can add additional fields to the existing fields in the source table. You can customize the field name, select the field type, and enter the field value.
- Configure task parameters.
Table 8 Task parameters Parameter
Description
Default Value
Execution Memory
Memory allocated for job execution, which automatically changes with the number of CPU cores.
8 GB
CPU Cores
Value range: 2 to 32
For each CPU core added, 4 GB execution memory and one concurrency are automatically added.
2
Maximum Concurrent Requests
Maximum number of jobs that can be concurrently executed. This parameter does not need to be configured and automatically changes with the number of CPU cores.
1
Auto Retry
Whether to enable automatic retry upon a job failure
No
Maximum Retries
This parameter is displayed when Auto Retry is set to Yes.
1
Retry Interval (Seconds)
This parameter is displayed when Auto Retry is set to Yes.
120
Add Custom Attribute
You can add custom attributes to modify some job parameters and enable some advanced functions. For details, see Job Performance Optimization.
-
- Submit and run the job.
After configuring the job, click Submit in the upper left corner to submit the job.
Figure 8 Submitting the job
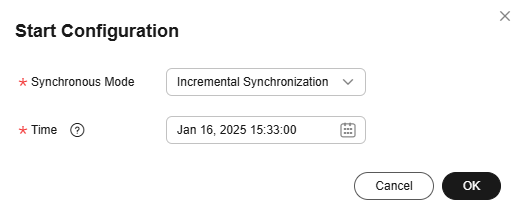
After submitting the job, click Start on the job development page. In the displayed dialog box, set required parameters and click OK.
Figure 9 Starting the job
Table 9 Parameters for starting the job Parameter
Description
Synchronous Mode
- Incremental Synchronization: Incremental data synchronization starts from a specified time point.
- Full and incremental synchronization: All data is synchronized first, and then incremental data is synchronized in real time.
Time
This parameter must be set for incremental synchronization, and it specifies the start time of incremental synchronization.
NOTE:If you set a time that is earlier than the earliest binlog time, the earliest log time is used.
- Monitor the job.
On the job development page, click Monitor to go to the Job Monitoring page. You can view the status and log of the job, and configure alarm rules for the job. For details, see Real-Time Migration Job O&M.
Figure 10 Going to Monitor Job page
Performance Tuning
If the synchronization speed is too slow, rectify the fault by referring to Job Performance Optimization.
Feedback
Was this page helpful?
Provide feedbackThank you very much for your feedback. We will continue working to improve the documentation.See the reply and handling status in My Cloud VOC.
For any further questions, feel free to contact us through the chatbot.
Chatbot


