
Setting Global Parameters
Large Screen Editing Page

|
Area |
Description |
|---|---|
|
Toolbar |
In the toolbar, you can align components to the left, center horizontally, align to the right, align to the top, center vertically, align to the bottom, bring to the front, or send to the back. |
|
Page configuration area |
Layers: Multiple layers are supported. You can configure layer groups, rotate layers, lock and hide layers, and more. Components: Add a variety of components to your large screen, including rich text, media, interactive controls, and materials to meet diverse needs. |
|
Data processing area |
You can select datasets, add data, modify data formats, and process data. |
|
Style configuration area |
Area for configuring the styles of data reports and components. |
Toolbar
- Undo: Click the undo button in the toolbar if you make a mistake in setting parameters.
- Redo: Click the redo button in the toolbar to restore the undo step if you make a mistake in undoing.
- Align Left: Align to the left margin based on the selected component or combination. If you select two or more components or combinations, the alignment rule is to align with the leftmost component or combination.
- Center Horizontally: Align to the center based on the middle position of the selected element.
- Align Right: Align to the right margin based on the selected component or combination. If you select two or more components or combinations, the alignment rule is to align with the rightmost component or combination.
- Align Top: Align to the top margin based on the selected component or combination. If you select two or more components or combinations, the alignment rule is to align with the topmost component or combination.
- Center Vertically: Align to the center based on the middle position of the selected element.
- Align Bottom: Align to the bottom margin based on the selected component or combination. If you select two or more components or combinations, the alignment rule is to align with the bottommost component or combination.
- Move Down: Move the component or combination down one layer.
- Move Up: Move the component or combination up one layer.
- Pin to Top: Bring the component to the front of the canvas.
- Pin to Bottom: Send the component to the back of the canvas.
- Zoom Canvas: Adjust the canvas zoom ratio, with a minimum value of 10% and a maximum value of 200%. You can adjust it through the scroll bar or drop-down box, and also support manually entering the zoom ratio. The shortcut key is Ctrl + mouse wheel.
Shortcut Keys
|
Operation |
win |
|---|---|
|
Undo |
Ctrl+Z |
|
Redo |
Ctrl+Y |
|
Duplicate |
Ctrl+D |
|
Delete |
Backspace |
|
Multi-select |
Ctrl + mouse click |
|
Group |
Ctrl+G |
|
Ungroup |
Shift+Ctrl+G |
|
Pin to Top |
Ctrl+Alt+] |
|
Pin to Bottom |
Ctrl+Alt+[ |
|
Move Up |
Ctrl+] |
|
Move Down |
Ctrl+[ |
|
Lock/Unlock |
Ctrl+l |
|
Unhide/Hide |
Ctrl+h |
|
Move Component Left/Right/Up/Down |
← → ↑ ↓ |
|
Preview |
F9 |
|
Save |
Ctrl+s |
|
Zoom Canvas |
Ctrl + mouse wheel |
|
Pan Canvas Left/Right |
Shift + mouse wheel |
|
Pan Canvas Up/Down |
Mouse wheel |
|
Drag Canvas |
Press and hold space bar and click mouse to drag |
Setting Large Screen Parameters
Set the following large screen parameters:
- Adjust the canvas zoom ratio, with a minimum value of 10% and a maximum value of 200%. You can adjust it through the scroll bar or drop-down box, and also support manually entering the zoom ratio. The shortcut key is Ctrl + mouse wheel.
Figure 2 Adjusting the size of the large screen in the canvas area using the slider
 Figure 3 Adjusting the size of the large screen in the canvas area using the drop-down list
- Toggle the grid on or off in the canvas.
Figure 4 Toggling the grid on
 Figure 5 Toggling the grid off
- Set the following large screen parameters:
- There are four screen sizes to choose from: 1280×720px, 1920×1080px, 2560×1440px, and 3840×2160px. You can control them through a drop-down list or customize the height and width of the screen by inputting your own values.
Figure 6 Controlling the screen size through a drop-down list
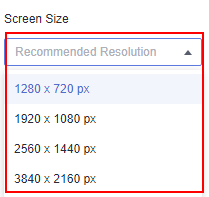 Figure 7 Controlling the screen size by customizing the height and width
- Adjust the background color of the canvas using the background color option.
Figure 8 Background color
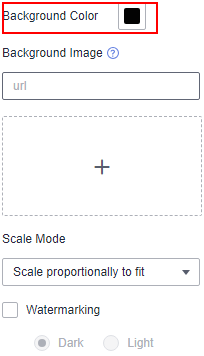
- Background image of the screen. You can upload the background image as required.

Use this feature with caution as it may result in the leakage of your background image data.
Figure 9 Background image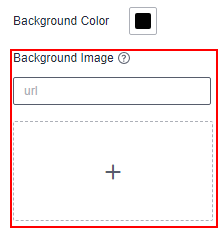
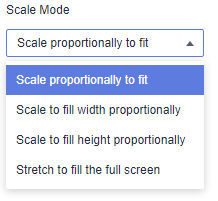
- There are four screen scaling modes to choose from: proportional scaling, proportional scaling to width, proportional scaling to height, and full-screen stretching.
Figure 10 Zoom mode
- There are four screen sizes to choose from: 1280×720px, 1920×1080px, 2560×1440px, and 3840×2160px. You can control them through a drop-down list or customize the height and width of the screen by inputting your own values.
|
Parameter |
Description |
Default Value |
|---|---|---|
|
Size of the large screen in the canvas area |
Size of the large screen displayed on the canvas, in percentage. The minimum value is 10% and the maximum value is 200%. |
100% |
|
Grid |
Toggle the grid on or off on the canvas. |
Toggle it on |
|
Screen size |
There are four screen sizes to choose from: 1280×720px, 1920×1080px, 2560×1440px, and 3840×2160px. |
1920×1080px |
|
Background color |
Adjust the background color of the canvas using the background color option. |
Black |
|
Background image |
You can upload your own background images for the screen as per your requirements. |
None |
|
Zoom mode |
There are four screen scaling modes to choose from: proportional scaling, proportional scaling to width, proportional scaling to height, and full-screen stretching. |
Proportional scaling |
Layer Group
Layer configuration can enhance the layout of the canvas, where each element in the canvas is considered a layer. This part explains how to configure layer groups. The following operations can be performed on layers:
- Group: Select two or more components by holding down Ctrl and clicking, then right-click to group them. The shortcut key for grouping is Ctrl+Shift+G.
- Move Down: Move the component down one layer in the layer list. The shortcut key is Ctrl+].
- Move Up: Move the component up one layer in the layer list. The shortcut key is Ctrl+[.
- Move to Front: Move the component to the front of the layer list. The shortcut key is Alt+Ctrl+].
- Move to Back: Move the component to the back of the layer list. The shortcut key is Alt+Ctrl+[.
- Duplicate: Quickly copy a component or group on the screen. The shortcut key is Ctrl+D.
- Hide: Hide a component or group. The shortcut key is Ctrl+H.
- Rename: Rename a component or group.

Flexibly Adjusting the Canvas Layout
This section explains the layout options for large screens, which allow for flexible adjustments to enhance the display of components on the canvas.
Compared to dashboards, large screens offer more flexibility in adjusting the canvas. You can freely drag and drop components and move them pixel by pixel. The toolbar on the top left can also be used to align components or groups to the left, center, or right, as well as to align them to the top, middle, or bottom, or to bring them to the front or back.

Reference Lines
To improve the usability of the large screen editor, DataArts Insight allows you to pull out reference lines on the left and top of the canvas, which always remain on top of the layers. The main function of reference lines is shown in Alignment, Definition, and Positioning.


Feedback
Was this page helpful?
Provide feedbackThank you very much for your feedback. We will continue working to improve the documentation.See the reply and handling status in My Cloud VOC.
For any further questions, feel free to contact us through the chatbot.
Chatbot


