Creating Embedded Analytics
You can embed dashboards, intelligent analysis assistants, and large screens from your project into other systems to integrate with other applications, making business integration more convenient. This enhances cross-platform data sharing and business collaboration, making them more efficient and intuitive. This section describes how to create embedded analytics.
Prerequisites
- There is a dashboard, intelligent analysis assistant, or large screen that has been published in the project.
- You have the analyst permission on the dashboard, intelligent analysis assistant, or large screen.
Procedure
- Log in to the DataArts Insight console.
- Click
 in the upper left corner of the management console to select a region. Then, select an enterprise project in the upper right corner.
 - On the top menu of the console, click Project. On the displayed My Projects page, click the name of the desired project.
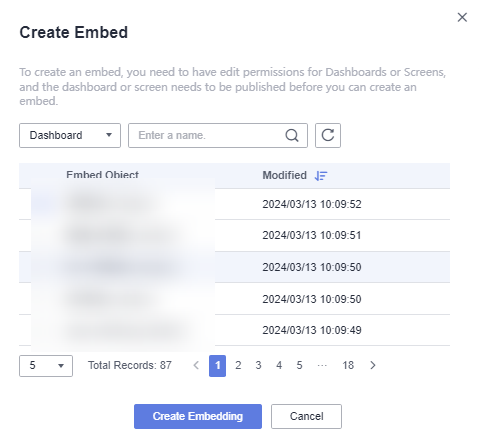
- In the navigation pane on the left, choose Work Management > Embedded Analytics. On the displayed page, click Create Embed in the upper right corner.
Figure 1 Embedded analytics

- In the Create Embed dialog box that appears, select the object for which you want to create an embed and click Enable Embedding.
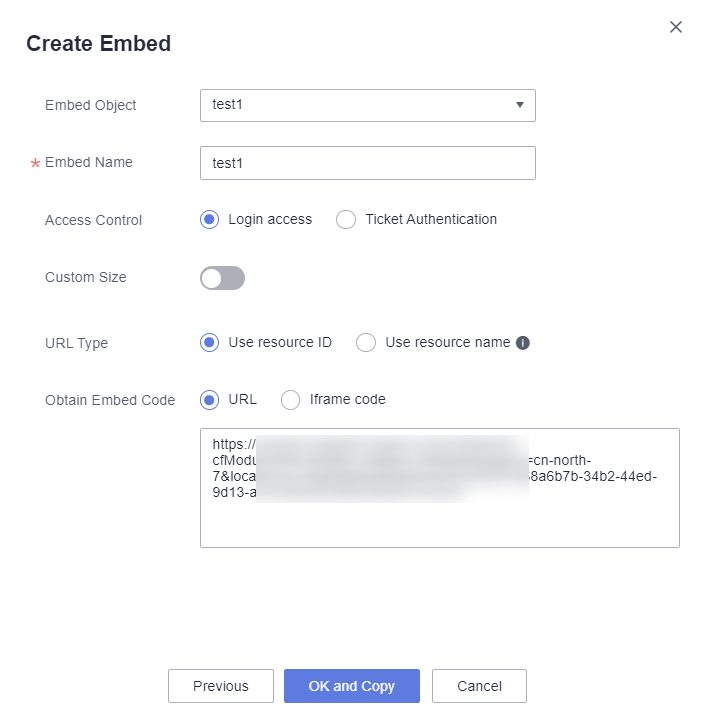
- Set the parameters based on Table 1.
Figure 2 Embed configuration

Table 1 Parameters Parameter
Description
Embed Object
The options currently are Dashboard, Intelligent Analysis Assistants, and Screen.
Embed Name
Uniqueness User-defined name
NOTE:- If the embedded names are the same, click OK and Copy. The message "The embedding name is already in use." is displayed.
- The name can contain up to 32 characters. Only letters, numbers, hyphens (-), and underscores (_) are allowed.
Access Control
The value can be Login access or Ticket authentication.
Setting ticket authentication parameters:- Click Quick Generate next to Ticket. In the displayed Generate Ticket dialog box, set the following ticket parameters:
- Binding User and Binding User Group: Select one user and one or multiple user groups, respectively. If you set them both, you can obtain the sharing and collaboration permissions of the user and the user groups.
- Ticket Validity Period: Set the validity period of the ticket, during which the generated URL/Iframe can be accessed.
- Number of ticket access times: You can control the number of times that the generated URL/Iframe can be accessed by setting the ticket access times.
NOTE:- If you set Embed Object to Intelligent Analysis Assistants, you can only select Ticket Authentication for Access Control.
- If set to Ticket authentication, any user can use a valid ticket to view dashboards, large screens, and intelligent analysis assistants, and access related data. Keep the ticket properly to avoid data leakage risks.
Custom Size
This parameter is available only when you choose Dashboard when creating the embed. The default width is 1920, and the default height is 1080.
URL Type
Use resource ID and Use resource name
NOTE:When using resource names as embed URLs, modifying the enterprise project name, project name, or embed name will make the previously used embed URL invalid. Be cautious when making modifications.
Obtain Embed Code
The options are URL and Iframe code.
- Click OK and Copy.
- Access the embed using the copied URL/Iframe.
Feedback
Was this page helpful?
Provide feedbackThank you very much for your feedback. We will continue working to improve the documentation.See the reply and handling status in My Cloud VOC.
For any further questions, feel free to contact us through the chatbot.
Chatbot


