
Managing Branches
Branching is the most commonly used method in version management. Branches isolate tasks in a project to prevent them from affecting each other, and can be merged for version release.
When you create a CodeArts Repo or Git repository, a master branch is generated by default and used as the branch of the latest version. You can create custom branches at any time for personalized scenarios.
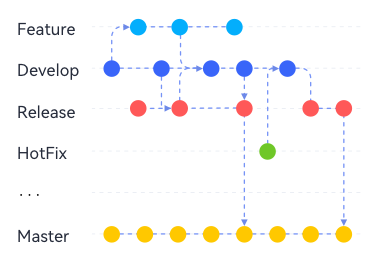
GitFlow
As a branch-based code management workflow, GitFlow is highly recognized and widely used in the industry. It is recommended for you to start team-based development.
- Concurrent development: Multiple features and patches can be concurrently developed on different branches to prevent intervention during code writing.
- Team collaboration: In team-based development, the development content of each branch (or each sub-team) can be recorded separately and merged into the project version. An issue can be accurately detected and rectified separately without affecting other code in the main version.
- Flexible adjustment: Emergency fixes are developed on the hotfix branch without interrupting the main version and sub-projects of each team.
|
Branch |
Master |
Develop |
Feature_1\2... |
Release |
HotFix_1\2... |
|---|---|---|---|---|---|
|
Description |
Core branch, which is used together with tags to archive historical versions. Ensure that all versions are available. |
Main development branch, which is used for routine development and must always be the branch with the latest and most complete functions. |
Feature development branch, which is used to develop new features. Multiple branches can exist concurrently. Each branch corresponds to a new feature or a group of new features. |
Release branch, which is used to check out a version to be released. |
Emergency fix branch, which is used to fix bugs in the current version. |
|
Validity |
Long-term |
Long-term |
Temporary |
Long-term |
Temporary |
|
When to Create |
Created when the project repository is created |
Created after the master branch is created. |
|
Created based on the develop branch before the first release. |
Created based on the corresponding version (usually the master branch) when issues are found in the master or bug version. |
|
When to Develop This Branch |
Never |
Not recommended |
Developed when being created. |
Never |
Developed when being created. |
|
When to Merge Other Branches into This Branch |
|
|
After a child feature branch is developed and tested, it is merged into the parent feature branch. |
When a version is to be released, the develop branch is merged into this branch. |
- |
|
When to Merge This Branch to Other Branches |
- |
|
After new features are developed and tested on this branch, it is merged into the develop branch. |
|
When the corresponding bug fixing task is complete, this branch is merged into the master and develop branches as a patch. |
|
When to End |
- |
- |
After the corresponding features are accepted (released and stable) |
- |
After the corresponding bugs are fixed and the version is accepted (released and stable) |

GitFlow has the following rules:
- All feature branches are pulled from the develop branch.
- All hotfix branches are pulled from the master branch.
- All commits to the master branch must have tags to facilitate rollback.
- Any changes that are merged into the master branch must be merged into the develop branch for synchronization.
- The master and develop branches are the main branches and they are unique. Other types of branches can have multiple derived branches.
Creating a Branch on the Console
- Access the repository list.
- Click a repository to go to the details page.
- Click the Code and Branches tabs. The branch list page is displayed.
- Click Create. In the displayed dialog box, select a version (branch or tag) based on which you want to create a branch and enter the branch name. You can associate the branch with an existing work item.

- Click OK. The branch is created.
Managing Branches on the Console
You can perform the following operations in the branch list:
- Filtering branches
- My: displays all branches created by you. The branches are sorted by the latest commit time in descending order.
- Active: displays the branches that have been developing in the past three months. Branches are sorted by the last commit time in descending order.
- Inactive: displays the branches that have not been developed in the past three months. Branches are sorted by the last commit time in descending order.
- All: displays all branches. The default branch is displayed on the top. Other branches are sorted by the last commit time in descending order.
- You can click a branch name to go to the Files tab page of the branch and view its content and history.
- You can click a commit ID to view the content latest committed on the details page.
- Select branches and click Batch Delete to delete branches in batches.
- You can click
 to associate work items with the branch.
 - You can click
 to go to the Comparison tab page and compare the current branch with another branch.
 - Click
 to download its compressed package.
 - You can click
 to the Merge Requests tab page and create a merge request.
 - Click
 to go to the repository settings page and set the branch as protected.
 - You can click
 to delete a branch as prompted.

You can download the compressed package of source code on the page only for hosts that have configured IP address whitelists.
If you delete a branch by mistake, submit a service ticket to contact technical support.
In addition, you can configure branches on the console.
Common Git Commands for Branches
- Creating a branch
git branch <branch_name> # Create a branch based on the current working directory in the local repository.
Example:git branch branch001 # Create a branch named branch001 based on the current working directory in the local repository.
If no command output is displayed, the creation is successful. If the branch name already exists, as shown in the following figure, create a branch with another name.

- Switching a branch
Switching a branch is to check out the branch file content to the current working directory.
git checkout <branch_name> # Switch to a specified branch.
Example:
git checkout branch002 # Switch to branch002.
The following information shows that the switch is successful.

- Switching to a new branch
You can run the following command to create a branch and switch to the new branch directly.
git checkout -b <branch_name> # Create a branch based on the current working directory in the local repository and directly switch to the branch.
Example:
git checkout -b branch002 # Create a branch named branch002 based on the current working directory in the local repository and directly switch to the branch.
The following information shows that the command is successfully executed.

- Viewing a branch
You can run the corresponding command to view the local repository branch, the remote repository branch, or all branches. These commands only list branch names. You can switch to a branch to view specific files in a branch.
git branch # View the local repository branch.
git branch -r # View the remote repository branch.
git branch -a # View the branches of the local and remote repositories.
The following figure shows the execution result of the three commands in sequence. Git displays the branches of the local and remote repositories in different formats. (Remote repository branches are displayed in the format of remote/<remote_repository_alias>/<branch_name>.)

- Merging a branch
When a development task on a branch is complete, the branch needs to be merged into another branch to synchronize the latest changes.
git merge <name_of_the_branch_merged_to_the_current_branch> # Merge a branch into the current branch.
Before merging a branch, you need to switch to the target branch. The following describes how to merge branch002 into the master branch.git checkout master # Switch to the master branch. git merge branch002 # Merge branch002 into the master branch.
The following figure shows the execution result of the preceding command. The merge is successful, and three lines are added to a file.

The system may prompt that a merge conflict occurs. The following shows that a conflict occurs in the fileOnBranch002.txt file.

To resolve the conflict, open the conflicting file, manually edit the conflicting code (as shown in the following figure), and save the file. Then run the add and commit commands again to save the result to the local repository.
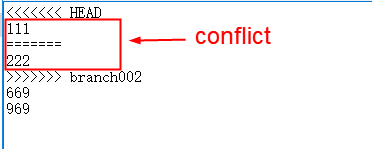
This is similar to resolving a conflict that occurs when you commit a file from the local repository to the remote repository. For details about the working principle, see Resolving Code Conflicts in an MR.
A proper collaboration mode can prevent conflicts.
- Deleting a local branch
git branch -d <branch_name>
Example:
git branch -d branch002 # Delete branch002 from the local repository. The following information shows that the operation is successful.

- Deleting a branch from the remote repository
git push <remote_repository_address_or_alias> -d <branch_name>
Example:
git push HTTPSOrigin -d branch002 # Delete branch002 from the remote repository whose alias is HTTPSOrigin. The following information shows that the deletion is successful.

- Pushing a new local branch to the remote repository
git push <remote_repository_address_or_alias> <branch_name>
Example:
git push HTTPSOrigin branch002 # Push the local branch branch002 to the remote repository whose alias is HTTPSOrigin. The following information shows that the push is successful.

If the push fails, check the connectivity.
- Check whether your network can access CodeArts Repo.
Run the following command on the Git client to test the network connectivity:
1ssh -vT git@********.com
If the returned information contains connect to host **********.com port 22: Connection timed out, your network is restricted and you cannot access CodeArts Repo. In this case, contact your local network administrator.
- Check the SSH key. If necessary, regenerate a key and configure it on the CodeArts Repo console. For details, see SSH Keys. Alternatively, check whether the HTTPS password is correctly configured.
Feedback
Was this page helpful?
Provide feedbackThank you very much for your feedback. We will continue working to improve the documentation.See the reply and handling status in My Cloud VOC.
For any further questions, feel free to contact us through the chatbot.
Chatbot


