Protected Branches
To configure protected branches, you can choose on the repository details page.
The settings take effect only for the repository configured.
Only the repository administrators and owners can view this tab page and configure protected branches.
Functions of Protected Branches
- Ensure branch security and allow developers to use MRs to merge code.
- Prevent non-administrators from pushing codes.
- Prevent all forcibly push to this branch.
- Prevent anyone from deleting this branch.

When you create a repository, the repository automatically sets the default branch (generally master) as the protection branch to ensure repository security.
After you set a protected branch, the protected branch cannot be used as the target branch for code merging.
Editing Protected Branches
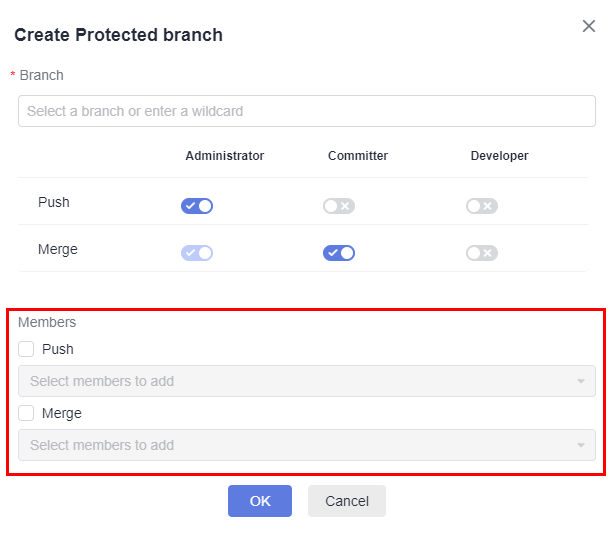
- Click Create Protected Branch. In the Added Protected Branch dialog box, select a branch from the drop-down list or manually enter a branch name or wildcard character, select the corresponding permissions or assign permissions to users, and click OK.
- Click
 to modify the configuration of the protected branch.
 - Click
 to delete the protected branch.

- Configure the whitelist: To assign permissions to one or more members of an unauthorized role, you can select Push and Merge under Members and click the drop-down list to add the members to the trustlist.


- Only developers and users with permissions higher than developers have the Can push and Can merge permissions.
- If Administrator, Committer, and Developer are selected for Can push, all these roles have the permissions. In this case, you do not need to select Can push or Can merge under Members.
- You can create, edit, and delete protected branches in batches.
Feedback
Was this page helpful?
Provide feedbackThank you very much for your feedback. We will continue working to improve the documentation.See the reply and handling status in My Cloud VOC.
For any further questions, feel free to contact us through the chatbot.
Chatbot


