Creating, Modifying, or Deleting a Notification Policy
You can configure an alarm notification policy so that the system sends a specific notification in the way you specified. This section describes how to create, modify, or delete a notification policy.
Constraints
You can add a maximum of 10 notification scopes to a notification policy.
Creating a Notification Policy
- Log in to the Cloud Eye console.
- In the navigation pane, choose Alarm Management > Alarm Notifications.
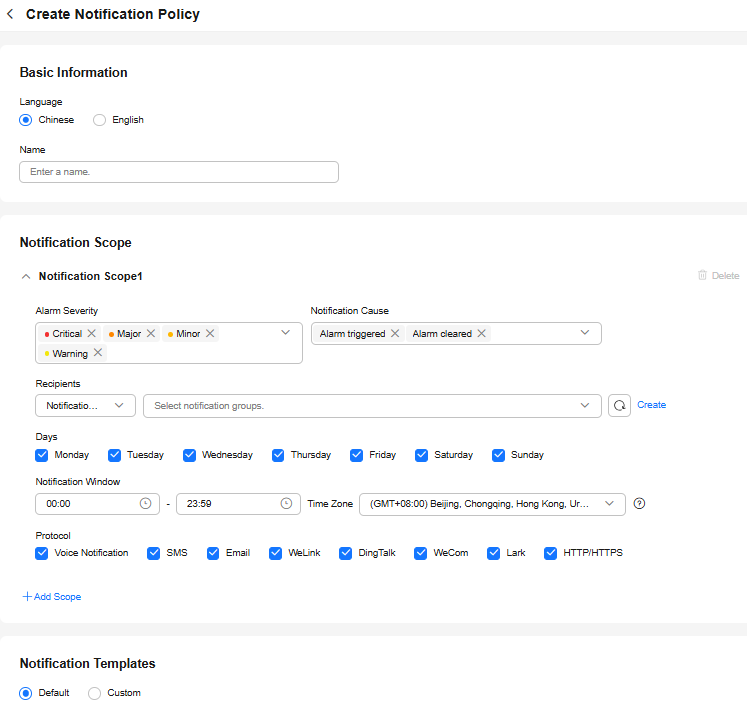
- On the Notification Policies tab, click Create Notification Policy and configure parameters.
Figure 1 Creating a notification policy

Table 1 Parameters for creating a notification policy Parameter
Description
Example Value
Language
Language of the alarm notification. The options are Chinese and English.
Chinese
Name
Name of the notification policy. The value can contain a maximum of 255 characters.
notification_policy
Alarm Severity
Alarm severity, which can be Critical, Major, Minor, or Warning.
Critical
Notification Cause
Cause for triggering an alarm notification. You can select Alarm triggered, Alarm cleared, or both.
Alarm triggered
Recipients
Recipient of the alarm notifications. There are two options:
- Notification group: Select an existing notification group or click Create to create one.
- Topic subscriptions: Select an existing notification topic, or click create to create one. You can select a topic across regions. You can select the region where the topic is deployed.
NOTE:
SMN topics are only available in these regions: CN North-Beijing4, CN East-Shanghai1, CN East-Shanghai2, CN South-Guangzhou, CN-Hong Kong, and AP-Singapore. You can create a topic in one of these regions if needed.
-
Days
On which days alarm notifications will be sent. You can select Monday, Tuesday, Wednesday, Thursday, Friday, Saturday, or Sunday. Multiple options are supported.
Monday
Notification Window
Cloud Eye sends notifications only within the validity period specified in the alarm rule.
If you set Notification Window to 08:00 to 20:00, Cloud Eye only sends notifications within this period.
08:00-20:00
Time Zone
Time zone for the alarm notification window. By default, it matches the time zone of the client server, but can be manually configured.
(GMT+08:00) Beijing, Chongqing, Hong Kong, Urumqi, Kuala Lumpur, Singapore, Perth, Taipei, Irkutsk, Ulaanbaatar
Protocol
Over which protocol alarm notifications will be sent. If Recipients is set to Notification group, you need to configure the protocol. You can select SMS, Email, WeLink, DingTalk, WeCom, Lark, or HTTP/HTTPS. Multiple protocols can be selected.
Email
Notification Templates
Notification content format. The value can be Default or Custom.
If you select Custom, you can select Templates for Metric Monitoring or Templates for Event Monitoring, or click Create Notification Template to create a new one.
NOTE:Some cloud services do not support fields such as the resource name, enterprise project, resource tag, private IP address, and public IP address in the notification template. If these fields are configured, no values will be displayed for them when alarm notifications are sent.
Default
- Click OK.
Modifying a Notification Policy
- Log in to the Cloud Eye console.
- In the navigation pane, choose Alarm Management > Alarm Notifications.
- On the Notification Policies tab, locate the notification policy and click Modify in the Operation column.
- Access the Modify Notification Policy page.
On the Overview page, modify the parameters.
On the Associated Alarm Rules page, select one or more alarm rules to be disassociated and click Disassociate.Figure 2 Modifying a notification policy
- Click OK.

After you modify the notification policy, an asynchronous task needs to be delivered. The change will apply within 5 minutes.
Deleting a Notification Policy
- Log in to the Cloud Eye console.
- In the navigation pane, choose Alarm Management > Alarm Notifications.
- On the Notification Policies tab,
- To delete a notification policy, locate the policy and click Delete in the Operation column.
- To batch delete notification policies, select them and click Delete above the list.
Figure 3 Deleting a notification policy

- Click OK.
Feedback
Was this page helpful?
Provide feedbackThank you very much for your feedback. We will continue working to improve the documentation.See the reply and handling status in My Cloud VOC.
For any further questions, feel free to contact us through the chatbot.
Chatbot


