
Deployments
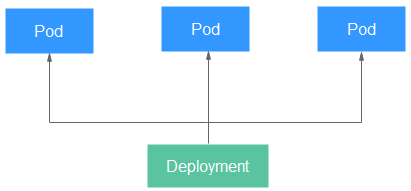
A Deployment is a service-oriented encapsulation of pods. A Deployment may manage one or more pods. These pods have the same role, and requests are distributed across the pods. All pods in a Deployment share the same volume.
Pods are the smallest deployable units. CCI provides controllers to manage pods. Controllers can create and manage pods, and provide replica management, rolling upgrade, and self-healing capabilities. The most commonly used controller is Deployment.
A Deployment can contain one or more pod replicas. These pod replicas have the same role, and requests are routed across the pod replicas.
A Deployment integrates a lot of functions, including rollout deployment, rolling upgrade, replica creation, and restoration of online jobs. To some extent, you can use Deployments to realize unattended rollout, which greatly reduces operation risks and improves rollout efficiency.
Creating a Deployment on the Console
- Log in to the CCI 2.0 console.
- In the navigation pane, choose Workloads. On the Deployments tab, click Create Deployment.
- Add basic configuration.
Parameter
Description
Workload Name
Enter 1 to 63 characters, starting and ending with a lowercase letter or digit. Only lowercase letters, digits, hyphens (-), and periods (.) are allowed. Do not enter consecutive periods or place a hyphen before or after a period. The workload name cannot be changed after the workload is created. If you need to change the name, create another workload.
Namespace
Select a namespace. If no namespaces are available, create one by following the steps provided in Creating a Namespace.
CPU Architecture
x86 or Kunpeng
Pod Type
General-computing or General-computing-lite
NOTE:Only x86-based general-computing-lite pods are supported.
vCPUs
Select a value from 0.25 to 64.
Memory
Select the memory based on the selected vCPUs.
Data Storage (Optional)
Only emptyDir volumes, ConfigMaps, and secrets are supported. Add a volume to the pod and then mount the volume to the specified container.
Click Add Data Store, select a volume type, and enter a volume name.- emptyDir volume: By default, CCI provides 30 GiB of free storage space, which is shared by emptyDir volumes and the system disk.
- ConfigMap: Select a ConfigMap. If no ConfigMaps are available, create one first. For details, see Creating a ConfigMap.
- Secret: Select a secret. If no secrets are available, create one first. For details, see Creating a Secret.
Pods
Specify the number of pods. A workload can have one or more pods. A pod can have one or more containers with the same flavor. Configure multiple pods for a workload if you want higher reliability. If one pod becomes faulty, the workload can still run normally.
- Add containers. A pod generally contains one or more containers created from different images. If your application needs to run on multiple containers in a pod, click Add Container and then select an image each time when you need another container.
- Click Add Container.
- Specify basic information.
Table 1 Basic parameters Parameter
Description
Container Name
Enter 1 to 63 characters, starting and ending with a lowercase letter or digit. Only lowercase letters, digits, and hyphens (-) are allowed.
Image
Select an image.
NOTICE:If different containers in a pod listen to the same port, there will be port conflicts, and the pod may fail to start. For example, if a container created from an Nginx image (which listens to port 80) has been added to a pod, there will be a port conflict when another container created from an HTTP image in the pod tries to listen to port 80.
- My Images: images you have pushed to SWR.
NOTE:
- If you are an IAM user, you must obtain permissions before you can use the private images in the account. For details on how to obtain permissions, see Uploading Images.
- Currently, CCI does not support third-party image repositories.
- A single layer of a decompressed image cannot exceed 20 GiB.
- Shared Images: images shared by others through SWR.
- Open Source Images: public images in the image center.
Image Tag
Select a tag.
vCPUs
The value cannot be less than 0 or greater than the remaining quota.
Memory (GiB)
The value cannot be less than 0 or greater than the remaining quota.
- My Images: images you have pushed to SWR.
- (Optional) Specify advanced settings.
- Lifecycle: Lifecycle scripts specify actions that applications take when a lifecycle event occurs. For details, see Lifecycle.
- Health Check: Container health can be checked regularly when the container is running. For details about how to configure health checks, see Health Check.
- Environment Variables: You can manually set environment variables or add variable references. Environment variables provide flexibility in configuring workloads. The environment variables for which you have assigned values during container creation will take effect upon container startup. This saves you the trouble of rebuilding the container image.
To manually set variables, enter the variable name and value.
To reference variables, set the variable name, reference type, and referenced value for each variable. The following variables can be referenced: PodIP (pod IP address), PodName (pod name), and Secret. For details about how to reference a secret, see Secrets.
- Data Storage: Volumes can be mounted to containers for data access in the containers.
- Security Settings: Users who run containers can be configured.
- Select an upgrade policy.
- Upgrade Policy: Rolling upgrade and Replace are available.
- Rolling upgrade: New pods gradually replace old ones, and service traffic is evenly distributed to both old and new pods to maintain service continuity.
Max Unavailable Pods: Maximum number of unavailable pods allowed in a rolling upgrade. If the number is equal to the total number of pods, services may be interrupted. (Minimum number of alive pods = The total number of pods – Maximum number of unavailable pods)
- Replace: Old pods are deleted, and then new pods are created. Services are interrupted during the upgrade.
- Rolling upgrade: New pods gradually replace old ones, and service traffic is evenly distributed to both old and new pods to maintain service continuity.
- Upgrade Policy: Rolling upgrade and Replace are available.
- Click Create Deployment.
In the workload list, if the workload status changes to Running, the workload is created. You can click the workload name to view the details and refresh the page to view the real-time workload status.
Creating a Deployment Using YAML
- Log in to the CCI 2.0 console.
- In the navigation pane, choose Workloads. On the Deployments tab, click Create from YAML.
- Import or add a YAML file and click OK to create a Deployment.
The following is an example file:
- Resource description in the deployment.yaml file
apiVersion: cci/v2 kind: Deployment metadata: annotations: description: '' labels: {} name: nginx spec: replicas: 2 selector: matchLabels: app: nginx template: metadata: annotations: vm.cci.io/pod-size-specs: 2.00_4.0 resource.cci.io/pod-size-specs: 2.00_4.0 metrics.alpha.kubernetes.io/custom-endpoints: '[{api:'''',path:'''',port:'''',names:''''}]' log.stdoutcollection.kubernetes.io: '{"collectionContainers": ["container-0"]}' labels: app: nginx spec: containers: - image: library/nginx:stable-alpine-perl name: container-0 resources: limits: cpu: 2000m memory: 4096Mi requests: cpu: 2000m memory: 4096Mi command: [] lifecycle: {} dnsPolicy: '' imagePullSecrets: - name: imagepull-secret dnsConfig: {} minReadySeconds: 0 strategy: type: RollingUpdate rollingUpdate: maxSurge: 0 maxUnavailable: 1 - Resource description in the deployment.json file
{
	"apiVersion": "cci/v2",
	"kind": "Deployment",
	"metadata": {
		"annotations": {
			"description": ""
		},
		"labels": {},
		"name": "nginx"
	},
	"spec": {
		"replicas": 2,
		"selector": {
			"matchLabels": {
				"app": "nginx"
			}
		},
		"template": {
			"metadata": {
				"annotations": {
					"vm.cci.io/pod-size-specs": "2.00_4.0",
					"resource.cci.io/pod-size-specs": "2.00_4.0",
					"metrics.alpha.kubernetes.io/custom-endpoints": "[{api:'',path:'',port:'',names:''}]",
					"log.stdoutcollection.kubernetes.io": "{\"collectionContainers\": [\"container-0\"]}"
				},
				"labels": {
					"app": "nginx"
				}
			},
			"spec": {
				"containers": [
					{
						"image": "library/nginx:stable-alpine-perl",
						"name": "container-0",
						"resources": {
							"limits": {
								"cpu": "2000m",
								"memory": "4096Mi"
							},
							"requests": {
								"cpu": "2000m",
								"memory": "4096Mi"
							}
						},
						"command": [],
						"lifecycle": {}
					}
				],
				"dnsPolicy": "",
				"imagePullSecrets": [
					{
						"name": "imagepull-secret"
					}
				],
				"dnsConfig": {}
			}
		},
		"minReadySeconds": 0,
		"strategy": {
			"type": "RollingUpdate",
			"rollingUpdate": {
				"maxSurge": 0,
				"maxUnavailable": 1
			}
		}
	}
}
- Resource description in the deployment.yaml file
Creating a Deployment Using ccictl
CCI 2.0 offers ccictl, a command-line tool that simplifies workload creation with a user experience closer to kubectl compared to the console.
Constraints
ccictl must be used to connect to CCI 2.0.
Procedure
- Run ccictl create namespace cci-test to create a namespace.
- Run ccictl create -f network.yaml to create a network. The following is an example YAML file:
apiVersion: yangtse/v2 kind: Network metadata: annotations: yangtse.io/domain-id: ${domain-id} yangtse.io/project-id: ${project-id} name: cci-network namespace: cci-test spec: networkType: underlay_neutron securityGroups: - ${security-group-id} subnets: - subnetID: ${subnet-id} - Run ccictl apply -f deployment.yaml to create a workload. The following is an example YAML file:
kind: Deployment apiVersion: cci/v2 metadata: name: nginx namespace: cci-test spec: replicas: 1 selector: matchLabels: app: nginx template: metadata: labels: app: nginx spec: containers: - name: nginx image: nginx:latest ports: - containerPort: 80 resources: limits: cpu: 500m memory: 1Gi requests: cpu: 500m memory: 1Gi dnsPolicy: Default - Run ccictl apply -f service.yaml to create a Service. The following is an example YAML file:
kind: Service apiVersion: cci/v2 metadata: name: service-nginx namespace: cci-test annotations: kubernetes.io/elb.class: elb kubernetes.io/elb.id: '${elb_id}' spec: ports: - name: service-nginx-port protocol: TCP port: 80 targetPort: 80 selector: app: nginx type: LoadBalancer - Use the EIP and listening port of the load balancer to access the Nginx service.
Updating a Deployment
- Log in to the CCI 2.0 console.
- In the navigation pane, choose Workloads. On the Deployments tab, locate the deployment you want to update and click Edit YAML in the Operation column.

- Edit the YAML file and click OK to update the Deployment.
Deleting a Pod
You can manually delete pods. Because pods are controlled by a controller, a new pod will be created immediately after you delete a pod. Manual pod deletion is useful when an upgrade fails halfway or when service processes need to be restarted.
Deleting a Deployment
- Log in to the CCI 2.0 console.
- In the navigation pane, choose Workloads. On the Deployments tab, locate the target Deployment and click Delete in the Operation column.
Feedback
Was this page helpful?
Provide feedbackThank you very much for your feedback. We will continue working to improve the documentation.See the reply and handling status in My Cloud VOC.
For any further questions, feel free to contact us through the chatbot.
Chatbot


