Environment Configuration
Purchasing VPC Endpoints
- To pull images from a repository of SWR Enterprise Edition, you need a VPC endpoint for accessing OBS.
- To pull images from an SWR public image repository, you need a VPC endpoint for accessing SWR and a VPC endpoint for accessing OBS in the VPC where the workload is deployed.
- Go to the VPC endpoint list page.
- On the VPC Endpoints page, click Buy VPC Endpoint.
The Buy VPC Endpoint page is displayed.
- Buy a VPC endpoint for accessing SWR.
- On the VPC Endpoints page, click Buy VPC Endpoint.
The Buy VPC Endpoint page is displayed.
- Configure the parameters.
- Region: Select a region based on site requirements.
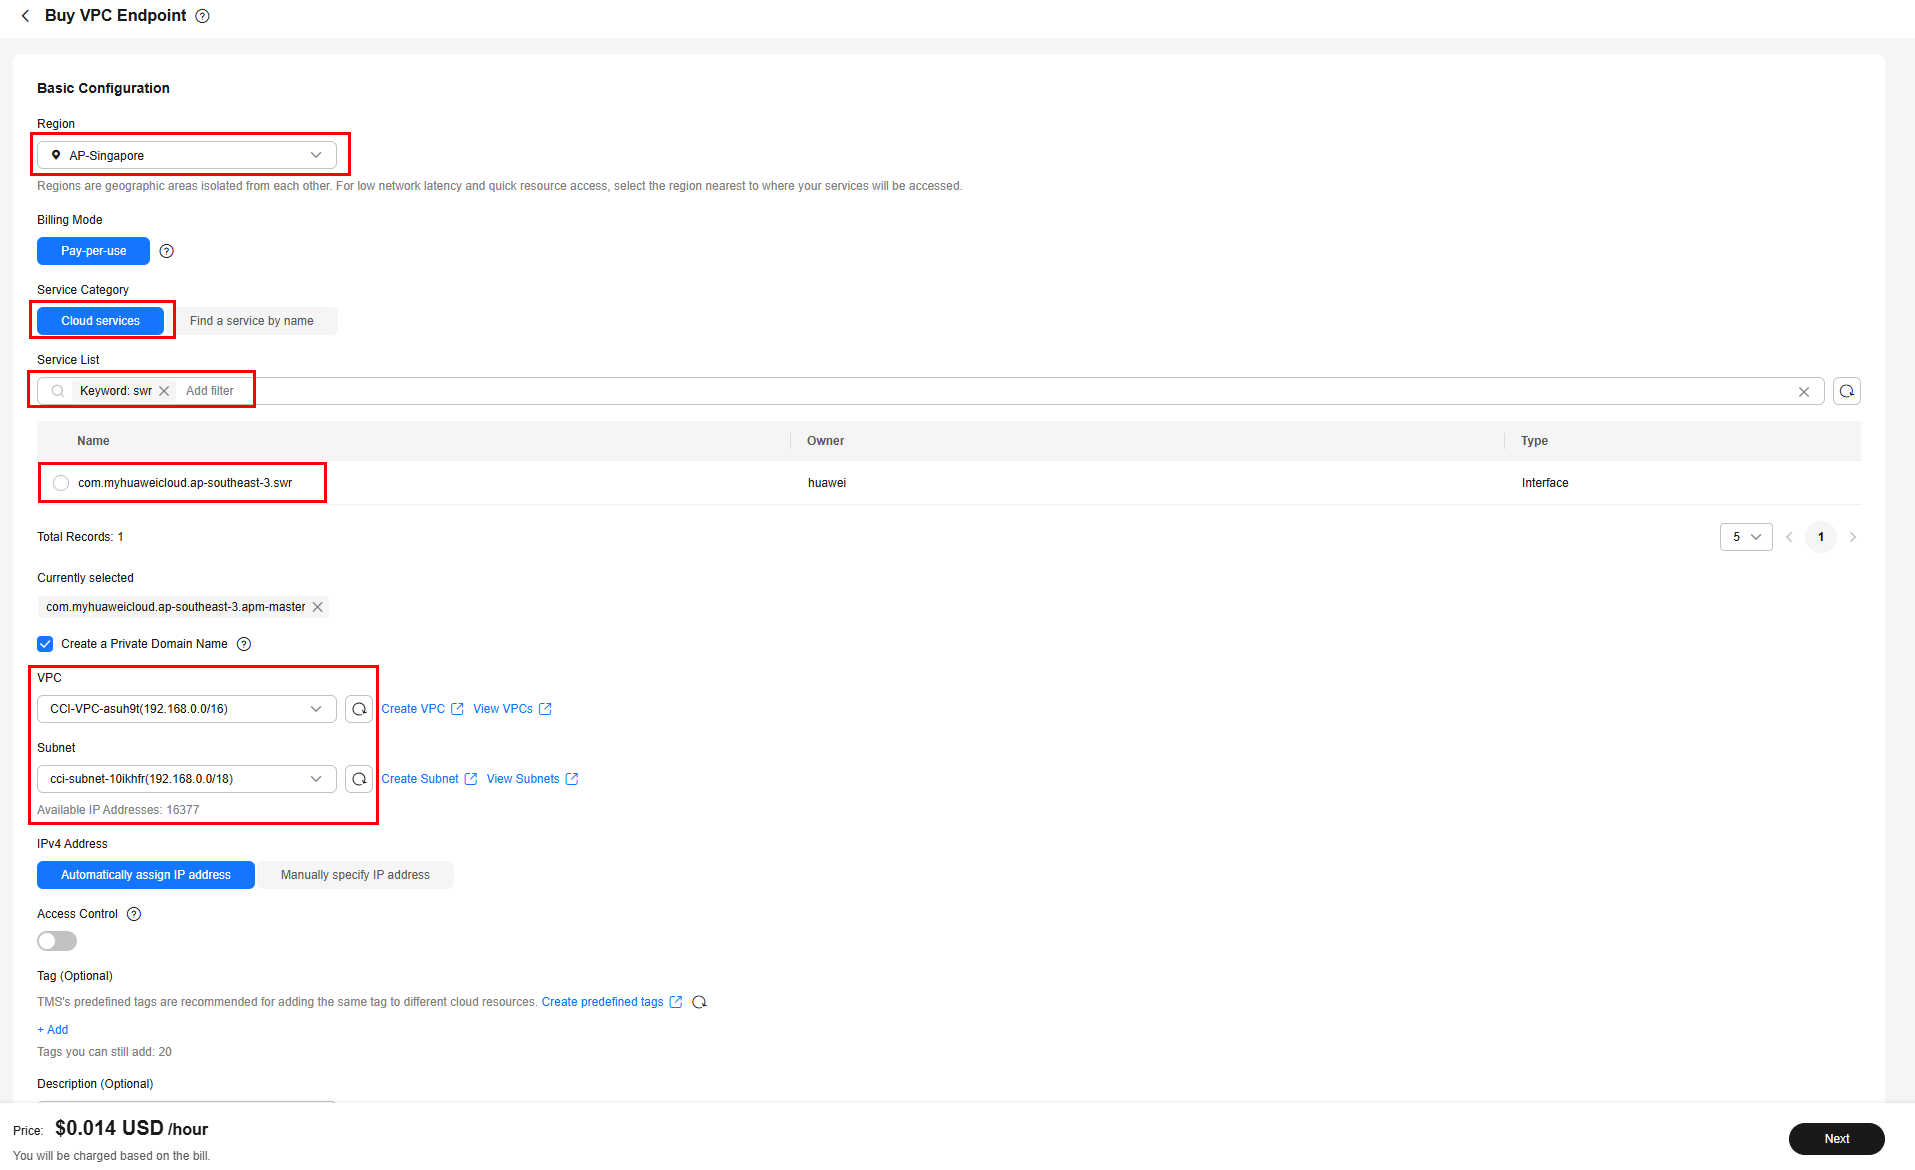
- Set Service Category to Cloud service, search for swr, and select the VPC endpoint service for accessing SWR.
- VPC: Select the VPC where the workload is deployed.
- Subnet: Select the subnet where the workload is deployed.
Specify other parameters as needed.Figure 1 Buying a VPC endpoint for accessing SWR
Table 1 VPC endpoint parameters Parameter
Example
Description
Region
CN-Hong Kong
Specifies the region where the VPC endpoint will be used to connect a VPC endpoint service.
Resources in different regions cannot communicate with each other over an intranet. For lower latency and quicker access, select the region nearest to your on-premises data center.
Billing Mode
Pay-per-use
Specifies the billing mode of the VPC endpoint. VPC endpoints can be used or deleted at any time.
VPC endpoints support only pay-per-use billing based on the usage duration.
Service Category
Cloud services
Select Cloud services when you buy a VPC endpoint for accessing SWR.
Service List
-
This parameter is available only when you select Cloud services for Service Category.
VPC endpoint services have been created. You only need to select the desired one.
VPC
-
Specifies the VPC where the VPC endpoint is to be deployed.
Subnet
-
Specifies the subnet where the VPC endpoint is to be deployed.
Route Table
-
This parameter is available only when you create a VPC endpoint for connecting to a gateway VPC endpoint service.
NOTE:This parameter is available only in the regions where the route table function is enabled.
You are advised to select all route tables. Otherwise, the access to the gateway VPC endpoint service may fail.
Select the route tables required for the VPC where the VPC endpoint is to be deployed.
For details about how to add a route, see Adding Routes to a Route Table in the Virtual Private Cloud User Guide.
Policy
-
Specifies the VPC endpoint policy.
VPC endpoint policies are a type of resource-based policies. You can configure a policy to control which principals can use the VPC endpoint to access VPC endpoint services.
Tag
example_key1
example_value1
Specifies the tag that is used to classify and identify the VPC endpoint.
The tag settings can be modified after the VPC endpoint is purchased
Description
-
Provides supplementary information about the VPC endpoint.
Table 2 Tag requirements for VPC endpoints Parameter
Requirement
Tag key
- Cannot be left blank.
- Must be unique for each resource.
- Can contain a maximum of 128 characters.
- Cannot start or end with a space or contain special characters =*<>\,|/
- A tag key can contain letters, digits, spaces, and any of the following characters: _.:=+-@. It cannot start or end with a space, or start with _sys_.
Tag value
- Can be left blank.
- Can contain a maximum of 255 characters.
- Cannot start or end with a space or contain special characters =*<>\,|/
- A tag value can contain letters, digits, spaces, and characters _.:/=+-@. It cannot start or end with a space.
- Confirm the settings and click Next.
- If the configuration is correct, click Submit.
- If any parameter is incorrect, click Previous to modify it as needed and then click Submit.
- On the VPC Endpoints page, click Buy VPC Endpoint.
- Buy a VPC endpoint for accessing OBS.
- On the VPC Endpoints page, click Buy VPC Endpoint.
The Buy VPC Endpoint page is displayed.
- Configure the parameters.
- Region: Select a region based on site requirements.
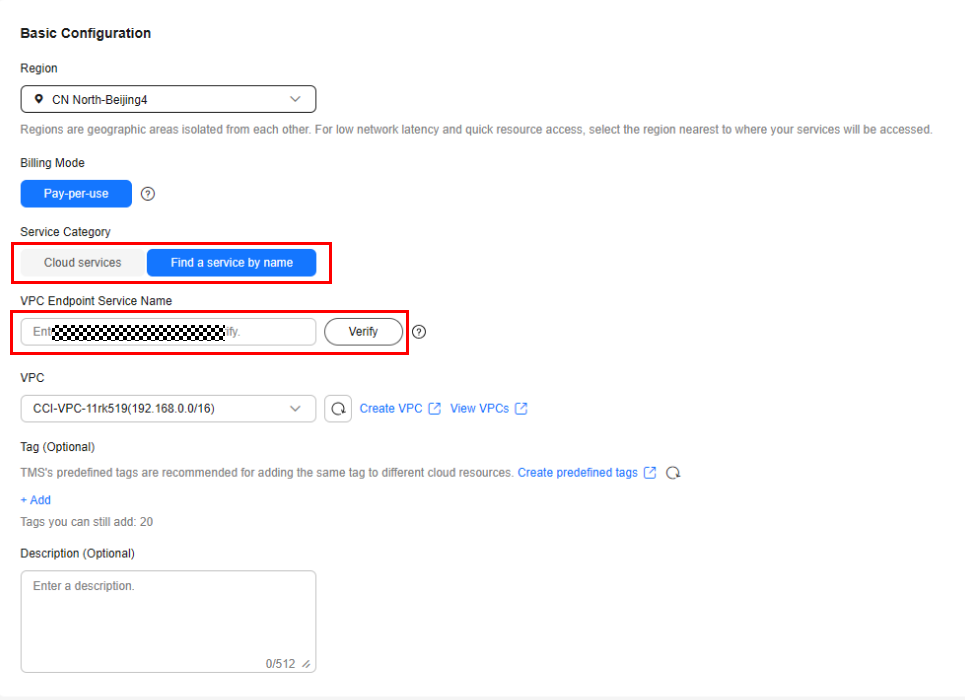
- Set Service Category to Find a service by name. You can obtain the name of the VPC endpoint service for OBS by submitting a service ticket. Enter the service name and click Verify to confirm that the service name is correct.
- VPC: Select the VPC where the workload is deployed. When you create a VPC endpoint for a VPC endpoint service of the gateway type, Route Table is displayed. You are advised to select all route tables. Otherwise, the network may be unreachable.
Specify other parameters as needed.
Figure 2 Buying a VPC endpoint for accessing OBS
Table 3 VPC endpoint parameters Parameter
Example
Description
Region
CN-Hong Kong
Specifies the region where the VPC endpoint will be used to connect a VPC endpoint service.
Resources in different regions cannot communicate with each other over an intranet. For lower latency and quicker access, select the region nearest to your on-premises data center.
Billing Mode
Pay-per-use
Specifies the billing mode of the VPC endpoint. VPC endpoints can be used or deleted at any time.
VPC endpoints support only pay-per-use billing based on the usage duration.
Service Category
Find a service by name
Select Find a service by name when you buy a VPC endpoint for accessing OBS.
VPC
-
Specifies the VPC where the VPC endpoint is to be deployed.
Subnet
-
Specifies the subnet where the VPC endpoint is to be deployed.
Route Table
-
This parameter is available only when you create a VPC endpoint for connecting to a gateway VPC endpoint service.
NOTE:This parameter is available only in the regions where the route table function is enabled.
You are advised to select all route tables. Otherwise, access to the VPC endpoint service of the gateway type may fail.
Select a route table required for the VPC where the VPC endpoint is to be deployed.
For details about how to add a route, see Adding Routes to a Route Table in the Virtual Private Cloud User Guide.
Policy
-
Specifies the VPC endpoint policy.
VPC endpoint policies are a type of resource-based policies. You can configure a policy to control which principals can use the VPC endpoint to access VPC endpoint services.
Tag
example_key1
example_value1
Specifies the tag that is used to classify and identify the VPC endpoint.
The tag settings can be modified after the VPC endpoint is purchased
Description
-
Provides supplementary information about the VPC endpoint.
Table 4 Tag requirements for VPC endpoints Parameter
Requirement
Tag key
- Cannot be left blank.
- Must be unique for each resource.
- Can contain a maximum of 128 characters.
- Cannot start or end with a space or contain special characters =*<>\,|/
- A tag key can contain letters, digits, spaces, and any of the following characters: _.:=+-@. It cannot start or end with a space, or start with _sys_.
Tag value
- Can be left blank.
- Can contain a maximum of 255 characters.
- Cannot start or end with a space or contain special characters =*<>\,|/
- A tag value can contain letters, digits, spaces, and characters _.:/=+-@. It cannot start or end with a space.
- Confirm the settings and click Next.
- If the configuration is correct, click Submit.
- If any parameter is incorrect, click Previous to modify it as needed and then click Submit.
- On the VPC Endpoints page, click Buy VPC Endpoint.
- Click Back to VPC Endpoint List after the task is submitted.
- View the endpoint details by clicking each endpoint ID.
Logging In to the CCI 2.0 Console
Log in to the CCI 2.0 console and grant CCI the permissions to access other cloud services.
- Log in to the management console.
- In the upper left corner, click
 to select a region.
CCI 2.0 is available in CN-Hong Kong, AP-Jakarta, TR-Istanbul, AF-Johannesburg, ME-Riyadh, LA-Mexico City2, LA-Sao Paulo1, AP-Bangkok, and AP-Singapore.

CCI 2.0 does not allow you to create resources in sub-projects.
- Choose Service List > Containers > Cloud Container Instance 2.0.
Switch to the CCI 2.0 console.
- If this is the first time you are logging in to the CCI 2.0 console, click Agree to grant CCI 2.0 the permissions to access other cloud services.
After the permissions are granted, an agency named cci_admin_trust is created. You can view the agency on the IAM console.
(Optional) Uploading Images
The cloud platform provides the SoftWare Repository for Container (SWR) service for you to upload container images to the image repository. You can easily pull these images when creating workloads on CCI. For details about how to upload images, see Pushing an Image.

- After Enterprise Project Management Service (EPS) is enabled, if an IAM user needs to use private images in your account, you need to log in to the CCI 2.0 console using the account, select the target image repository, and grant the required permissions to the user on the SWR console.
- You can use either of the following methods to grant permissions to an IAM user:
- On the details page of an image, click the Permissions tab, click Add Permission, and then grant the read, write, and manage permissions to the user. For details, see Granting Permissions for a Specific Image.
- On the details page of an organization, click the Users tab, click Add Permission, and then grant the read, write, and manage permissions to the user. For details, see Granting Permissions for an Organization.
Feedback
Was this page helpful?
Provide feedbackThank you very much for your feedback. We will continue working to improve the documentation.See the reply and handling status in My Cloud VOC.
For any further questions, feel free to contact us through the chatbot.
Chatbot


