Managing Basic Information
On the Basic Information page, you can modify the account information and set preferences.
Procedure
- Use your partner account to log in to Huawei Cloud.
- In the drop-down list of your account name, click Partner Center to go to the Partner Center.
- Choose Partner Information > Basic Information in the drop-down list of the account name in the upper right corner.
- Manage the account information.
- Modify company information
- Change company logos
Click Change Logo. One the displayed page, upload a new logo and click OK.
- Modifying the partner information
On the Partner Information tab, click Modify Partner Info. On the Modify Information page, modify the basic information, registration address, and contact information. Click OK to make the modifications take effect.
- Change company logos
-

- You can set whether to enable the verification code function (disabled by default). After you enable this function, verification code will be required for some operations. For details, see Critical Operations. The verification code function is only available to resellers.
- You can enable or disable the verification code option as needed.
- Modifying the email address
On the Account Information tab, click Modify next to Email. On the Change Email Address page that is displayed, verify the identity and enter the new email address.
- Modifying the mobile number
On the Account Information tab, click Modify next to Mobile Number. On the Change Mobile Number page that is displayed, verify the identity and enter the new mobile number.
- Preferences
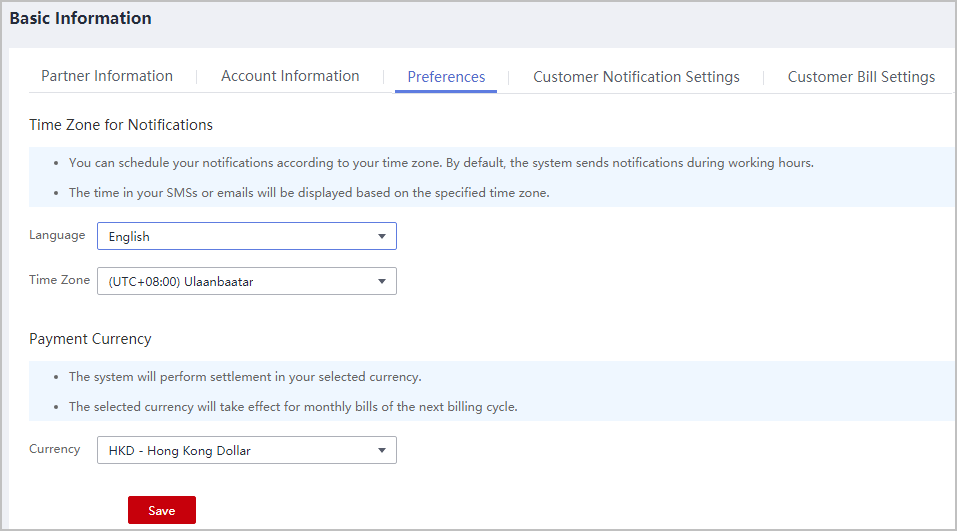
You can choose Partner Information > Basic Information in the drop-down list of the account name in the upper right corner. On the displayed page, set the email or SMS message language, time zone, and payment currency on the Preferences tab page.
With the language and time zone specified, the system sends notifications during the working hours in the specified time zone. The time in the SMS messages and emails is displayed based on the specified time zone.
After the payment currency is set, the system will perform settlements in the specified currency, and the selected currency will take effect for monthly bills of the next billing cycle.

- Setting customer notification receiving rules
You can choose Partner Information > Basic Information in the drop-down list of the account name in the upper right corner. On the displayed page, configure the notification receiving rules on reseller customers' behalf and set a unified notification receiving template for these customers on the Customer Notification Settings tab page. Customers cannot modify the configured template by themselves.


- You can enable Configure Templates on Customers' Behalf to perform operations on customers' behalf.
- If you have enabled the verification code function, a verification code is required.
- You can also click View Operation Records as required.
- Configuring customer bill permissions
You can choose Partner Information > Basic Information in the drop-down list of the account name in the upper right corner. Switch to the Customer Bill Settings tab page and grant or revoke your reseller customers' permissions to view the Billing and Cost Center in the Billing Center. Once the permission is revoked, all reseller customers cannot view Billing or Cost Center or receive expenditure data.


- You can grant or revoke your reseller customers' permissions to view the Billing and Cost Center in the Billing Center by disabling or enabling Revoke Permissions to View Bills and Cost.
- If you have enabled the verification code function, a verification code is required.
- Viewing budget quota
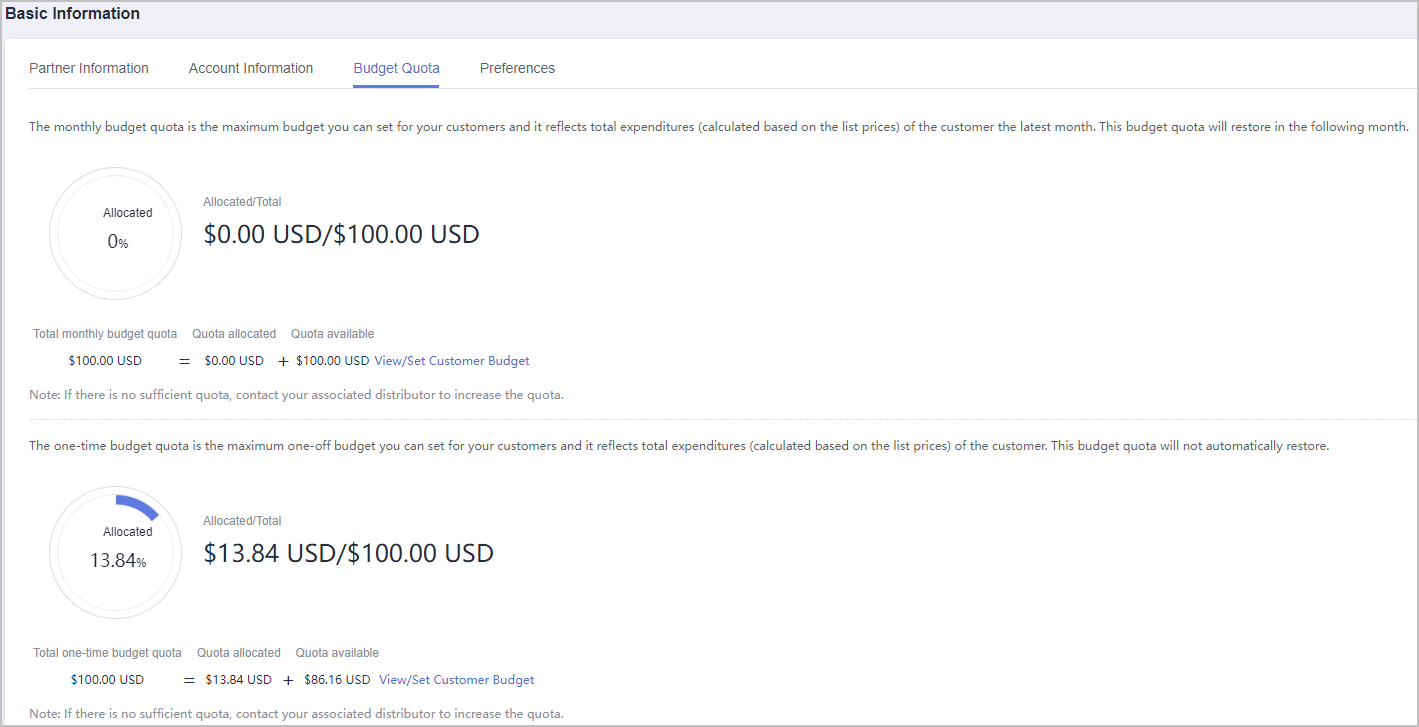
You can choose Partner Information > Basic Information in the drop-down list of the account name in the upper right corner. Go to the Budget Quota tab page to view the budget usage.


- If there is no sufficient quota, contact your associated distributor to increase the quota or make repayment in advance.
- The monthly budget quota is the maximum budget you can set for your customers and it reflects total expenditures (calculated based on the list prices) of the customer the latest month. This budget quota will restore in the following month.
- The one-time budget quota is the maximum budget you can set for your customers. It is based on the total customer expenditures at list prices and will not automatically restore.
- Modify company information
Feedback
Was this page helpful?
Provide feedbackThank you very much for your feedback. We will continue working to improve the documentation.See the reply and handling status in My Cloud VOC.
For any further questions, feel free to contact us through the chatbot.
Chatbot


