Customize a URL for Calling Scripts
You can encapsulate an activated script into a new URL for easy calling by third-party systems.
Customizing a URL for a Script
- Log in to the application designer by referring to Logging In to the Application Designer.
- In the navigation pane, choose Integrations.
- Click
 next to Open API. The page for creating an open API is displayed.
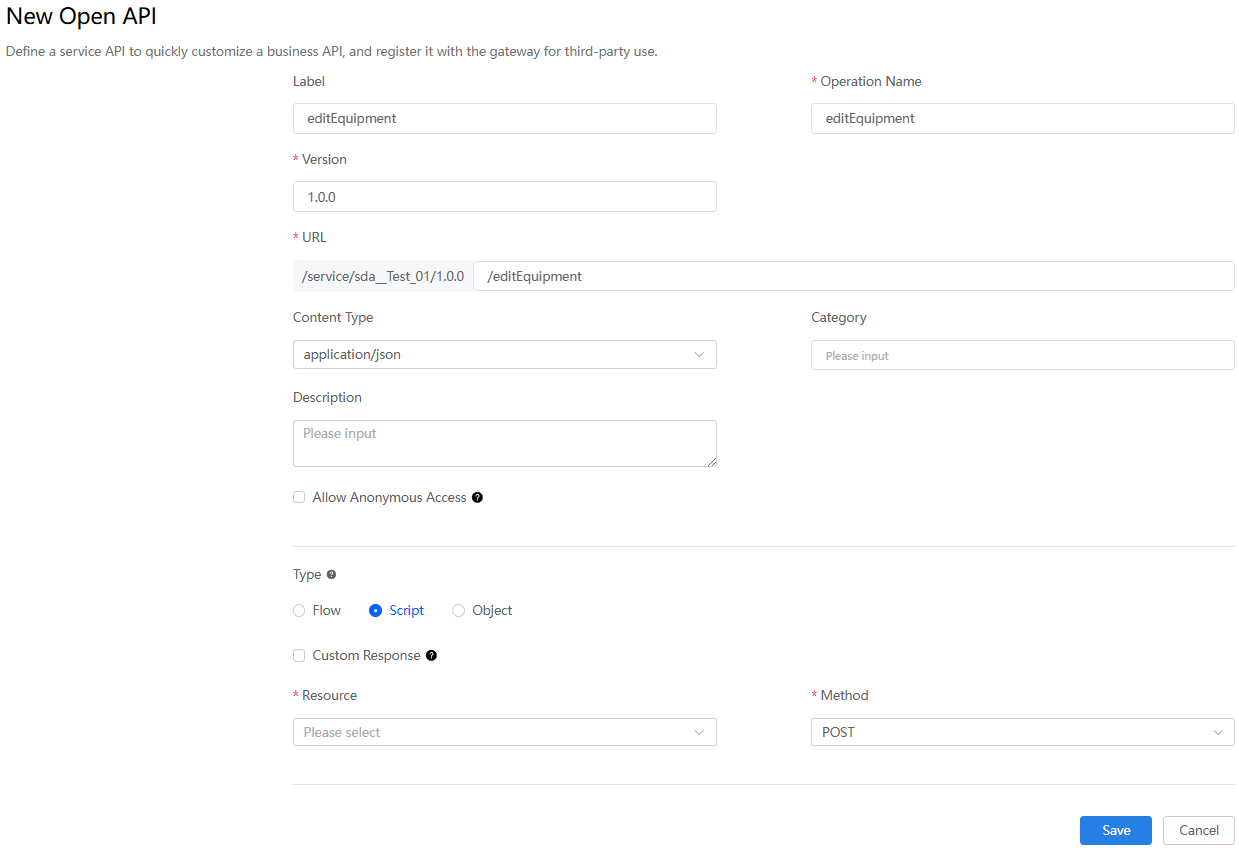
 - Complete the configuration and click Save.
Figure 1 Creating an API

Table 1 Parameters for creating an API Parameter
Description
Label
API label, which is displayed on the page.
Value: 1–64 characters.
Operation Name
Operation name of the API. The naming requirements are as follows:
- Value: 1–40 characters.
- Start with a letter and can contain only letters, digits, and underscores (_). It cannot end with an underscore (_).
Version
Version number corresponding to the URL, for example, 1.0.0.
URL
New URL. In the URL, /service is a fixed value, and is followed by /App name/Version. The rest can be customized.
A custom URL must meet the following rules:
- Must start with a slash (/).
- Multi-level paths can be configured. Content must exist between slashes (/).
Content Type
Body type in a request. The options are as follows:
- application/json
- multipart/form-data
- binary-data
multipart/form-data and binary-data are used for the file upload API. If either of them is selected, only POST scripts can be invoked.
The default value is application/json.
Category
Category of the API.
Value: 1–255 characters.
Description
Enter the description of the API.
Value: 1–255 characters.
Allow Anonymous Access
Indicates whether the API can be accessed anonymously in the runtime environment. If this option is selected, anonymous access is allowed. If you access the API using a subdomain name of the runtime environment with invalid token authentication information, you can access it as an anonymous user without CSRF verification. The profile of anonymous users is Anonymous User Profile. Ensure that this profile has the service permission credential or related resource permissions for accessing the API. For example, add a service permission credential required by the API to Anonymous User Profile to access the API anonymously using the subdomain name of the runtime environment.
For example, the URL of the login API (used to log in to applications) is /service/namespace__MyApp/1.0.0/login, and the subdomain name of the runtime environment is test.example.com. To allow anonymous access to this API, select Allow Anonymous Access. If the API's service permission credential is configured for Anonymous User Profile, anonymous users can access the API through https://test.example.com/service/namespace__MyApp/1.0.0/login.
When configuring anonymous access, comply with the following rules:
- If an account needs to support anonymous access to the custom API, the subdomain name of the runtime environment must be set.
- A custom API that allows anonymous access is preferentially accessed with valid authentication profiles.
- CSRF verification is not required for anonymous users to access custom APIs.
- Regardless of the access mode, profile verification after identity authentication is the same. If the API has service permission credentials, the system checks whether the user profile has the credentials.
Type
API type.
- Flow: indicates that a flow is called through this API.
- Script: indicates that a script is called through this API.
- Object: indicates that the custom URL is used to operate object data, including adding, deleting, modifying, and querying object data.
Default value: Flow. In this example, select Script.
Custom Response
Indicates whether to format the response returned after the URL is called. If this option is selected, the response is formatted. The resCode, resMsg, and result outer information is deleted, and only the returned messages are transparently transmitted.
- If Custom Response is not selected, the following response is returned:
{ "resCode": "0", "resMsg": "Success", "result": [ { "equipments": [ { "createdBy": "aaa", "createdBy.__objectType": "User" }, { "createdBy": "aaa", "createdBy.__objectType": "User" } ], "total": "2" } ] } - If Custom Response is selected, only the following response is returned:
{
    "equipments": [
        {
            "createdBy": "aaa",
            "createdBy.__objectType": "User"
        },
        {
            "createdBy": "aaa",
            "createdBy.__objectType": "User"
        }
    ],
    "total": "2"
}
Resource
Name of the called flow, script, or name of the operated object.
Object Operation
Select an operation. This parameter is displayed only when Type is set to Object.
- Insert Record: Add object data.
- Update or Insert Record: Update or add object data.
- Update By ID: Update object data by record ID.
- Delete By ID: Delete object data by record ID.
- Query By ID: Query object data by record ID.
- Update By Condition: Update object data by condition.
- Delete By Condition: Delete object data by condition.
- Query By Condition: Query object data by condition.
Method
Method, such as GET, PUT, POST, or DELETE, to be called after the mapping.
- Test the new API online.
- In the navigation pane of the application designer, choose Integrations.
- On the Open API area, move the cursor to
 of the corresponding API, and choose Check. The preview page is displayed.
 - Click
 next to the URL.
Figure 2 Accessing the preview page
- Click the try button, enter input parameters if required, and click Execute.
If a success response is returned, the API is called successfully.
Feedback
Was this page helpful?
Provide feedbackThank you very much for your feedback. We will continue working to improve the documentation.See the reply and handling status in My Cloud VOC.
For any further questions, feel free to contact us through the chatbot.
Chatbot


