
Modifying a Policy Group
Scenarios
You can modify the policy configuration (including the default policy group), basic information, and policy objects in an existing policy group, or delete a policy group that is no longer used.
Modifying Basic Information

The basic information about the default policy group cannot be modified.
- Log in to the Workspace Application Streaming console as an administrator.
- In the navigation pane, click Policy Groups. The Policy Groups page is displayed.
- Click Basic Info in the Operation column of the policy to be modified. The Basic Info page is displayed.
- Modify the name, priority, and description as required.
- The policy name can contain up to 55 characters in digits, letters, and underscores (_).
- The priority value must be less than the total number of policy groups. The priority is a basis for determining an execution sequence or an action weight of a policy by Workspace Application Streaming. The priority is represented by a positive integer. A smaller value indicates a higher priority.
- The description contains up to 255 characters.
- Click Save.
Modifying Policy Configuration
- Log in to the Workspace Application Streaming console as an administrator.
- In the navigation pane, click Policy Groups. The Policy Groups page is displayed.
- Click Policy Configuration in the Operation column of the policy to be modified. The General Policy Configuration page is displayed.
- Enable or disable policy items as required. Table 1 describes the policy items.
Table 1 Policy management Type
Parameter
Description
File Redirection
Fixed driver
- Read-only: Files in drivers and storage devices can only be pre-viewed.
- Read/write: Files in drivers and storage devices can be modified.
Users can use drivers through file redirection in VMs on Workspace Application Streaming.
Removable driver
CD/DVD-ROM driver
Network driver
Clipboard Redirection
Bidirectional
After this function is enabled, end users can copy data from Workspace Application Streaming and paste the data on local desktops, or vice versa.
Server to client
After this function is enabled, end users can only copy data on Workspace Application Streaming and paste the data on local desktops.
Client to server
After this function is enabled, end users can only copy data on local desktops and paste the data on Workspace Application Streaming.
NOTE:Files can be copied only from a Windows client to a server, and file redirection and the corresponding driver must be enabled.
Print Device Redirection
Server to client
Users can use print devices connected to TCs.
Sessions
Auto Disconnection Without Keyboard/Mouse Device Operations
Enabled: If no keyboard or mouse device operation is performed on the client for a specified period of time, the client automatically disconnects from the server and the application is closed.
Disabled: The automatic disconnection function is disabled.
Waiting Time (Min)
Sets the waiting time for automatic disconnection when no keyboard or mouse device operation is performed. Value range: 3–86,400.
Auto Logout
If Auto Disconnection Without Keyboard/Mouse Device Operations is enabled, you can configure the waiting time before the session is automatically logged out of.
Session Retention After Disconnection (Min)
If Auto Disconnection Without Keyboard/Mouse Device Operations is enabled, in the case of automatic disconnection, the session is automatically logged out of after the session retention period expires. Value range: 1–86,400.
- Click Advanced Policies and modify advanced policy items as required.
- Click Save.
Modifying a Policy Object
The policy object of the default policy group cannot be modified.
- Log in to the Workspace Application Streaming console as an administrator.
- In the navigation pane, click Policy Groups. The Policy Groups page is displayed.
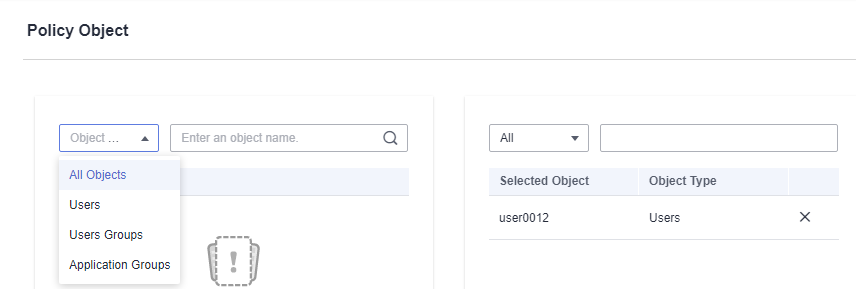
- Click Policy Object in the Operation column of the policy to be modified. The Policy Object page is displayed.
- Modify the policy object as required. You can add an object in the drop-down list box on the left. In the selected object list on the right, click
 to delete an object, as shown in Figure 1.
 Rules for a policy to take effect:
- If a policy object is included in multiple policy groups, the object takes effect in the policy group with the highest priority.
- When an application is connected, if there is a policy group in both the application groups of user (group) and application, the object takes effect in the policy group with the highest priority.
- Click Save.
Deleting a Policy Group
The default policy group cannot be deleted.
- Log in to the Workspace Application Streaming console as an administrator.
- In the navigation pane, click Policy Groups. The Policy Groups page is displayed.
- Click Delete in the Operation column of the policy to be deleted. The page for confirming the deletion is displayed.
- Click OK.
Feedback
Was this page helpful?
Provide feedbackThank you very much for your feedback. We will continue working to improve the documentation.See the reply and handling status in My Cloud VOC.
For any further questions, feel free to contact us through the chatbot.
Chatbot


