
Network Configurations for Primary and Standby Instances in the Same Region
GeminiDB Redis allows you to create two active instances in the same region. Data between them is synchronized. Once one instance becomes faulty, the other one can take over read/write traffic to ensure service continuity.
Before you create a dual-active relationship, connect the two instances using a VPC peering connection so that the VPCs where the two instances are deployed can communicate with each other.
Procedure
- Create two different VPCs in the same region.
- Log in to the VPC console.
- Click Create VPC.
Figure 1 Creating a VPC

- On the Basic Information page, configure required parameters.
Figure 2 Configuring VPC parameters
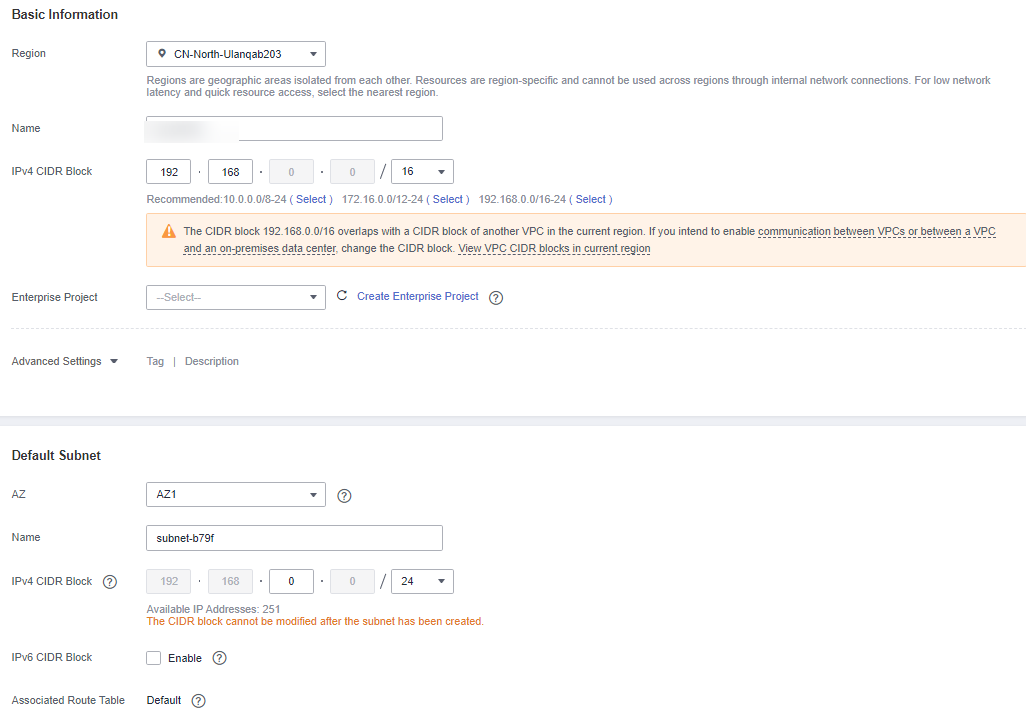
Table 1 VPC 1 configurations Parameter
Description
Example Value
Region
Region where the VPC is created. For lower network latency and faster access to your resources, select the region nearest you.
-
Name
VPC name
vpc-10-0-master
IPv4 CIDR Block
CIDR block of the VPC. The CIDR block of any subnet in the VPC must be within the VPC CIDR block.
10.0.0.0/24
IPv4 CIDR Block
CIDR block for the subnet. The block must be within the VPC CIDR block.
10.0.0.0/24

Retain default values for the parameters not listed in the above table.
- Create another VPC by referring to 1.c.
Figure 3 Configuring VPC information

Table 2 VPC 2 configurations Parameter
Description
Example Value
Region
Select the same region as VPC 1.
-
Name
VPC name
vpc-10-1-slave
IPv4 CIDR Block
Select a CIDR block different from VPC 1 CIDR block.
10.1.0.0/24
IPv4 CIDR Block
CIDR block for the subnet. The block must be within the VPC CIDR block.
10.1.0.0/24
- Create a VPC peering connection.
- Log in to the VPC console.
- In the navigation pane on the right, choose VPC Peering Connections > Create VPC Peering Connection.
Figure 4 Creating a VPC peering connection

- Select My account for Account and configure other required parameters.
Table 3 VPC peering connection configurations Parameter
Description
Example Value
Name
Name of the VPC peering connection
peering-1264
Local VPC
Select a VPC from the drop-down list.
vpc-10-0-master
Local VPC CIDR Block
CIDR block of the local VPC
10.0.0.0/24
Account
Account that the VPC to be peered with is from. The value can be:
- My account: The VPC is from your account.
- Another account: The VPC is from another account.
My account
Peer Project
Peer project name. The name of the current project is used by default.
cn-east-3
Peer VPC
The other VPC that you want to connect. Select a VPC from the drop-down list if you want to connect your VPC with another VPC of your own.
vpc-10-1-slave
Peer VPC CIDR Block
The CIDR block for the peer VPC
10.1.0.0/24
- Click OK.
- View the created VPC peering connection.
Figure 5 Viewing the VPC peering connection

- Add a route for the peering connection.
- Add a local route.
In the peering connection list, locate the VPC peering connection that you want to configure routes for and click the connection name. The page showing the VPC peering connection details is displayed.
Click the Local Routes tab and then click the Route Tables hyperlink. The Summary tab of the default route table for the local VPC is displayed.
Figure 6 Local routes
Click Add Route to add a route to the route table.
Figure 7 Adding a route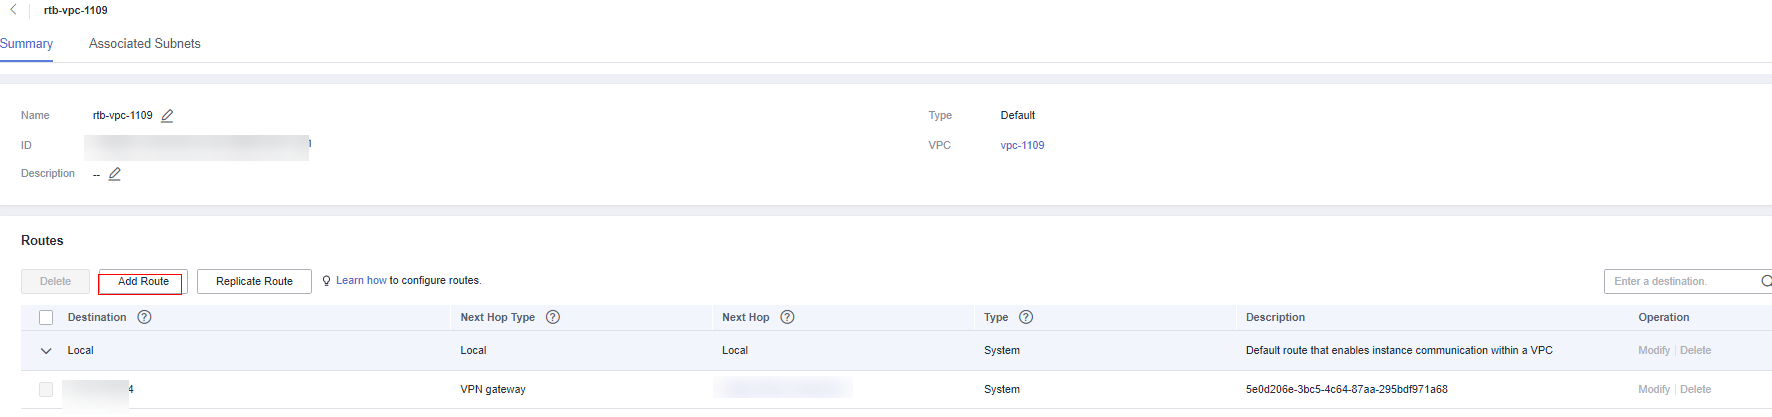
In the displayed dialog box, configure required parameters.
Figure 8 Configuring route parameters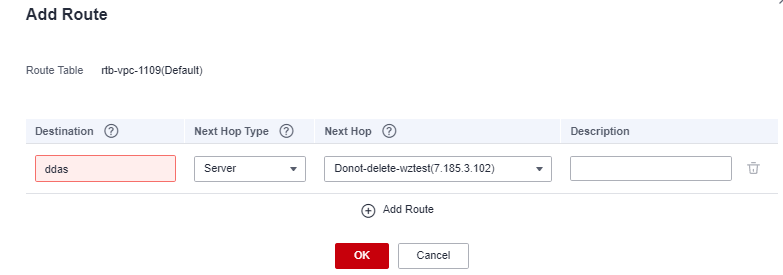
Table 4 Route configurations Parameter
Description
Example Value
Destination
CIDR block of the peer VPC
10.1.0.0/24
Next Hop Type
Type of the next hop
VPC peering connection
Next Hop
Select the created VPC peering connection.
peering-1264
Description
(Optional) Provides supplementary information about the route.
-
Click OK. You can then view the added route on the Local Routes page.
Figure 9 Viewing local routes
- Add a peer route.
Click the Peer Routes tab and then click the Route Tables hyperlink. The Summary tab of the default route table for the peer VPC is displayed.
Figure 10 Peer routes
Click Add Route to add a route to the route table.
Figure 11 Adding a route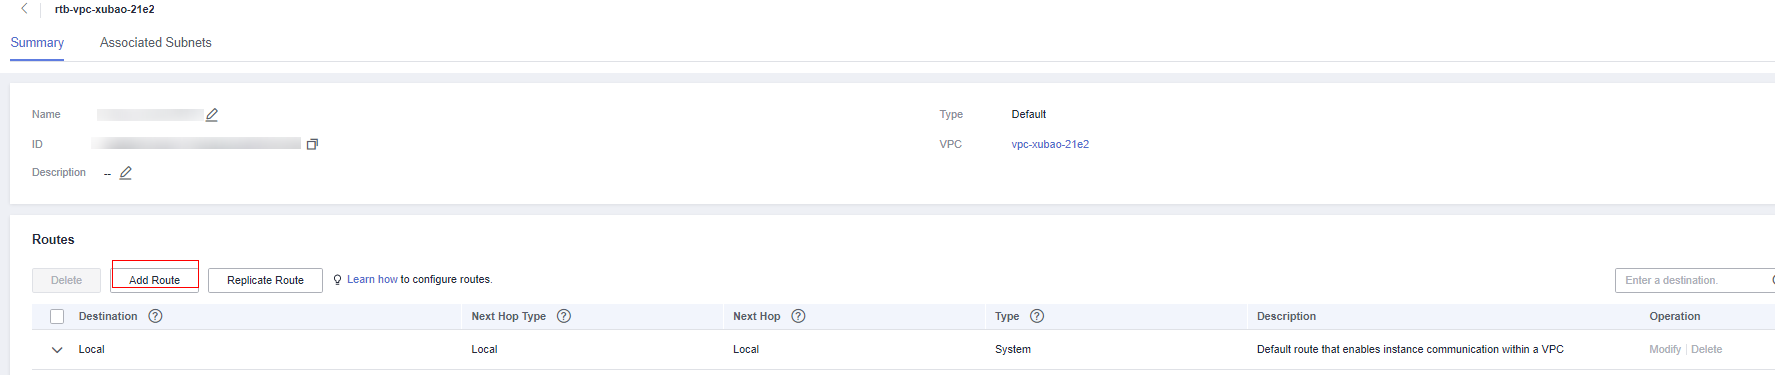
In the displayed dialog box, configure required parameters.
Figure 12 Configuring route parameters
Table 5 Route configurations Parameter
Description
Example Value
Destination
CIDR block of the local VPC
10.0.0.0/24
Next Hop Type
Type of the next hop
VPC peering connection
Next Hop
Select the created VPC peering connection.
peering-1264
Description
(Optional) Provides supplementary information about the route.
-
Click OK. You can then view the added route on the Peer Routes page.
Figure 13 Viewing peer routes
The two VPCs can communicate with each other now. Then you can create two GeminiDB Redis instances in these two VPCs by referring to Buying an Instance.
- Add a local route.
Feedback
Was this page helpful?
Provide feedbackThank you very much for your feedback. We will continue working to improve the documentation.See the reply and handling status in My Cloud VOC.
For any further questions, feel free to contact us through the chatbot.
Chatbot


