
Building an Image and Pushing It to the Image Repository
To deploy an existing application on CCI, build an image for the application and push it to the image repository. Then you can pull the image when creating a workload on CCI.
Installing the Container Engine
Before pushing an image, ensure that you have installed the container engine of version 1.11.2 or later.
- Create a Linux ECS with a public IP address. For details, see the ECS documentation.
For demonstration, you do not need to select high specifications for ECS and public IP address. For example, select 1 vCPUs | 2 GiB for ECS specifications, 1 Mbit/s for the IP bandwidth, and CentOS 7.6 for the operating system.

You can also install the container engine on other machines.
- Go to the ECS list and click Remote Login to log in to the ECS.
- Run the following command to quickly install the container engine:
curl -fsSL get.docker.com -o get-docker.sh
sh get-docker.sh
sudo systemctl daemon-reload
sudo systemctl restart docker
Building an Image
The following describes how to use a Dockerfile and an Nginx image to build the 2048 image. Before building the image, you need to create a Dockerfile.
- Pull the Nginx image from the image repository as the base image.
docker pull nginx
- Download the 2048 static web application.
git clone https://gitee.com/jorgensen/2048.git
- Build a Dockerfile.
- Run the following command:
vi Dockerfile
- Edit the Dockerfile.
FROM nginx

MAINTAINER Allen.Li@gmail.com
COPY . /usr/share/nginx/html

EXPOSE 80

CMD ["nginx", "-g", "daemon off;"]
- nginx indicates the base image. You can select the base image based on the type of the created application. For example, select a Java image as the base image to create a Java application.
- /usr/share/nginx/html indicates the directory for the Nginx image to store the static web.
- 80 indicates the container port.
- Run the following command:
- Build the 2048 image.
- Run the following command:
docker build -t='2048' .
The following information will be displayed upon a successful image creation:
Figure 1 Successful image creation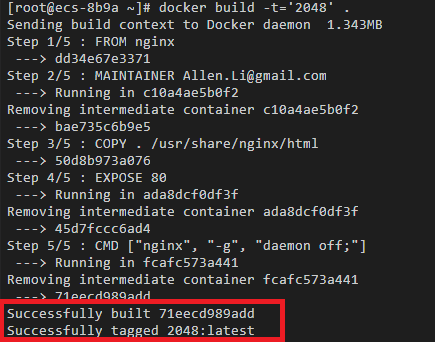
- Query the image.
docker images
If the following information is displayed, the image is successfully created.
Figure 2 Querying the image
- Run the following command:
Pushing the Image
- Access SWR.
- Log in to the management console, choose Service List > Application > SoftWare Repository for Container.
- In the navigation pane, choose My Images and then click Upload Through Client. On the page displayed, click Generate a temporary login command and click
 to copy the command.
The validity period of the temporary login command is 24 hours. To obtain a long-term valid login command, see Obtaining a Long-Term Valid Login Command.
- Run the login command on the machine where the container engine is installed.
The message login succeeded will be displayed upon a successful login.
- Push the image.
- Run the following command to label the 2048 image on the machine where the container engine is installed:
docker tag [Image name:tag] [Image repository address]/[Organization name]/[Image name:tag]
Example:
docker tag 2048:latest swr.cn-north-4.myhuaweicloud.com/cloud-develop/2048:latest
In the preceding command:
- swr.cn-north-4.myhuaweicloud.com indicates the address of the SWR image repository.
- cloud-develop indicates the organization name of the image.
- 2048:latest indicates the image name and tag.
- Run the following command to push the image to the image repository:
docker push [Image repository address]/[Organization name]/[Image name:tag]
Example:
docker push swr.cn-north-4.myhuaweicloud.com/cloud-develop/2048:latest
The following information will be returned upon a successful push:
6d6b9812c8ae: Pushed
695da0025de6: Pushed
fe4c16cbf7a4: Pushed
v1: digest: sha256:eb7e3bbd8e3040efa71d9c2cacfa12a8e39c6b2ccd15eac12bdc49e0b66cee63 size: 948
To view the pushed image, go to the SWR console and refresh the My Images page.
- Run the following command to label the 2048 image on the machine where the container engine is installed:
Feedback
Was this page helpful?
Provide feedbackThank you very much for your feedback. We will continue working to improve the documentation.See the reply and handling status in My Cloud VOC.
For any further questions, feel free to contact us through the chatbot.
Chatbot


