
Governing Microservices
After a microservice is deployed, you can govern it based on its running statuses.
Prerequisites
- You can create a microservice in Microservice List from Service Catalog and start the microservice. After the microservice starts, the service instance is registered under the corresponding service based on configurations in the .yaml file.
- If the microservice is not created in advance or has been deleted, the microservice is automatically created when the service instance is registered.
- After a microservice is created, register the service instance before performing the corresponding operation.
Governance Policies
You can configure the following policies: Load Balancing, Rate Limiting, Fault Tolerance, Service Degradation, Circuit Breaker, Fault Injection, and Blacklist and Whitelist. For details, see the following table.
|
Name |
Description |
|---|---|
|
Load Balancing |
|
|
Rate Limiting |
|
|
Service Degradation |
|
|
Fault Tolerance |
|
|
Circuit Breaker |
|
|
Fault Injection |
NOTE:
This policy applies only to microservices accessed through Java chassis. |
|
Blacklist and Whitelist |
NOTE:
This policy applies only to microservices accessed through Java chassis. |
Configuring Load Balancing
- Log in to ServiceStage and choose Cloud Service Engine > Engines.
- Select the target microservice engine from the Microservice Engine drop-down list in the upper part of the page.

- Choose Microservice Governance.
- In the displayed Security Authentication dialog box, enter the account name and password, and click OK.

- If you connect to the microservice engine for the first time, enter the account name root and the password entered when creating the microservice engine.
- For details about how to create an account, see Adding an Account.
- Click the microservice to be governed.
- Choose Load Balancing.
- Click New. Select the microservices to be governed and select a proper load balancing policy. For details, see the following table.
Figure 1 Configuring load balancing (for microservices accessed through Spring Cloud)
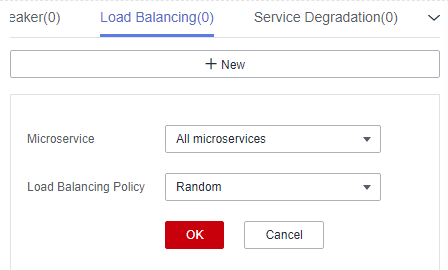 Figure 2 Configuring load balancing (for microservices accessed through Java chassis)
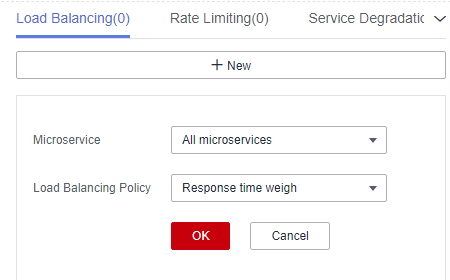
Policy
Description
Round robin
Supports routes according to the location information about service instances.
Random
Provides random routes for service instances.
Response time weigh
NOTE:This policy applies to microservices accessed through Java chassis.
Provides weight routes with the minimum active number (latency) and supports service instances with slow service processing in receiving a small number of requests to prevent the system from stopping response. This load balancing policy is suitable for applications with low and stable service requests.
Session stickiness
NOTE:This policy applies to microservices accessed through Java chassis.
Provides a mechanism on the load balancer. In the specified session stickiness duration, this mechanism allocates the access requests related to the same user to the same instance.
- Stickiness Duration: time limit for keeping a session. The value ranges from 0 to 86400, in seconds.
- Failures: number of access failures. The value ranges from 0 to 10. If the upper limit of failures or the session stickiness duration exceeds the specified values, the microservice stops accessing this instance.
- Click OK.
Configuring Rate Limiting
- Log in to ServiceStage and choose Cloud Service Engine > Engines.
- Select the target microservice engine from the Microservice Engine drop-down list in the upper part of the page.

- Choose Microservice Governance.
- In the displayed Security Authentication dialog box, enter the account name and password, and click OK.
- If you connect to the microservice engine for the first time, enter the account name root and the password entered when creating the microservice engine.
- For details about how to create an account, see Adding an Account.
- Click the microservice to be governed.
- Click Rate Limiting.
- Click New. The following table describes configuration items of rate limiting.
Figure 3 Configuring rate limiting (for microservices accessed through Spring Cloud)
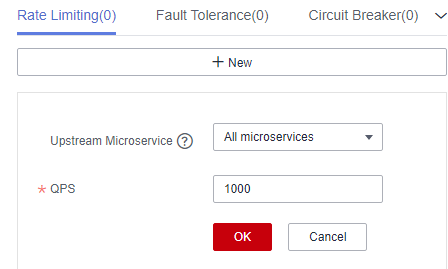 Figure 4 Configuring rate limiting (for microservices accessed through Java chassis)
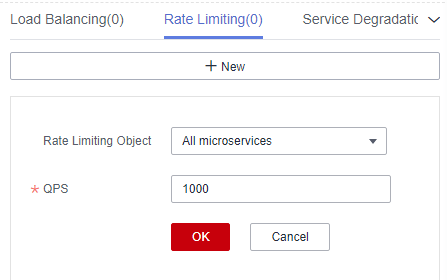
Configuration Item
Description
Value Range
Rate Limiting Object
NOTE:This configuration applies to microservices accessed through Java chassis.
Other microservices that access the microservice.
Select an item from the drop-down list next to Rate Limiting Object.
Upstream Microservice
NOTE:This configuration applies to microservices accessed through Spring Cloud.
Configure rate limiting for the upstream microservice to invoke the service.
Select an item from the drop-down list next to Upstream Microservice.
QPS
Requests generated per second. When the number of requests sent by the rate limiting object to the current service instance exceeds the specified value, the current service instance no longer accepts requests from the rate limiting object.
Enter an integer ranging from 1 to 99999.
If a microservice has three instances, the rate limiting of each instance is set to 2700 QPS, then the total QPS is 8100, and rate limiting is triggered only when the QPS exceeds 8100.
- Click OK.
Configuring Service Degradation
- Log in to ServiceStage and choose Cloud Service Engine > Engines.
- Select the target microservice engine from the Microservice Engine drop-down list in the upper part of the page.

- Choose Microservice Governance.
- In the displayed Security Authentication dialog box, enter the account name and password, and click OK.
- If you connect to the microservice engine for the first time, enter the account name root and the password entered when creating the microservice engine.
- For details about how to create an account, see Adding an Account.
- Click the microservice to be governed.
- Click Service Degradation.
- Click New and select a proper policy. The following table describes the configuration items of service degradation.
Figure 5 Configuring service degradation (for microservices accessed through Spring Cloud)
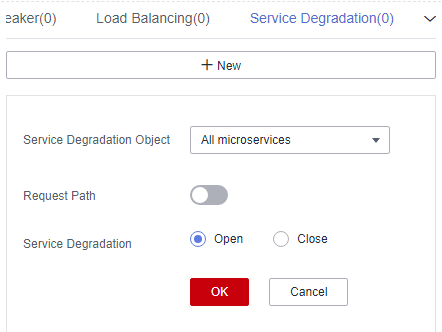 Figure 6 Configuring service degradation (for microservices accessed through Java chassis)
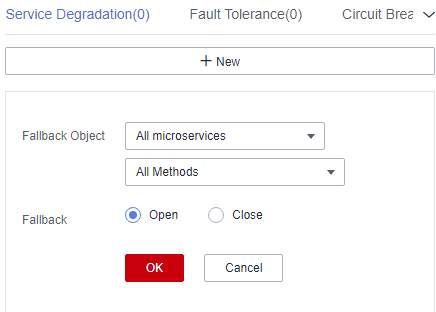
Configuration Item
Description
Fallback Object
Microservice to be degraded.
Request Path
NOTE:This configuration applies to microservices accessed through Spring Cloud.
Click
 and set Method, Path, and Headers to specify the request path.
Fallback
- Open
- Close
- Click OK.
Configuring Fault Tolerance
- Log in to ServiceStage and choose Cloud Service Engine > Engines.
- Select the target microservice engine from the Microservice Engine drop-down list in the upper part of the page.

- Choose Microservice Governance.
- In the displayed Security Authentication dialog box, enter the account name and password, and click OK.
- If you connect to the microservice engine for the first time, enter the account name root and the password entered when creating the microservice engine.
- For details about how to create an account, see Adding an Account.
- Click the microservice to be governed.
- Click Fault Tolerance.
- Click New and select a proper policy. The following table describes the configuration items of fault tolerance.
Figure 7 Configuring fault tolerance (for microservices accessed through Spring Cloud)
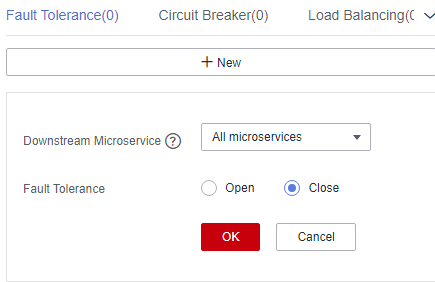 Figure 8 Configuring fault tolerance (for microservices accessed through Java chassis)
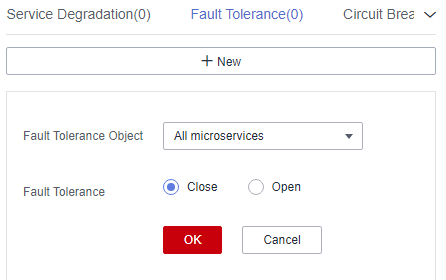
- Click OK.
Configuring Circuit Breaker
- Log in to ServiceStage and choose Cloud Service Engine > Engines.
- Select the target microservice engine from the Microservice Engine drop-down list in the upper part of the page.

- Choose Microservice Governance.
- In the displayed Security Authentication dialog box, enter the account name and password, and click OK.
- If you connect to the microservice engine for the first time, enter the account name root and the password entered when creating the microservice engine.
- For details about how to create an account, see Adding an Account.
- Click the microservice to be governed.
- Click Circuit Breaker.
- Click New and select a proper policy. The following table describes the configuration items of circuit breaker.
Figure 9 Configuring circuit breaker (for microservices accessed through Spring Cloud)
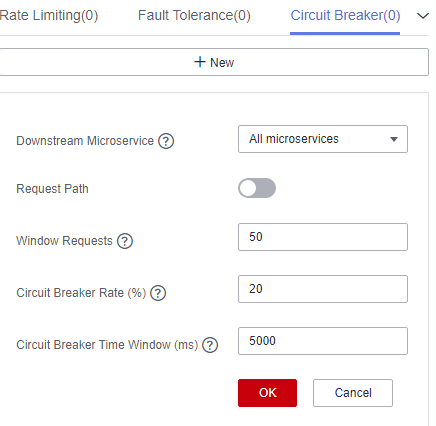 Figure 10 Configuring circuit breaker (for microservices accessed through Java chassis)
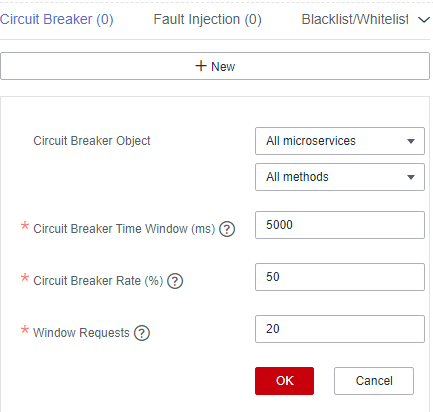
Configuration Item
Description
Downstream Microservice
NOTE:This configuration applies to microservices accessed through Spring Cloud.
Configure circuit breaker for the microservice to invoke the downstream microservice.
Fallbreak Object
NOTE:This configuration applies to microservices accessed through Java chassis.
Microservice or method invoked by the application.
Request Path
NOTE:This configuration applies to microservices accessed through Spring Cloud.
Click
 and set Method, Path, and Headers to specify the request path.
Triggering Condition
- Circuit Breaker Time Window: circuit breaker duration. The system does not respond to requests within this time window.
- Request Failure Rate: failure rate of window requests.
- Window Requests: number of requests received by the window. Circuit breaker is triggered only when Request Failure Rate and Window Requests both reach their thresholds.
- Click OK.
Configuring Fault Injection
- Log in to ServiceStage and choose Cloud Service Engine > Engines.
- Select the target microservice engine from the Microservice Engine drop-down list in the upper part of the page.

- Choose Microservice Governance.
- In the displayed Security Authentication dialog box, enter the account name and password, and click OK.
- If you connect to the microservice engine for the first time, enter the account name root and the password entered when creating the microservice engine.
- For details about how to create an account, see Adding an Account.
- Click the microservice to be governed.
- Click Fault Injection.
- Click New and select a proper policy. The following table describes the configuration items of fault injection.
Figure 11 Configuring fault injection (delayed)
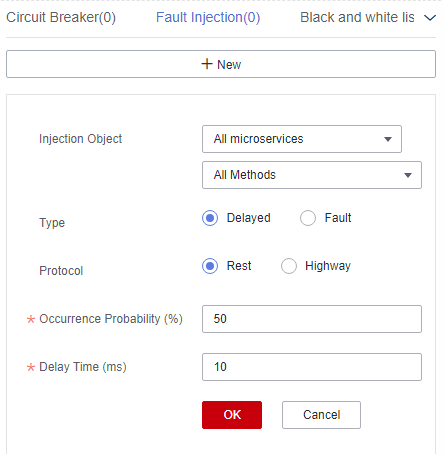 Figure 12 Configuring fault injection (fault)
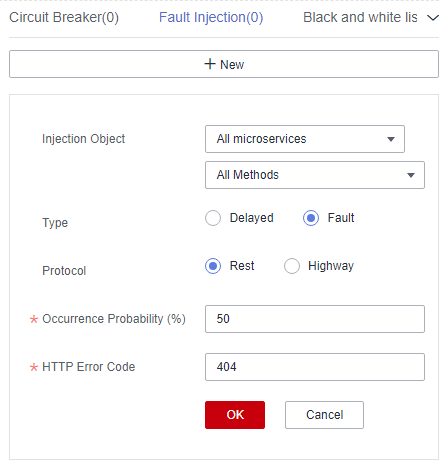
Configuration Item
Description
Injection Object
Microservices for which fault injection is required. You can specify a method for this configuration item.
Type
Type of the fault injected to the microservice.
- Delayed
- Fault
Protocol
Protocol for accessing the microservice when latency or fault occurs.
- Rest
- Highway
Occurrence Probability
Probability of latency or fault occurrence.
Delay Time
Duration of the latency during microservice access. This parameter is required when Type is set to Delayed.
HTTP Error Code
HTTP error code during microservice access. This parameter is required when Type is set to Fault. This error code is an HTTP error code.
- Click OK.
Configuring Blacklist and Whitelist
Based on the public key authentication mechanism, CSE provides the blacklist and whitelist functions. The blacklist and whitelist can be used to control which services can be accessed by microservices.
The blacklist and whitelist take effect only after public key authentication is enabled. For details, see Configuring Public Key Authentication.
- Log in to ServiceStage and choose Cloud Service Engine > Engines.
- Select the target microservice engine from the Microservice Engine drop-down list in the upper part of the page.

- Choose Microservice Governance.
- In the displayed Security Authentication dialog box, enter the account name and password, and click OK.
- If you connect to the microservice engine for the first time, enter the account name root and the password entered when creating the microservice engine.
- For details about how to create an account, see Adding an Account.
- Click the microservice to be governed.
- Click Black and white list.
- Click New to add a blacklist or whitelist for the application. The following table describes configuration items of blacklist and whitelist.
Figure 13 Configuring blacklist and whitelist
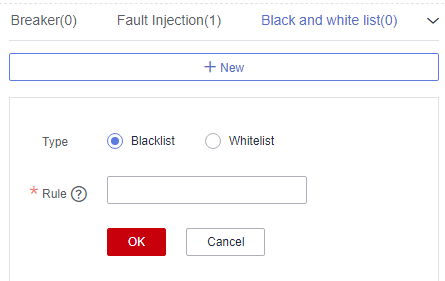
Configuration Item
Description
Type
- Blacklist: Microservices that match the matching rule are not allowed to access the current service.
- Whitelist: Microservices that match the matching rule are allowed to access the current service.
Rule
Use a regular expression.
For example, if Rule is set to data*, services whose names start with data in the blacklist are not allowed to access the current service, or services whose names start with data in the whitelist are allowed to access the current service.
- Click OK.
Configuring Public Key Authentication
Public key authentication is a simple and efficient authentication mechanism between microservices provided by CSE. Its security is based on the reliable interaction between microservices and the service center. That is, the authentication mechanism must be enabled between microservices and the service center. The procedure is as follows:
- When the microservice starts, a key pair is generated and the public key is registered with the service center.
- Before accessing the provider, the consumer uses its own private key to sign a message.
- The provider obtains the public key of the consumer from the service center and verifies the signed message.
To enable public key authentication, perform the following steps:
- Enable public key authentication for both the consumer and provider.
servicecomb: handler: chain: Consumer: default: auth-consumer Provider: default: auth-provider - Add the following dependency to the pom.xml file:
<dependency>
    <groupId>org.apache.servicecomb</groupId>
    <artifactId>handler-publickey-auth</artifactId>
  </dependency>
Feedback
Was this page helpful?
Provide feedbackThank you very much for your feedback. We will continue working to improve the documentation.See the reply and handling status in My Cloud VOC.
For any further questions, feel free to contact us through the chatbot.
Chatbot


