
- What's New
- Function Overview
- Product Bulletin
-
Service Overview
- Infographics
- What Is DMS for RabbitMQ?
- Product Advantages
- Application Scenarios
- Specifications
- Comparing RabbitMQ, Kafka, and RocketMQ
- Comparing RabbitMQ AMQP-0-9-1 with Open-Source RabbitMQ
- Comparing RabbitMQ Versions
- Related Services
- Security
- Notes and Constraints
- Basic Concepts
- Exchanges
- Permissions Management
- Billing
- Getting Started
-
User Guide
- Process of Using RabbitMQ
- Permissions Management
- Buying a RabbitMQ Instance
- Configuring Virtual Hosts
- Accessing a RabbitMQ Instance
- Managing Messages
- Advanced Features
-
Managing Instances
- Viewing and Modifying Basic Information of a RabbitMQ Instance
- Viewing RabbitMQ Client Connection Addresses
- Managing RabbitMQ Instance Tags
- Configuring RabbitMQ Recycling Policies
- Resetting the RabbitMQ Instance Password
- Enabling RabbitMQ Plug-ins
- Exporting the RabbitMQ Instance List
- Deleting a RabbitMQ Instance
- Logging In to RabbitMQ Management UI
- Modifying RabbitMQ Instance Specifications
- Migrating RabbitMQ Services
- Testing Instance Performance
- Applying for Increasing RabbitMQ Quotas
- Viewing Metrics and Configuring Alarms
- Viewing RabbitMQ Audit Logs
-
Best Practices
- RabbitMQ Best Practices
- Automatic Recovery of a RabbitMQ Client from Network Exceptions
- Automatic Consumer Reconnection After a RabbitMQ Node Restart
- Improving RabbitMQ Performance
- Configuring Queue Load Balancing
- Deduplicating Messages Through Message Idempotence
- Suggestions on Using DMS for RabbitMQ Securely
- Developer Guide
-
API Reference
- Before You Start
- API Overview
- Calling APIs
- Getting Started
- APIs V2 (Recommended)
- Permissions and Supported Actions
- Out-of-Date APIs
- Appendix
- Change History
- SDK Reference
-
FAQs
-
Instances
- What RabbitMQ Version Does DMS for RabbitMQ Use?
- What SSL Version Does DMS for RabbitMQ Use?
- Why Can't I View the Subnet and Security Group Information During Instance Creation?
- How Are Requests Evenly Distributed to Each VM of a Cluster RabbitMQ Instance?
- Do Queues Inside a Cluster RabbitMQ Instance Have Any Redundancy Backup?
- Does DMS for RabbitMQ Support Data Persistence? How Do I Perform Scheduled Data Backups?
- How Do I Obtain the Certificate After SSL Has Been Enabled?
- Can I Change the SSL Setting of a RabbitMQ Instance?
- Can RabbitMQ Instances Be Scaled Up?
- Does RabbitMQ Support Two-Way Authentication?
- Does DMS for RabbitMQ Support CPU and Memory Upgrades?
- How Do I Disable the RabbitMQ Management UI?
- Can I Change the AZ for an Instance?
- How Do I Obtain the Region ID?
- Why Can't I Select Two AZs?
- How to Change Single-node RabbitMQ Instances to Cluster Ones?
- Can I Change the VPC and Subnet After a RabbitMQ Instance Is Created?
-
Connections
- How Do I Configure a Security Group?
- Why Does a Client Fail to Connect to a RabbitMQ Instance?
- Does DMS for RabbitMQ Support Public Access?
- Does DMS for RabbitMQ Support Cross-Region Deployment?
- Do RabbitMQ Instances Support Cross-VPC Access?
- Do RabbitMQ Instances Support Cross-Subnet Access?
- What Should I Do If I Fail to Access a RabbitMQ Instance with SSL Encryption?
- Can I Access a RabbitMQ Instance Using DNAT?
- Why Can't I Open the Management Web UI?
- Can a Client Connect to Multiple Virtual Hosts of a RabbitMQ Instance?
- Why Does a RabbitMQ Cluster Have Only One Connection Address?
- Do RabbitMQ Instances Support the Ping Command?
- Messages
- Monitoring & Alarm
-
Instances
- Videos
-
More Documents
-
User Guide (ME-Abu Dhabi Region)
- Service Overview
- Getting Started
- Process of Using RabbitMQ
- Permissions Management
- Buying a RabbitMQ Instance
- Configuring Virtual Hosts
- Accessing a RabbitMQ Instance
- Managing Messages
- Advanced Features
-
Managing Instances
- Viewing and Modifying Basic Information of a RabbitMQ Instance
- Viewing RabbitMQ Client Connection Addresses
- Managing RabbitMQ Instance Tags
- Resetting the RabbitMQ Instance Password
- Enabling RabbitMQ Plug-ins
- Using the rabbitmq_tracing Plug-in
- Exporting the RabbitMQ Instance List
- Deleting a RabbitMQ Instance
- Logging In to RabbitMQ Management UI
- Modifying RabbitMQ Instance Specifications
- Migrating RabbitMQ Services
- Applying for Increasing RabbitMQ Quotas
- Viewing Metrics and Configuring Alarms
- Viewing RabbitMQ Audit Logs
-
FAQs
-
Instances
- What RabbitMQ Version Does DMS for RabbitMQ Use?
- What SSL Version Does DMS for RabbitMQ Use?
- Why Can't I View the Subnet and Security Group Information During Instance Creation?
- How Are Requests Evenly Distributed to Each VM of a Cluster RabbitMQ Instance?
- Do Queues Inside a Cluster RabbitMQ Instance Have Any Redundancy Backup?
- Does DMS for RabbitMQ Support Data Persistence? How Do I Perform Scheduled Data Backups?
- How Do I Obtain the Certificate After SSL Has Been Enabled?
- Can I Change the SSL Setting of a RabbitMQ Instance?
- Can RabbitMQ Instances Be Scaled Up?
- Does RabbitMQ Support Two-Way Authentication?
- Does DMS for RabbitMQ Support CPU and Memory Upgrades?
- How Do I Disable the RabbitMQ Management UI?
- Can I Change the AZ for an Instance?
- How Do I Obtain the Region ID?
- Why Can't I Select Two AZs?
- How to Change Single-node RabbitMQ Instances to Cluster Ones?
- Can I Change the VPC and Subnet After a RabbitMQ Instance Is Created?
-
Connections
- How Do I Configure a Security Group?
- Why Does a Client Fail to Connect to a RabbitMQ Instance?
- Does DMS for RabbitMQ Support Public Access?
- Does DMS for RabbitMQ Support Cross-Region Deployment?
- Do RabbitMQ Instances Support Cross-VPC Access?
- Do RabbitMQ Instances Support Cross-Subnet Access?
- What Should I Do If I Fail to Access a RabbitMQ Instance with SSL Encryption?
- Can I Access a RabbitMQ Instance Using DNAT?
- Why Can't I Open the Management Web UI?
- Can a Client Connect to Multiple Virtual Hosts of a RabbitMQ Instance?
- Why Does a RabbitMQ Cluster Have Only One Connection Address?
- Messages
- Monitoring & Alarm
-
Instances
- Change History
- API Reference (ME-Abu Dhabi Region)
-
User Guide (Kuala Lumpur Region)
- Service Overview
- Permissions Management
- Preparing the Environment
- Buying an Instance
- Accessing a RabbitMQ Instance
- Operating RabbitMQ Instances
- Quotas
- Monitoring
- Auditing
-
FAQs
-
Instances
- What RabbitMQ Version Does DMS for RabbitMQ Use?
- What SSL Version Does DMS for RabbitMQ Use?
- Why Can't I View the Subnet and Security Group Information During Instance Creation?
- What If One RabbitMQ VM Fails to Be Restarted When a Cluster RabbitMQ Instance Is Being Restarted?
- How Are Requests Evenly Distributed to Each VM of a Cluster RabbitMQ Instance?
- Do Queues Inside a Cluster RabbitMQ Instance Have Any Redundancy Backup?
- Does DMS for RabbitMQ Support Data Persistence? How Do I Perform Scheduled Data Backups?
- How Do I Obtain the Certificate After SSL Has Been Enabled?
- Can I Change the SSL Setting of a RabbitMQ Instance?
- Can RabbitMQ Instances Be Scaled Up?
- Does DMS for RabbitMQ Support MQTT?
- How Do I Clear Queue Data?
- Does DMS for RabbitMQ Support CPU and Memory Upgrades?
- How Do I Disable the RabbitMQ Management UI?
- Can I Change the AZ for an Instance?
-
Connections
- How Do I Configure a Security Group?
- Why Does a Client Fail to Connect to a RabbitMQ Instance?
- Does DMS for RabbitMQ Support Public Access?
- Does DMS for RabbitMQ Support Cross-Region Deployment?
- Does DMS for RabbitMQ Support Cross-VPC Access?
- Does DMS for RabbitMQ Support Cross-Subnet Access?
- What Should I Do If I Fail to Access a RabbitMQ Instance with SSL Encryption?
- Can I Access a RabbitMQ Instance Using DNAT?
- Why Can't I Open the Management Web UI?
- Can a Client Connect to Multiple Virtual Hosts of a RabbitMQ Instance?
- Why Does a RabbitMQ Cluster Have Only One Connection Address?
- Plug-ins
- Messages
- Monitoring & Alarm
-
Instances
- Change History
- API Reference (Kuala Lumpur Region)
-
User Guide (ME-Abu Dhabi Region)
- General Reference
Copied.
Deleting Queues
Delete queues on the RabbitMQ management UI or by calling APIs.
- Method 1: Deleting a Single Queue on the Management UI: Delete a single queue on the Queues tab page of the management UI.
- Method 2: Deleting Queues in Batches Using a Policy: Add a policy to delete multiple queues at a time. The policy has the same prefix as the queues to be deleted, and the queue time-to-live (TTL) is 1 ms.
- Method 3: Deleting a Single Queue Using an API: Call an API to delete a queue from a RabbitMQ instance with SSL disabled.
- Method 4: Deleting Queues in Batches Using an API: Compile a shell script to repeatedly call an API to delete queues in batches from a RabbitMQ instance with SSL disabled.
 NOTICE:
Before deleting a queue, ensure that all messages in the queue have been retrieved. Otherwise, unretrieved messages will be deleted together with the queue.
Method 1: Deleting a Single Queue on the Management UI
- Log in to the RabbitMQ management UI.
- On the Queues tab page, click the name of the desired queue.
Figure 1 Queue list

- Click Delete Queue to delete the queue.
Figure 2 Deleting a single queue

Method 2: Deleting Queues in Batches Using a Policy
Add a policy to delete multiple queues at a time. The policy has the same prefix as the queues to be deleted, and the queue TTL is 1 ms.
- Log in to the RabbitMQ management UI.
- On the Admin > Policies page, add a policy.
Figure 3 Adding a policy to delete queues in batches

- Name: Enter a policy name.
- Pattern: queue matching mode. Enter a queue name. Queues with the same prefix will be matched. If this parameter is set to .*, all queues are matched. If this parameter is set to .*queue-name, all queues whose name prefix is queue-name are matched.
- Apply to: Select Queues.
- Priority: policy priority. A larger value indicates a higher priority. This parameter is optional.
- Definition: TTL, in milliseconds. Set expires to 1, indicating that the queue expiration time is 1 ms.
- Click Add policy.
On the Queues tab page, check whether the queues are successfully deleted.
- After the queues are deleted, choose Admin > Policies, locate the row that contains the policy added in 2, and click Clear to delete the policy.
If this policy is retained, it will also apply to queues created later, and queues may be deleted by mistake.Figure 4 Deleting the policy

Method 3: Deleting a Single Queue Using an API
If SSL is not enabled for a RabbitMQ instance, you can call an API to delete a queue.
- Connect to the instance in Linux. For details, see Accessing a RabbitMQ Instance Without SSL Encryption.
- Run the following command to delete a queue:
curl -i -XDELETE http://${USERNAME}:${PASSWORD}@${HOST}:${PORT}/api/queues/${VHOST_NAME}/${QUEUE_NAME}Parameter description:- USERNAME: username set when the instance was created.
- PASSWORD: password set when the instance was created. If you forget the password, reset it by referring to Resetting the Instance Password.
- HOST: management UI address queried on the instance details page.
- PORT: management UI port number queried on the instance details page.
- VHOST_NAME: vhost name. The default value is /. Change it to %2F in the command.
- QUEUE_NAME: name of the queue to be deleted.
Example:
curl-i -XDELETE http://test:Zsxxxdx@192.168.0.241:15672/api/queues/%2F/hello
If the deletion is successful, the following information is displayed.
Figure 5 Queue deleted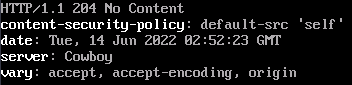
You can also check whether the queue is successfully deleted on the Queues tab page of the management UI.
Method 4: Deleting Queues in Batches Using an API
If SSL is not enabled for a RabbitMQ instance, you can compile a shell script to repeatedly call an API to delete queues in batches.
- Connect to the instance in Linux. For details, see Accessing a RabbitMQ Instance Without SSL Encryption.
- Create the delete_queues.sh script.
touch delete_queues.sh
- Edit the script.
vim delete_queues.sh
Copy the following content to the script. Change the values of USERNAME, PASSWORD, HOST, and QUEUES_LIST as required.
#!/usr/bin/env bash

USERNAME=root
PASSWORD=Zsxxxdx
HOST=192.168.0.241
PORT=15672
VHOST='%2F'


QUEUES_LIST="test1 test2 test3";
for QUEUE_NAME in $QUEUES_LIST :
do
   curl -i -XDELETE http://$USERNAME:$PASSWORD@$HOST:$PORT/api/queues/$VHOST/$QUEUE_NAME
done
Parameter description:- USERNAME: username set when the instance was created.
- PASSWORD: password set when the instance was created. If you forget the password, reset it by referring to Resetting the Instance Password.
- HOST: management UI address queried on the instance details page.
- PORT: management UI port number queried on the instance details page.
- VHOST: vhost name. The default value is /. Change it to %2F in the command.
- QUEUES_LIST: names of the queues to be deleted. Use spaces to separate queue names.
- Save the script.
- Configure the script permissions.
chmod 777 delete_queues.sh
- Run the script.
sh delete_queues.sh
If the deletion is successful, the following information is displayed.
Figure 6 Queues deleted
You can also check whether the queues are successfully deleted on the Queues tab page of the management UI.
Feedback
Was this page helpful?
Provide feedbackThank you very much for your feedback. We will continue working to improve the documentation.See the reply and handling status in My Cloud VOC.
For any further questions, feel free to contact us through the chatbot.
Chatbot


