
Snapshot Capturing
Live captures snapshots from a livestream based on a configured template and stores the captured snapshots in an OBS bucket. Multiple snapshot templates can be configured for an ingest domain name. The template in which App Name is the same as that in the ingest URL takes effect.
Process Flow
Figure 1 shows the process for configuring a snapshot template.
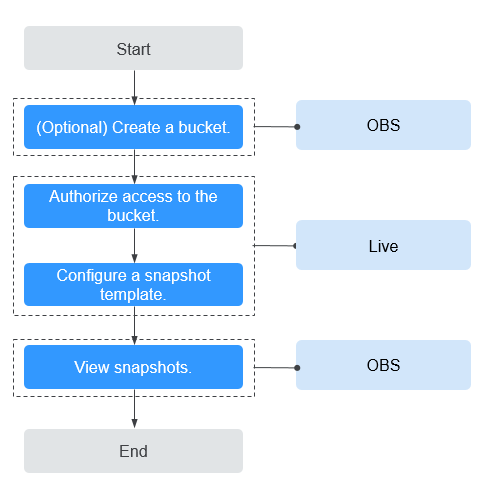
- (Optional) Create an OBS bucket for storing live video snapshots. If you already have one, go to 2.

The OBS bucket for storing live video snapshots must be in the same region as the Live service. For example, if you use Live in the CN North-Beijing4 region, then snapshots must be stored in an OBS bucket in the CN North-Beijing4 region.
- Authorize access to the OBS bucket so that the system can save the snapshots in the OBS bucket.
- Configure a snapshot template to capture snapshots from a video stream at a specified interval and save them as JPG files in an authorized OBS bucket.
- View snapshots in the output path.
Notes
- Live and the OBS bucket for storing snapshots must be in the same region.
- You are advised to set the OBS bucket as a private bucket. The differences between a private bucket and a public bucket are as follows:
- Private bucket: You must add authentication information before accessing the bucket and downloading snapshots. For details about the authentication information, see Creating a Signed URL (SDK for Go).
- Public bucket: You can directly access the bucket and download snapshots.
- Multiple snapshot templates can be configured for a domain name. The snapshot template in which App Name is same as that in the ingest URL takes effect.
- Only JPG files can be generated.
- In the AP-Bangkok region, submit a service ticket for review after configuring a template. The configuration takes effect only after it is approved.
- Huawei Cloud Live plans to bring offline the function of carrying authentication information in a snapshot callback URL on August 15, 2024.
Prerequisites
- You have added an ingest domain name.
- You have configured CNAME records at your domain names' DNS provider.
- Snapshots are stored in OBS. You must enable OBS before storing recordings in OBS.
Pricing Notes
- Snapshot capturing is a billing item. You are billed based on the number of snapshots.
- Snapshots are stored in OBS. OBS charges you for the storage.
Step 1: (Optional) Create an OBS Bucket
If you have not created an OBS bucket, create one in the region of Live. If you already have one, go to Step 2: Authorize Access to the OBS Bucket.
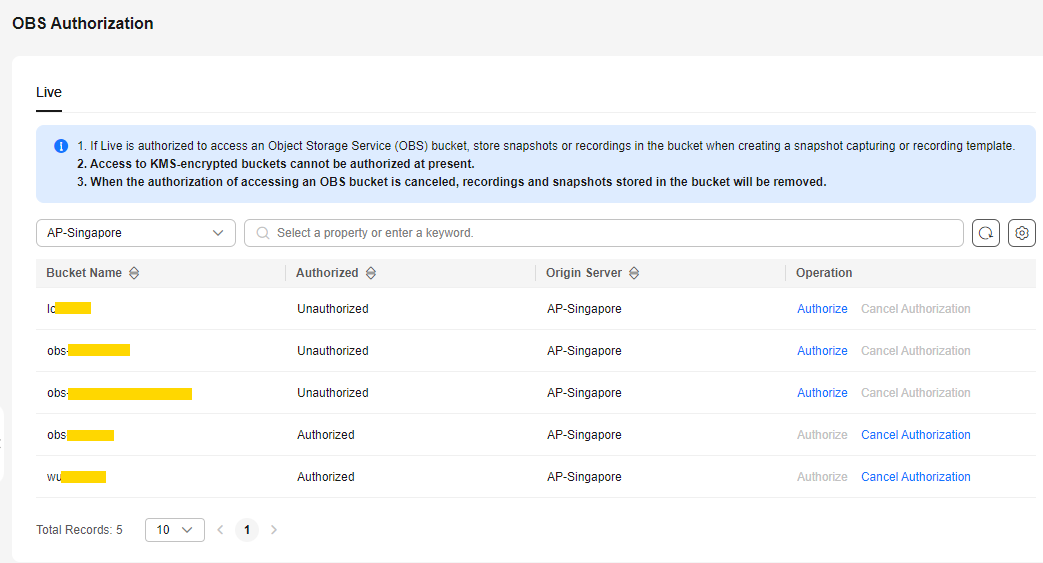
Step 2: Authorize Access to the OBS Bucket
Perform the following steps to authorize Live to store snapshots in your OBS bucket.

After access to the OBS bucket is authorized, Live can access the OBS bucket. Ensure that the bucket processes only workloads related to Live. Do not store confidential files in the bucket.
- Log in to the Live console.
- In the navigation pane, choose OBS Authorization.
- Under the Live tab, click Authorize in the Operation column of the desired OBS bucket.
Figure 2 OBS authorization
Step 3: Configure a Snapshot Template
After OBS authorization is successful, you can configure a snapshot template.
- Log in to the Live console.
- In the navigation pane, choose Domains.
- Click Manage in the Operation column of the desired ingest domain name.
- In the navigation pane, choose Templates > Snapshot Capturing.
- Click Create Snapshot Template.
Figure 3 Creating a snapshot template
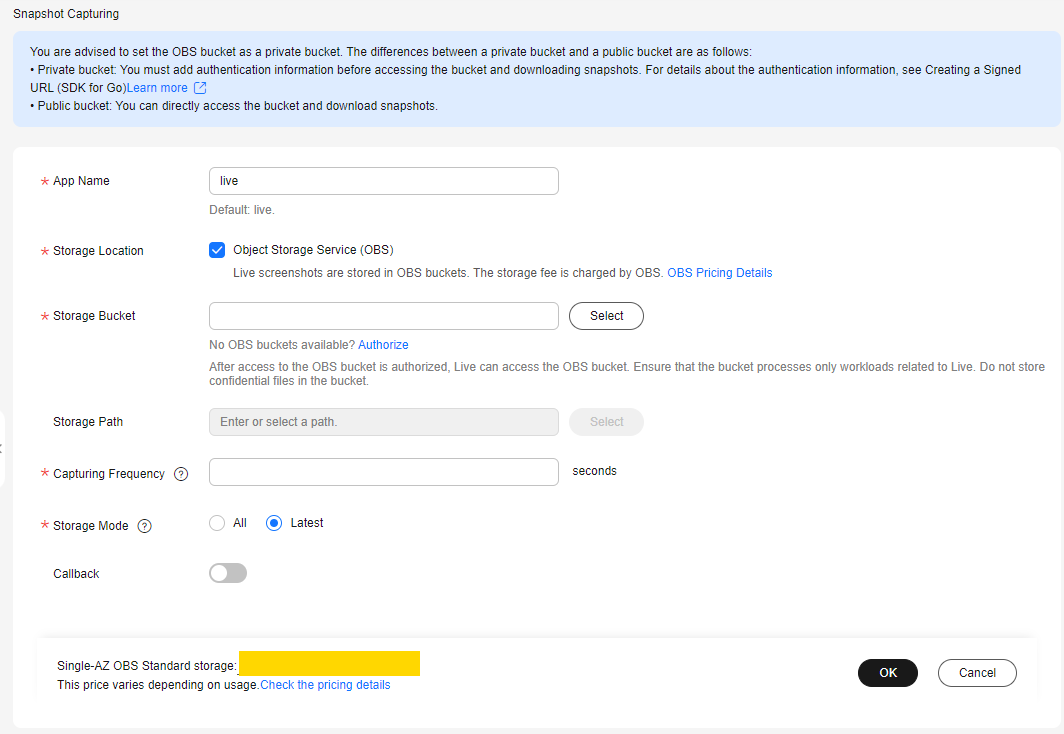
Table 1 describes the parameters.
Table 1 Template parameters Parameter
Description
App Name
Application name. The default value is live. You can customize the application name. Only letters, digits, underscores (_), and hyphens (-) are allowed.
Storage Location
Live snapshots are stored in OBS.
Storage Bucket
OBS bucket for storing snapshots
Storage Path
OBS bucket path for storing snapshots
Capturing Frequency
Snapshot capturing frequency, in second.
Value range: 5 to 3,600
Storage Mode
Snapshot file storage mode.
- All: A snapshot file name contains the timestamp. All snapshot files of each stream are stored in OBS. Example: snapshot/{domain}/{app_name}/{stream_name}/{UnixTimestamp}.jpg
- Latest: A snapshot file name does not contain the timestamp. Only the latest snapshot file of each stream will be saved. A new snapshot file overwrites the previous one. Example: snapshot/{domain}/{app_name}/{stream_name}.jpg
Callback
Whether to enable callback
Callback URL
Enter a callback URL when Callback is enabled. A callback URL cannot contain message headers or parameters. HTTP and HTTPS (recommended) are supported.
Callback messages in JSON format are sent in POST requests to your server through HTTP APIs. For details about a callback message body, see Callback Message.
Authentication Key
Authentication key. Configure this parameter only when callback authentication is required.
- A key contains 32 to 128 characters.
- A key can also be automatically generated.
- Click OK.
After a snapshot template is configured, stream push starts. During stream push, snapshots of the livestream are taken based on template settings.
- Click Edit in the Operation column to modify template parameters. App Name cannot be modified.
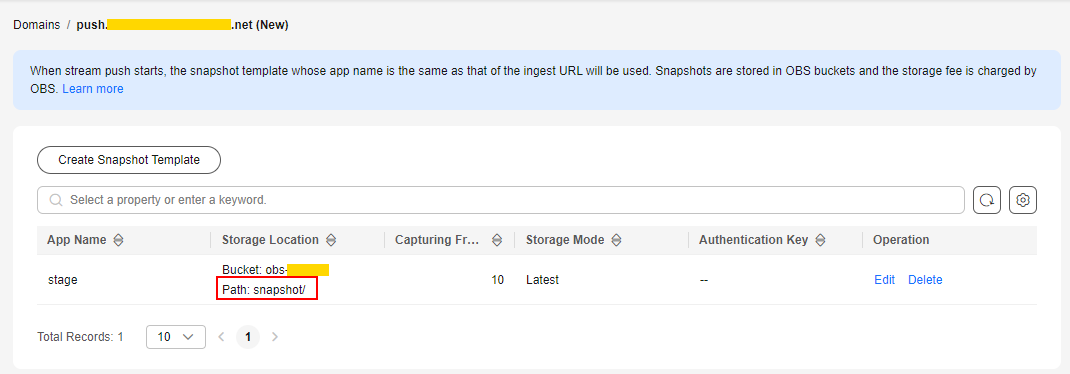
Step 4: View Snapshots
View snapshots in the predefined output path or from a download link in your received callback message.
- Viewing snapshots on the console
- Log in to the Live console.
- In the navigation pane, choose Domains.
- Click Manage in the Operation column of the desired ingest domain name.
- In the navigation pane, choose Templates > Snapshot Capturing.
- Click the output path in the Storage Location column to go to the OBS bucket and view snapshot details.
Figure 4 Viewing snapshot details
You can download and share the snapshots. For details, see OBS Help Center.
- Viewing snapshots through a callback message
If you set a callback URL when configuring a snapshot template, then you will receive a message each time a snapshot is generated. Table 2 describes the fields in a callback message.
{
    "domain": "play.example.com",
    "app": "live",
    "stream_name": "test001",
    "snapshot_url": "https://xxx.obs.cn-north-4.myhuaweicloud.com:443...",
    "width":"720",
    "height":"1280",
    "obs_addr": {
        "bucket": "xxx",
        "location": "cn-north-4",
        "object": "xxx.jpg"
    },
   "auth_timestamp":1587954140,
    "auth_sign":"4918b1axxxxxxb583cffa119d72513bbc35a989f8569fxxxxxx057646154a04a"
}
Table 2 Message body Field
Description
domain
Ingest domain name
app
Application name
stream_name
Stream name
snapshot_url
URL to download snapshots
width
Image width
Unit: pixel
height
Image height
Unit: pixel
obs_addr
Address of the OBS bucket where snapshots are stored.- bucket: OBS bucket name
- location: Region where the OBS bucket is located
- object: OBS object path
auth_timestamp
UNIX timestamp when the event notification signature expires. This parameter is carried when an authentication key is configured.
The value is a decimal UNIX timestamp, that is, the number of seconds that have elapsed since January 1, 1970 (midnight UTC/GMT).
Example: 1592639100 (June 20, 2020 15:45)
auth_sign
Event notification signature. This parameter is carried when an authentication key is configured.
auth_sign = HmacSHA256(domain + app + stream_name + snapshot_url + width + height + obs_addr.bucket + obs_addr.location + obs_addr.object + auth_timestamp,key)
key indicates the key used for authentication.
Feedback
Was this page helpful?
Provide feedbackThank you very much for your feedback. We will continue working to improve the documentation.See the reply and handling status in My Cloud VOC.
For any further questions, feel free to contact us through the chatbot.
Chatbot


