
What Should I Do If the Password Cannot Be Reset After I Use a Private Linux Image to Create a FlexusL Instance or Change the OS of an Existing Instance and I Forgot the Initial Password of the Private Image?
Symptom
After I use a private Linux image to create a FlexusL instance or change the OS of an existing instance, I cannot log in to the server in the instance by resetting the password. If the private image is created from a server on another cloud platform or downloaded from a third party, the image may not have the password reset plug-in installed, so the password reset function is unavailable.
- If you know the password for logging in to the server created from the private image or whose OS is changed using the private image, install the plug-in by referring to What Should I Do If the Password Cannot Be Reset After I Use a Private Linux Image to Create a FlexusL Instance or Change the OS of an Existing Instance and I Know the Initial Password of the Private Image?
- If you forgot the server login password, see the content in this section.
This section describes how to reset the password of user root. After resetting the password, you can log in to the cloud server and change the private key or reset the password of a non-root user.
Prerequisites
- Use the private image that has no password reset plug-in installed to create a temporary Linux ECS A.
- Prepare a temporary Linux ECS B that resides in the same AZ as the temporary ECS A.

- Ensure that the temporary ECSs A and B are in the same region as the FlexusL instance for which you are going to install the password reset plug-in.
- You can select an existing ECS or purchase an ECS as the temporary ECS B.
- After the password is reset, delete the temporary ECS B in a timely manner to avoid generating costs.
- An EIP has been bound to the temporary ECS B.
Process Flow

Procedure
- Download the password reset script and upload the script to the temporary ECS B.
Download the password reset script. Use a connection tool, such as WinSCP, to upload the obtained changepasswd.sh script to the temporary ECS B.
You can download WinSCP from https://winscp.net/.
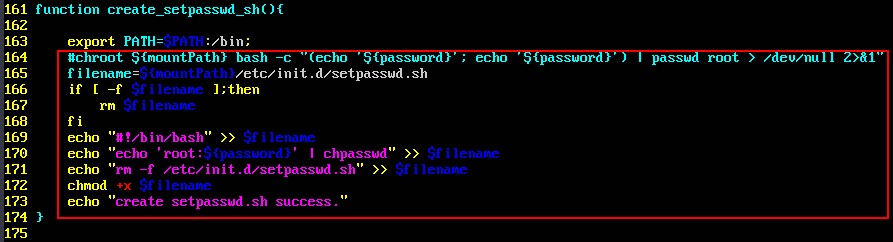
- In the password reset script, comment out line 164 and uncomment lines 165 to 173.
- Stop the temporary ECS A, detach its system disk, and attach it to the temporary ECS B.
- Log in to the management console.
- Click
 in the upper left corner and select a region and project.
 - Click
 . Under Compute, click Elastic Cloud Server.
 - Stop the temporary ECS A, click its name to go to the details page, and click the Disks tab.
Do not forcibly stop the temporary ECS A, or the password reset may fail.
- Locate the row containing the system disk to be detached and click Detach.
- Attach the system disk to the temporary ECS B.
- Click the temporary ECS B to go to the details page and click the Disks tab.
- Click Attach Disk. In the displayed dialog box, select the system disk detached in step 3.e and attach it to the temporary ECS B.
- Log in to the temporary ECS B and reset the password.
- In the server list, locate the row containing the temporary ECS B and click Remote Login in the Operation column.
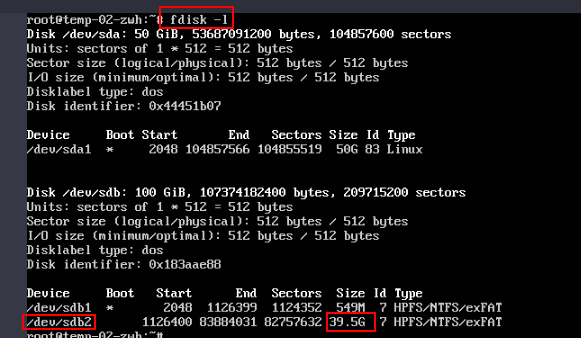
- Run the following command to view the directory of the system disk that was detached from the temporary ECS A now attached to the temporary temporary ECS B:
Figure 2 Viewing the directory of the system disk
- Run the following commands in the directory where the changepasswd.sh script is stored to execute the password reset script:
chmod +x changepasswd.sh
./changepasswd.sh
When you run the password reset script, if the system displays a message indicating that there is no command related to logical volume manager (LVM), such as the message "no lvs command", install an LVM tool on the temporary ECS B. The LVM2 tool is recommended and you can install it by running the yum install lvm2 command.
If the temporary ECSs A and B both run CentOS 7, a mount failure may occur during script execution. To resolve this issue, replace mount $dev $mountPath with mount -o nouuid $dev $mountPath in the script.
- Enter the new password and the directory obtained in step 5.b as prompted.
The password is reset if the following information is displayed:
set password success.
- (Optional) Enable remote root login for non-root users.
Modify the following settings:
- Change PasswordAuthentication no to PasswordAuthentication yes.
Alternatively, uncomment PasswordAuthentication yes.
- Change PermitRootLogin no to PermitRootLogin yes.
Alternatively, uncomment PermitRootLogin yes.
- Change the value of AllowUsers to root.
Search for AllowUsers in the file. If AllowUsers is missing, add it at the end of the file.
- Change PasswordAuthentication no to PasswordAuthentication yes.
- Stop the temporary ECS B, detach its system disk, and attach it back to the temporary ECS A. Then, restart the temporary ECS B.
- Stop the temporary ECS B, go to its details page, and click the Disks tab.
- Locate the row containing the system disk that was attached in 3 and click Detach.
- Click the temporary ECS A to go to the details page and click the Disks tab.
- Click Attach Disk. In the displayed dialog box, select the system disk detached in 7.b.
- Install the password reset plug-in on the temporary ECS A. For details, see Procedure.
- Restart the temporary ECS A.
- Create a system disk image from the temporary ECS A. For details, see Creating a System Disk Image.
- Use the system disk image to change the OS of the FlexusL instance. For details, see Changing an OS.
After the preceding operations are complete, you can reset the password for logging in to the server in your FlexusL instance. For details, see Setting or Resetting a Password.
Feedback
Was this page helpful?
Provide feedbackThank you very much for your feedback. We will continue working to improve the documentation.See the reply and handling status in My Cloud VOC.
For any further questions, feel free to contact us through the chatbot.
Chatbot


