
Certificate Authority Service Configuration Procedure
Root CA Directly Issuing End Entity Certificates
As shown in the figure, the Certificate Authority Service is enabled on the NetEco and only one CA is deployed. Functioning as both the root CA and lowest-level CA, the CA issues end entity certificates to the NetEco and services/devices. As the lowest-level CA, the root CA can issue only end entity certificates and cannot issue lower-level CAs.
This method applies to small-scale networks where the number of network devices does not exceed the NetEco CA specifications. It does not apply to networks where different devices need to be divided into multiple subdomains.

The configuration procedure is as follows.
|
Step |
Operation |
Preparation |
Description |
|---|---|---|---|
|
1 |
Create a CA certificate profile. |
Certificate profile name, subject information, key usage, and other required information |
This step is optional. A root certificate profile is required only when the root CA is created by creating a self-signed certificate. For details, see Configuring a Certificate Profile.
NOTE:
When creating a root certificate profile, set Certificate level to Root CA and Path length constraint to 0. Set other parameters based on site requirements. |
|
2 |
View root certificate profile details. |
N/A |
On the Certificate Profile page, click the name of a root certificate profile to view its details. |
|
3 |
Create a root CA. |
|
You can create a root CA by creating a self-signed certificate or uploading a certificate file. For details, see Configuring a CA.
|
|
4 |
View root CA details. |
N/A |
On the CA page, click the name of a root CA to view its details.
NOTE:
If the subject and issuer of the CA certificate are the same, the CA is a self-signed root CA. |
|
5 |
Apply for a certificate. |
N/A |
You can apply for a certificate from the root CA in automatic application mode. The automatic application mode includes using CMP and using the privacy CA protocol.
|
Subordinate CA in a Single PKI System Issuing Certificates
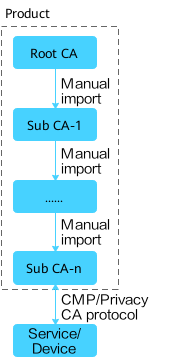
As shown in the figure, after the Certificate Authority Service is enabled on the NetEco, both the root CA and subordinate CAs are deployed. The root CA can only issue subordinate CAs offline and cannot issue end entity certificates. The lowest-level subordinate CA can only issue end entity certificates and cannot issue lower-level subordinate CAs. Three methods are available:
- Method 1: The root CA issues multi-level subordinate CAs. Only the lowest-level subordinate CA can issue end entity certificates. The number of subordinate CA levels depends on NetEco resources and specifications. This method applies to the scenario where the network is divided into multiple layers of subdomains.
Figure 2 Subordinate CA in a single PKI system issuing certificates - method 1
The configuration procedure is as follows.
Step
Operation
Preparation
Description
1
Create a CA certificate profile.
Certificate profile name, subject information, key usage, and other required information
This step is optional. A root certificate profile is required only when the root CA is created by creating a self-signed certificate. For details, see Configuring a Certificate Profile.
NOTE:When creating a root certificate profile, set Certificate level to Root CA. If multiple levels of subordinate CAs are constructed, the value of Path length constraint must be greater than 1. Set other parameters based on site requirements.
2
View root certificate profile details.
N/A
On the Certificate Profile page, click the name of a root certificate profile to view its details.
3
Create a root CA.
- In New self-signed certificate mode: root CA name, certificate profile, subject, and other required information
- In Upload certificate file mode: CA name, certificate file in .p12, .pfx, or .jks format, certificate password, and other required information
You can create a root CA by creating a self-signed certificate or uploading a certificate file. For details, see Configuring a CA.
- In New self-signed certificate mode, you need to select the root certificate profile created in step 1 and enter the information about the subject configured in the profile.
NOTE:
When creating a root CA certificate by creating a self-signed certificate (New self-signed certificate), set Certificate profile to the root CA certificate profile created in step 1. Set other parameters based on site requirements.
- In Upload certificate file mode, you need to upload the certificate prepared by yourself.
NOTE:
When creating a root CA by uploading a certificate file (Upload certificate file), upload the certificate file in .p12, .pfx, or .jks format and enter the password that matches the certificate file. Set other parameters based on site requirements.
4
View root CA details.
N/A
On the CA page, click the name of a root CA to view its details.
NOTE:If the subject and issuer of the CA certificate are the same, the CA is a self-signed root CA.
5
Create a subordinate CA.
Subordinate CA name, certificate profile, subject, and other required information
Method 1:
On the CA page, click New, select Signed by internal CA, select a CA, and create a subCA for the CA.
Method 2:
- On the CA page, create a CA in pending state and download the CSR file corresponding to the CA.
- On the Certificate Application page, apply for a certificate from the root CA by uploading the CSR file and download the certificate.
- On the CA page, upload the downloaded certificate file to the CA in pending state. The CA is activated and becomes the subordinate CA of the root CA.
NOTE:
- When constructing multiple levels of subordinate CAs, ensure that the certificate chain structure is correct and repeat the steps for creating a subordinate CA as required.
- The root CA and subordinate CAs are created on the same NetEco.
6
View subordinate CA details.
N/A
On the CA page, click the name of a subordinate CA to view its details.
7
Apply for a certificate.
N/A
You can apply for a certificate from the root CA in automatic application mode. The automatic application mode includes using CMP and using the privacy CA protocol.
- To apply for a certificate using CMP, you need to configure the port status, TLS certificate, CMP information, request, and responder, and use the CMP request URI to apply for a certificate. For details, see Global Configuration and Configuring CMP.
NOTE:
- If the CMP port is an HTTP port, you do not need to configure the TLS certificate. If you select to use the CA to protect messages sent to terminals, you do not need to set response protection on the Responder Configuration tab page. Set other parameters based on site requirements.
- HTTPS is more secure than HTTP. Therefore, you are advised to select HTTPS (One-way authentication or Two-way authentication) when configuring CMP.
- To apply for a certificate using the privacy CA protocol, you need to configure the port status, TLS certificate, privacy CA protocol information, and EK trusted certificate, and use the privacy CA request URI to apply for a certificate. For details, see Global Configuration and Configuring the Privacy CA Protocol.
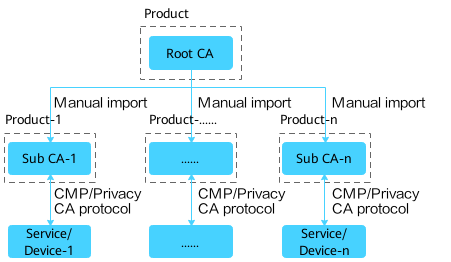
- Method 2: The root CA issues multiple subordinate CAs. Only the lowest-level subordinate CA can issue end entity certificates. The number of subordinate CAs depends on NetEco resources and specifications. This method applies to the scenario where the network is divided into multiple subdomains.
Figure 3 Subordinate CA in a single PKI system issuing certificates - method 2

The configuration procedure is as follows.
Step
Operation
Preparation
Description
1
Create a CA certificate profile.
Certificate profile name, subject information, key usage, and other required information
This step is optional. A root certificate profile is required only when the root CA is created by creating a self-signed certificate. For details, see Configuring a Certificate Profile.
NOTE:When creating a root certificate profile, set Certificate level to Root CA. If multiple levels of subordinate CAs are constructed, the value of Path length constraint must be greater than 1. Set other parameters based on site requirements.
2
View root certificate profile details.
N/A
On the Certificate Profile page, click the name of a root certificate profile to view its details.
3
Create a root CA.
- In New self-signed certificate mode: root CA name, certificate profile, subject, and other required information
- In Upload certificate file mode: CA name, certificate file in .p12, .pfx, or .jks format, certificate password, and other required information
You can create a root CA by creating a self-signed certificate or uploading a certificate file. For details, see Configuring a CA.
- In New self-signed certificate mode, you need to select the root certificate profile created in step 1 and enter the information about the subject configured in the profile.
NOTE:
When creating a root CA certificate by creating a self-signed certificate (New self-signed certificate), set Certificate profile to the root CA certificate profile created in step 1. Set other parameters based on site requirements.
- In Upload certificate file mode, you need to upload the certificate prepared by yourself.
NOTE:
When creating a root CA by uploading a certificate file (Upload certificate file), upload the certificate file in .p12, .pfx, or .jks format and enter the password that matches the certificate file. Set other parameters based on site requirements.
4
View root CA details.
N/A
On the CA page, click the name of a root CA to view its details.
NOTE:If the subject and issuer of the CA certificate are the same, the CA is a self-signed root CA.
5
Create a subordinate CA.
Subordinate CA name, certificate profile, subject, and other required information
Method 1:
On the CA page, click New, select Signed by internal CA, select a CA, and create a subCA for the CA.
Method 2:
- On the CA page, create a CA in pending state and download the CSR file corresponding to the CA.
- On the Certificate Application page, apply for a certificate from the root CA by uploading the CSR file and download the certificate.
- On the CA page, upload the downloaded certificate file to the CA in pending state. The CA is activated and becomes the subordinate CA of the root CA.
NOTE:
- When constructing multiple subordinate CAs, repeat the steps for creating a subordinate CA as required.
- The root CA and subordinate CAs are created on the same NetEco.
6
View subordinate CA details.
N/A
On the CA page, click the name of a subordinate CA to view its details.
7
Apply for a certificate.
N/A
You can apply for a certificate from the root CA in automatic application mode. The automatic application mode includes using CMP and using the privacy CA protocol.
- To apply for a certificate using CMP, you need to configure the port status, TLS certificate, CMP information, request, and responder, and use the CMP request URI to apply for a certificate. For details, see Global Configuration and Configuring CMP.
NOTE:
- If the CMP port is an HTTP port, you do not need to configure the TLS certificate. If you select to use the CA to protect messages sent to terminals, you do not need to set response protection on the Responder Configuration tab page. Set other parameters based on site requirements.
- HTTPS is more secure than HTTP. Therefore, you are advised to select HTTPS (One-way authentication or Two-way authentication) when configuring CMP.
- To apply for a certificate using the privacy CA protocol, you need to configure the port status, TLS certificate, privacy CA protocol information, and EK trusted certificate, and use the privacy CA request URI to apply for a certificate. For details, see Global Configuration and Configuring the Privacy CA Protocol.
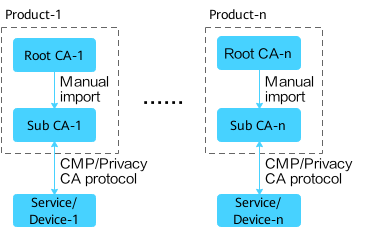
- Method 3: The root CA issues multiple subordinate CAs that are deployed on different NetEcos. Only the lowest-level subordinate CA can issue end entity certificates. Services/devices that have certificates issued by different subordinate CAs must have the root CA certificate installed so that the mutual authentication can be successful. This method applies to the scenario where the NetEco and its services/devices are divided into a subdomain.
Figure 4 Subordinate CA in a single PKI system issuing certificates - method 3
The configuration procedure is as follows.
|
Step |
Operation |
Preparation |
Description |
|---|---|---|---|
|
1 |
Create a CA certificate profile. |
Certificate profile name, subject information, key usage, and other required information |
This step is optional. A root certificate profile is required only when the root CA is created by creating a self-signed certificate. For details, see Configuring a Certificate Profile.
NOTE:
When creating a root certificate profile, set Certificate level to Root CA. If multiple levels of subordinate CAs are constructed, the value of Path length constraint must be greater than 1. Set other parameters based on site requirements. |
|
2 |
View root certificate profile details. |
N/A |
On the Certificate Profile page, click the name of a root certificate profile to view its details. |
|
3 |
Create a root CA. |
|
You can create a root CA by creating a self-signed certificate or uploading a certificate file. For details, see Configuring a CA.
|
|
4 |
View root CA details. |
N/A |
On the CA page, click the name of a root CA to view its details.
NOTE:
If the subject and issuer of the CA certificate are the same, the CA is a self-signed root CA. |
|
5 |
Create a subordinate CA. |
Subordinate CA name, certificate profile, subject, and other required information |
Method 1: On the CA page, click New, select Signed by internal CA, select a CA, and create a subCA for the CA. Method 2:
|
|
6 |
View subordinate CA details. |
N/A |
On the CA page, click the name of a subordinate CA to view its details. |
|
7 |
Apply for a certificate. |
N/A |
You can apply for a certificate from the root CA in automatic application mode. The automatic application mode includes using CMP and using the privacy CA protocol.
|
Subordinate CA in a Multi-PKI System Issuing Certificates
As shown in the figure, different root CAs are deployed on different NetEcos. The peer root CA certificate needs to be installed on services/devices in different subdomains so that the mutual authentication can be successful. On NetEco-1, the Certificate Authority Service is enabled and root CA-1 is deployed. On NetEco-2, the Certificate Authority Service is enabled and root CA-2 (different from root CA-1) is deployed. The two root CAs are independent of each other. The certificates of root CA-1 and root CA-2 need to be installed on service/device-1 and service/device-2 so that the mutual authentication can be successful.
This method applies to the networking scenario where different subdomains are completely isolated. More subdomains require more root CAs, complicating management.
The configuration procedure is as follows.
|
Step |
Operation |
Preparation |
Description |
|---|---|---|---|
|
1 |
Create a CA certificate profile. |
Certificate profile name, subject information, key usage, and other required information |
This step is optional. A root certificate profile is required only when the root CA is created by creating a self-signed certificate. For details, see Configuring a Certificate Profile.
NOTE:
When creating a root certificate profile, set Certificate level to Root CA. If multiple levels of subordinate CAs are constructed, the value of Path length constraint must be greater than 1. Set other parameters based on site requirements. |
|
2 |
View root certificate profile details. |
N/A |
On the Certificate Profile page, click the name of a root certificate profile to view its details. |
|
3 |
Create a root CA. |
|
You can create a root CA by creating a self-signed certificate or uploading a certificate file. For details, see Configuring a CA.
|
|
4 |
View root CA details. |
N/A |
On the CA page, click the name of a root CA to view its details.
NOTE:
If the subject and issuer of the CA certificate are the same, the CA is a self-signed root CA. |
|
5 |
Create a subordinate CA. |
Subordinate CA name, certificate profile, subject, and other required information |
Method 1: On the CA page, click New, select Signed by internal CA, select a CA, and create a subCA for the CA. Method 2:
|
|
6 |
View subordinate CA details. |
N/A |
On the CA page, click the name of a subordinate CA to view its details. |
|
7 |
Apply for a certificate. |
N/A |
You can apply for a certificate from the root CA in automatic application mode. The automatic application mode includes using CMP and using the privacy CA protocol.
|
Feedback
Was this page helpful?
Provide feedbackThank you very much for your feedback. We will continue working to improve the documentation.See the reply and handling status in My Cloud VOC.
For any further questions, feel free to contact us through the chatbot.
Chatbot


