Importing and Configuring HBase Sample Projects
Background Information
After importing the CloudTable sample code project to Eclipse, you can start learning CloudTable application development samples.
Prerequisites
You have correctly configured the running environment. For details about how to configure the running environment, see Preparing an HBase Application Running Environment.
Procedure
- Import the sample project to the Windows development environment. For details about how to obtain the sample project, see Downloading an HBase Sample Project.
- In the application development environment, import the sample project to the Eclipse development environment.
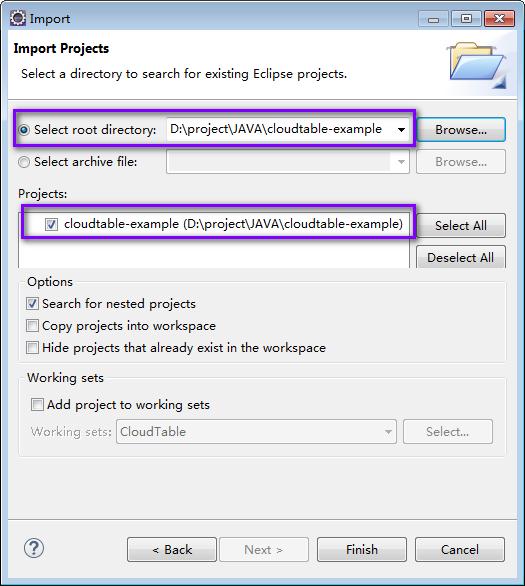
- Choose File > Import > General > Existing Projects into Workspace > Next > Browse.
The Browse Folder dialog box is displayed, as shown in Figure 1.
- Select the sample project folder, and click Finish.
- Choose File > Import > General > Existing Projects into Workspace > Next > Browse.
- Right-click the cloudtable-example project, and choose Properties from the shortcut menu. The window is displayed.
- In the navigation tree, select Java Build Path. Click the Libraries tab, select all error JDKs, and click Remove, as shown in Figure 2.
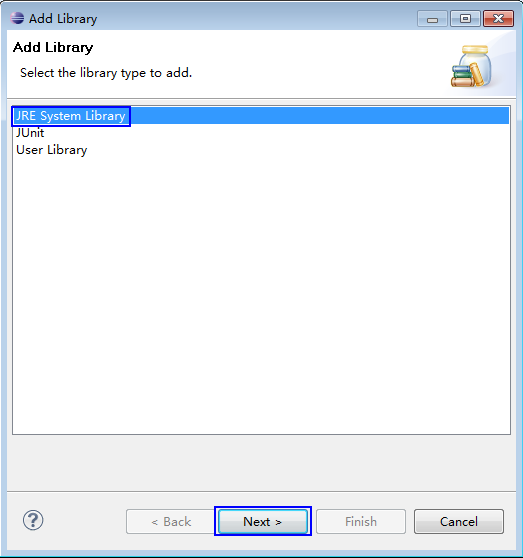
- Click Add Library... shown in Figure 3. Select JRE System Library in the pop-up window.
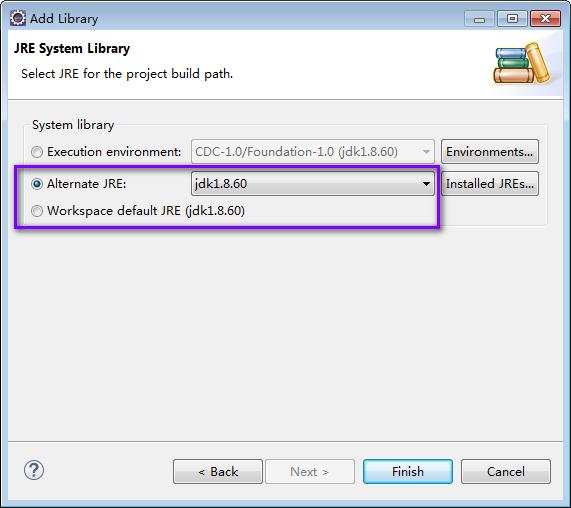
- In the dialog box, select a JDK version from the drop-down list of Alternate JRE or Workspace default JRE. Select Alternate JRE and select the JDK version, as shown in Figure 4.
- Click Finish to complete configuration and close the window.
- Set the Eclipse text file coding format to prevent garbled characters.
- On the Eclipse menu bar, choose Window > Preferences.
The Preferences window is displayed.
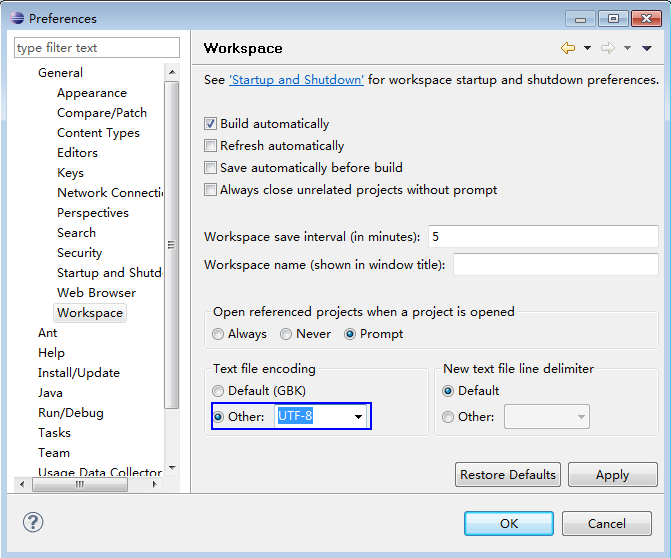
- In the navigation tree, choose General > Workspace. In the Text file encoding area, select Other and set the value to UTF-8. Click Apply and then OK. Figure 5 shows the settings.
- On the Eclipse menu bar, choose Window > Preferences.
- Open the conf/hbase-site.xml file in the sample project and change the value of hbase.zookeeper.quorum to the correct ZooKeeper address.
<property>
<name>hbase.zookeeper.quorum</name>
<value>xxx-zk1.cloudtable.com,xxx-zk2.cloudtable.com,xxx-zk3.cloudtable.com</value>
</property>
value is the domain name of the ZooKeeper cluster. Log in to the CloudTable console and choose Cluster Management. In the cluster list, locate the required cluster and obtain the address in the Access Address (Intranet) column.
Feedback
Was this page helpful?
Provide feedbackThank you very much for your feedback. We will continue working to improve the documentation.See the reply and handling status in My Cloud VOC.
For any further questions, feel free to contact us through the chatbot.
Chatbot


