
Mixed Stream Recording
Scenario
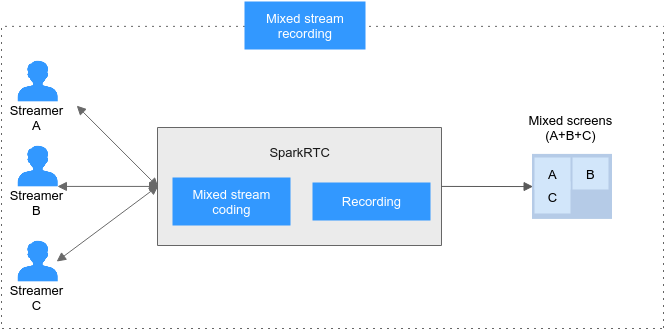
Audio/Video streams in a room can be mixed in the cloud, and then the mixed audio/video streams can be recorded and saved in one file.
Layout
The mixed stream recording supports two preset layouts: grid template and screen sharing template (main window on the left or main window on the right). You can also customize the mixed stream layout (video pane position).
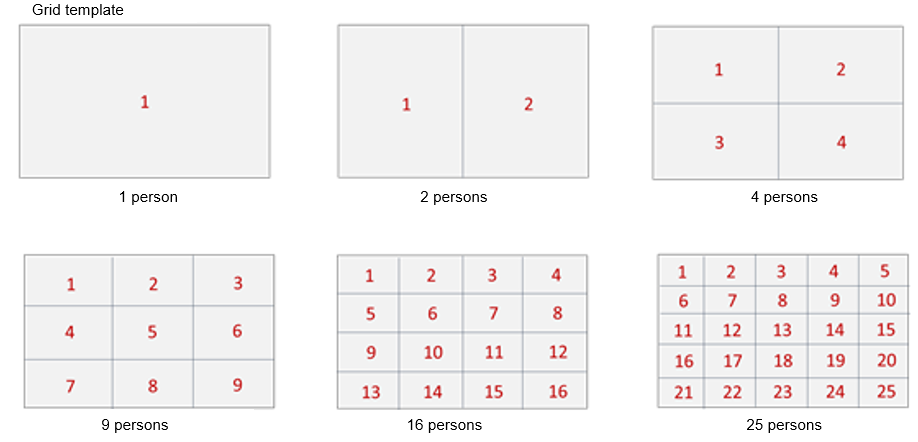
- Grid template
Screens of each user are tiled and have the same size. The size and position of each screen are adjusted according to the number of users. A maximum of 25 screens are supported. The following figure shows the layouts with different user quantities.
- If the aspect ratio of the actual video stream is different from that of the screen, the video image will be cropped to adapt to the screen size.
- If a user exits the room, the image of this user will be replaced by the next user who enters the room.
- If there are not enough users in the room, the rest of the screen displays a background color.
- A user who only sends audio still occupies a screen.
- A background image is supported. If there are not enough users in the room, the rest of the screen displays a background image.
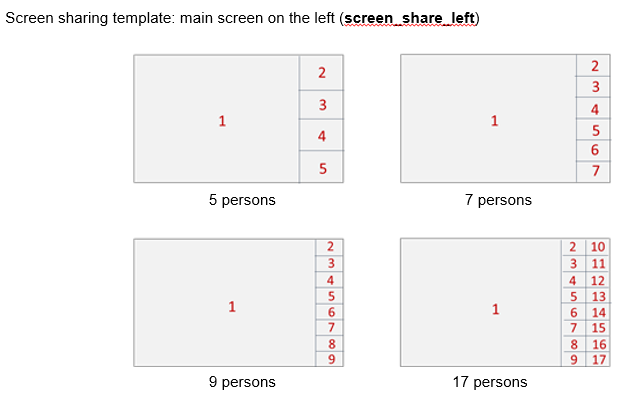
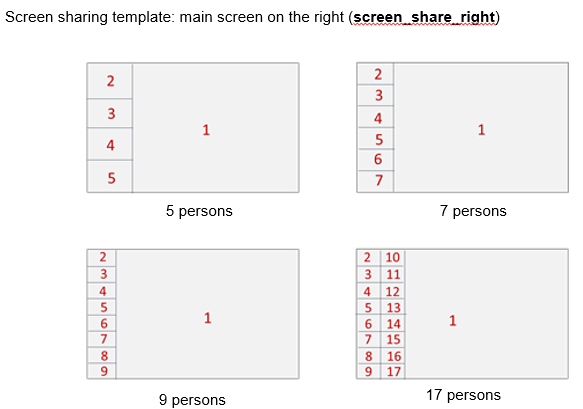
- Screen sharing template
A shared screen or a presenter view is displayed in the main screen on the right or left. Other users are sorted out vertically on the side of the main screen. A maximum of 17 screens are supported. The following figure shows the layouts with different user quantities.
- The main screen displays a presenter view or a shared screen.
- The main screen displays the video of a specific user. If no user is specified or the specified user does not enter the room, the main screen displays the background color.
- Images in the main screen on the left are zoomed in or out to display the complete content. Images in the small screens on the right are cropped to adapt to the screen size.
- The small screens of users on the right are sorted by the time when they enter the room.
- If a user in the right small screen exits the room, the image of this user will be replaced by the next user who enters the room.
- If there are not enough users in the room, the rest of the screen displays a background color.
- A user who only sends audio still occupies a screen.
- A background image is supported. If there are not enough users in the room, the rest of the screen displays a background image.
- Custom layout template
You can customize the mixed stream layout by setting the screen size and specifying the relative position of the screen on the video canvas.

- You can customize the position of each video screen on the canvas.
- You can customize the width and height of each video screen.
- For each screen, you can specify a user in the room to be displayed using user_id.
- You can choose to display camera streams or screen sharing streams in a screen.
- If the aspect ratio of the actual video stream is different from that of the window, the video image will be cropped or zoomed in or out.
- If there are not enough users in the room, the rest of the screen displays a background color.
- A user who only sends audio still occupies a screen.
- A background image is supported. If there are not enough users in the room, the rest of the screen displays a background image.
Working Principles
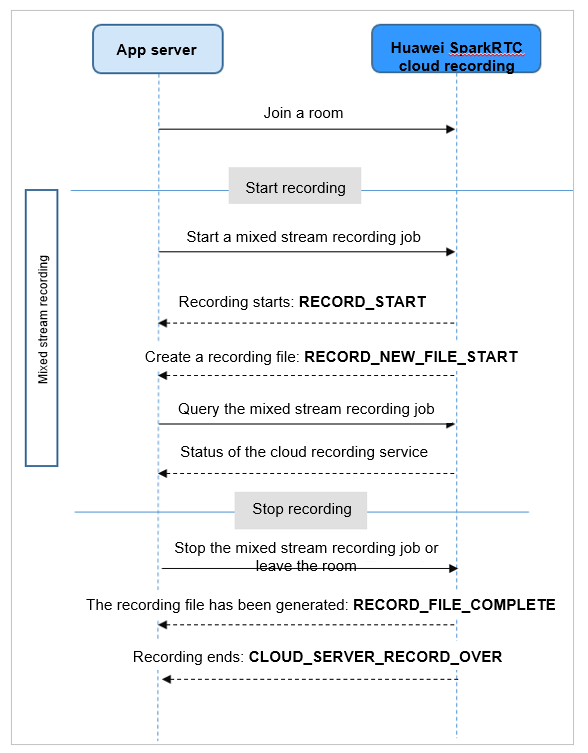
Figure 1 shows how SparkRTC implements mixed stream recording.
Note: When starting a mixed stream recording task, you need to specify MixParam and layout_template.
Implementation
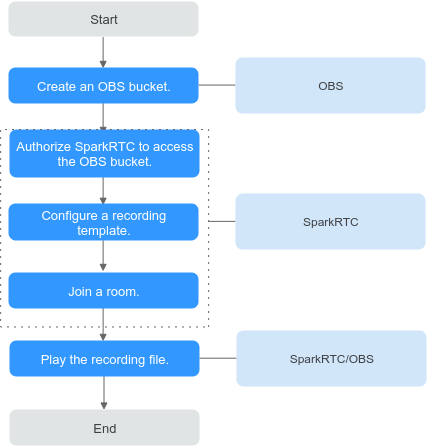
- Create an OBS bucket for storing recordings. If you already have one, go to 2.

The reliability of a single-AZ bucket is lower than that of a multi-AZ bucket. To prevent recording failures caused by OBS exceptions, you are advised to create multi-AZ buckets for storing recordings.
- Authorize SparkRTC to store recordings in the bucket.
- Configure recording rules for SparkRTC and enable automatic recording. After you join a room, the recording rule with the same recording rule ID as that in the application automatically takes effect. The recordings are stored in OBS based on the recording settings. You can set a callback URL to obtain notifications about the recording status.
- Join a room: After configuring recording rules, you can use the SparkRTC app to join a room for real-time interaction. SparkRTC will record the ongoing audio/video stream based on the configured recording rules.
If automatic recording is not enabled during recording rule configuration, you need to call the SparkRTC API to start, query, and control a cloud recording task after joining a room. Then SparkRTC can record images based on the recording rule ID in the API calling request.
- View recordings. After the recording is complete, you can receive the callback message of the recording task in the configured callback URL. You can obtain the basic information about the recordings and manage the recordings in OBS, such as downloading, sharing, and deleting them.
The resolution of recordings is the same as that of the pushed streams.
Procedure
- Create a bucket by referring to OBS Help Center. If you have one, go to 2.
The OBS bucket to be created must be located in the CN North-Beijing4 region.
- Authorize access to OBS.
- Log in to the SparkRTC console.
- In the navigation pane, choose OBS Authorization.
- In the row of the target OBS bucket, click Authorize.
- Configure a recording rule.
- Log in to the SparkRTC console.
- In the navigation pane, choose .
- Click Configure in the row of the application for which you want to create a recording rule.
- On the Recording Rule tab page, click Add. The Add Recording Rule page is displayed.
Only one recording rule can be created for an application ID.
- Configure recording parameters according to Table 1.
Table 1 Recording parameters Parameter
Description
Storage Bucket
OBS bucket where the recording is stored.
Currently, recorded files can be stored only in OBS buckets of CN North-Beijing4.
Region
Region where the OBS bucket is deployed.
Storage Path
Path of the OBS bucket where the recording is stored.
Record As
Recording format, which can be HLS and MP4.
HLS
File Naming
Storage path and filename prefix of M3U8 files.
Default format:{app_id}/{record_format}/{stream}_{file_start_time}/{stream}_{file_start_time}The meanings of the preceding variables are as follows:
- app_id: app ID
- record_format: recording format
- stream: stream name
- file_start_time: file generation time
Recording Length
The recording length can be 0 or 1 to 720 minutes (12 hours). If a stream has been recorded for more than 12 hours, another file will be created based on the naming rule. If the recording length is 0, the entire stream is recorded as a file.
Max Stream Pause Length
Values:
- Generate a new file when a stream is paused
- Do not generate a new file when a stream is paused: The maximum stream pause length is 30 days.
- Other: If the stream pause length is within the specified range, the system does not generate a new file. Otherwise, a new file is generated.
MP4
File Naming
Storage path and filename prefix of MP4 files.
Default format:{app_id}/{record_format}/{stream}_{file_start_time}/{stream}_{file_start_time}The meanings of the preceding variables are as follows:
- app_id: app ID
- record_format: recording format
- stream: stream name
- file_start_time: file generation time
Recording Length
The recording length ranges from 1 to 180 minutes (3 hours). If a stream has been recorded for more than 3 hours, another file will be created based on the naming rule.
Max Stream Pause Length
Values:
- Generate a new file when a stream is paused
- Other: If the stream pause length is within the specified range, the system does not generate a new file. Otherwise, a new file is generated.
- Click OK.

- In the recording rule list, enable automatic recording as required. When automatic recording is enabled, if a new room is created under the app, the system automatically performs single stream recording during real-time communication in the room based on the configured recording rule.
Automatic recording takes effect only for rooms created under the app after you enable it.
- Join a room.
After configuring recording rules, you can use the SparkRTC app to join a room for real-time interaction. SparkRTC will record the ongoing audio/video stream based on the configured recording rules.
If automatic recording is not enabled during recording rule configuration, you need to call the SparkRTC API to start a cloud recording task after joining a room. Then SparkRTC can record images based on the recording rule ID in the API calling request.
- Replay recordings.
When the recording is complete, view recordings on the OBS console or through callback messages.
- Viewing recordings on the OBS console
- In the navigation pane of the OBS console, choose Object Storage.
- In the bucket list, click the bucket that stores SparkRTC recordings.
- In the navigation pane, choose Objects to view the recording information.
- Download and share the recordings as required. For details, see OBS Documentation.
- Viewing recordings on the OBS console
Feedback
Was this page helpful?
Provide feedbackThank you very much for your feedback. We will continue working to improve the documentation.See the reply and handling status in My Cloud VOC.
For any further questions, feel free to contact us through the chatbot.
Chatbot


