
Using WebSocket for Real-time Messaging
WebSocket is a network protocol that enables full-duplex communication over a single TCP connection. With WebSocket, servers can proactively send data to clients. This makes the connection between the client and server more persistent, data exchange simpler, and communication more efficient. Application load balancers support WebSocket by default, helping you balance real-time communication traffic.
WebSocket Overview
- What Is WebSocket?
As web applications are serving increasingly purposes, they demand better communication technologies. For example, social networking, collaborative office, and online customer service require real-time data push. However, the traditional round robin algorithm needs a client to send requests to a server at a fixed interval to obtain the latest data, which is not efficient for these needs. Clients need to frequently send requests with large HTTP headers but less useful information. These requests not only increase the load on the server but also waste substantial bandwidths.
To address this issue, HTML5 introduces WebSocket. WebSocket defines a persistent two-way communication between servers and clients, meaning that both parties can exchange message data at the same time. This two-way communication cuts unnecessary messages, enhances real-time experience, and saves server and bandwidth costs.
For more information about WebSocket, see The WebSocket Protocol.
HTTP and HTTPS listeners support WebSocket by default.
- Websocket Application Scenarios
WebSocket enables full-duplex real-time communication and is widely used in service scenarios that require high-frequency interaction and low latency.
- Real-time social networking and interaction: online chat rooms, live comments, and multiplayer online board & card gaming that require simultaneous interaction
- Collaborative office and online education: multiuser applications with simultaneous editing and online classroom interaction
- Map navigation: real-time push of passenger location changes and traffic congestion information
- Customer service and notification: instant information exchange between users and customer service personnel
Solution Architecture
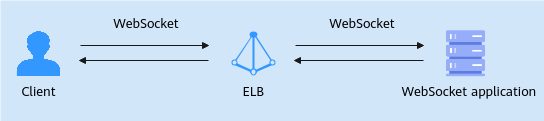
This practice provides a simple example of real-time messaging. A client sends a message to a server, which responds immediately. After getting the response, the client sends another message, and the server responds once more. This is a real-time interaction process.
Preparations
- Create a dedicated load balancer (application load balancing) and bind an IPv4 EIP to it.
- Create two ECSs running CentOS in the same VPC as the load balancer. The first ECS (ECS_client) is used as the client to send HTTP requests, and the second ECS (ECS_server) is used as the backend server for deploying the WebSocket application.
Step 1: Deploy the WebSocket Application on the Backend Server
- Remotely log in to the backend server ECS_server.
Multiple methods are available for logging in to an ECS. For details, see Logging In to an ECS.
- Run the following command to ensure that the Python version on the server is 3.7 or later:
yum install python39
- Install the latest websockets library, which provides a simple API to make it easy to establish WebSocket connections in Python.
- Install the Python package management tool pip.
sudo yum install python3-pip
- Install WebSocket.
pip install websockets
- Install the Python package management tool pip.
- Create the websocket directory on the backend server.
mkdir websocket
- In the websocket directory, create a websocket_server.py file and deploy and test WebSocket application in the file.
- Create the websocket_server.py file.
vi websocket_server.py
- Press i to enter editing mode.
- Create the websocket_server.py file.
- Press Esc and enter :wq to save the websocket_server.py file.
- Run the websocket_server.py file.
python3 websocket_server.py
- If the command output shown in Figure 2 is displayed, the WebSocket application is deployed.

Step 2: Deploy the WebSocket Application on the Client
- Remotely log in to ECS_client.
Multiple methods are available for logging in to an ECS. For details, see Logging In to an ECS.
- Run the following command to ensure that the Python version on the client is 3.7 or later:
yum install python39
- Run the following command to install the latest websockets library on the client:
- Install the Python package management tool pip.
sudo yum install python3-pip
- Install WebSocket.
pip install websockets
- Install the Python package management tool pip.
- Create the websocket_client directory on the client server.
mkdir websocket_client
- In the websocket directory, create a websocket_client.py file and deploy the WebSocket application in the file.
- Create the websocket_client.py file.
vi websocket_client.py
- Press i to enter editing mode.
- Create the websocket_client.py file.
- Press Esc and enter :wq to save the websocket_client.py file.
Step 3: Create an HTTP Backend Server Group and Add a Backend Server
- Go to the backend server group list page.
- Click Create Backend Server Group in the upper right corner.
- On the Configure Routing Policy page, associate the backend server group Server_Group with your load balancer and set the backend protocol to HTTP.
- Retain the default values for other parameters, and click Next.
- On the Add Backend Server page, click Add Cloud Server on the Cloud Servers tab.
- In the Add Backend Server dialog box, select ECS_server and set the service port to 8081.
- Click Next and confirm the configuration.
- Click Create Now.
Step 4: Add an HTTP Listener and Associate it with the Backend Server Group
- Go to the load balancer list page.
- Locate the target load balancer and click Add Listener in the Operation column.
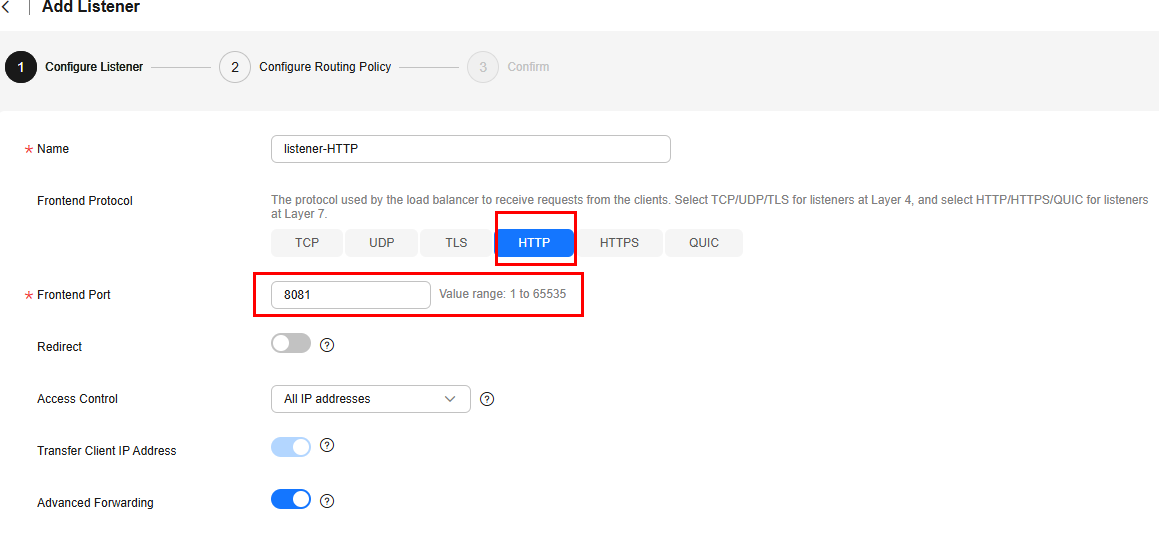
- On the Add Listener page, set the protocol to HTTP and port to 8081.
Figure 3 Adding an HTTP listener
- Click Next: Configure Request Routing Policy and select Use existing for Backend Server Group. Select the backend server group Server_Group created in Step 3 and click Next: Confirm.
- Confirm the configurations and click Submit.
Step 5: Verify the Real-time Messaging
- Remotely log in to ECS_client.
- Run the following command:
python3 websocket_client.py
- Check whether the client and backend server print "Sent: Hello server, this is client!" and "Received: Hello client, this is server!" respectively. If they do, the load balancer enables real-time messaging through WebSocket.
Figure 4 Real-time messaging through the load balancer over WebSocket

Feedback
Was this page helpful?
Provide feedbackThank you very much for your feedback. We will continue working to improve the documentation.See the reply and handling status in My Cloud VOC.
For any further questions, feel free to contact us through the chatbot.
Chatbot


