Using a Flink Job of DLI to Synchronize Kafka Data to a DWS Cluster in Real Time
This practice demonstrates how to use DLI Flink (Flink 1.15 is used as an example) to synchronize consumption data from Kafka to DWS in real time. The demonstration process includes writing and updating existing data in real time.
- For details, see What Is Data Lake Insight?
- For details about Kafka, see What Is DMS for Kafka?

This practice takes about 90 minutes. The cloud services used in this practice include Virtual Private Cloud (VPC) and subnets, Elastic Load Balance (ELB), Elastic Cloud Server (ECS), Object Storage Service (OBS), Distributed Message Service (DMS) for Kafka, Data Lake Insight (DLI), and Data Warehouse Service (DWS). The basic process is as follows:
- Preparations: Register an account and prepare the network.
- Step 1: Create a Kafka Instance: Purchase DMS for Kafka and prepare Kafka data.
- Step 2: Create a DWS Cluster and Target Table: Purchase a DWS cluster and bind an EIP to it.
- Step 3: Create a DLI Elastic Resource Pool and Queue: Create a DLI elastic resource pool and add queues to the resource pool.
- Step 4: Create an Enhanced Datasource Connection for Kafka and DWS: Connect Kafka and DWS.
- Step 5: Prepare the dws-connector-flink Tool for Interconnecting DWS with Flink: Use this plugin to import data from MySQL to DWS efficiently.
- Step 6: Create and Edit a DLI Flink Job: Create a Flink SQL job and configure SQL code.
- Step 7: Create and Modify Messages on the Kafka Client: Import data to DWS in real time.
Scenario Description
Assume that the sample data of the data source Kafka is a user information table, as shown in Table 1, which contains the id, name, and age fields. The id field is unique and fixed, which is shared by multiple service systems. Generally, the id field does not need to be modified. Only the name and age fields need to be modified.
Use Kafka to generate the following three groups of data and use DLI Flink jobs to synchronize the data to DWS: Change the users whose IDs are 2 and 3 to jim and tom, and use DLI Flink jobs to update data and synchronize the data to DWS.
Constraints
- Ensure that VPC, ECS, OBS, Kafka, DLI, and DWS are in the same region, for example, China-Hong Kong.
- Ensure that Kafka, DLI, and DWS can communicate with each other. In this practice, Kafka and DWS are created in the same region and VPC, and the security groups of Kafka and DWS allow the network segment of the DLI queues.
- To ensure that the link between DLI and DWS is stable, bind the ELB service to the created DWS cluster.
Preparations
- You have sign up for a Huawei ID and enabled Huawei Cloud services. The account cannot be in arrears or frozen.
- You have created a VPC and subnet. For details, see Creating a VPC.
Step 1: Create a Kafka Instance
- Log in to the Kafka console.
- Configure the following parameters as instructed. Retain default settings for other parameters.
Table 2 Kafka instance parameters Parameter
Value
Billing Mode
Pay-per-use
Region
CN-Hong Kong
AZ
AZ 1 (If not available, select another AZ.)
Bundle
Starter
VPC
Select a created VPC. If no VPC is available, create one.
Security Group
Select a created security group. If no security group is available, create one.
Other parameters
Retain the default value.
- Click Confirm, confirm the information, and click Submit. Wait until the creation is successful.
- In the Kafka instance list, click the name of the created Kafka instance. The Basic Information page is displayed.
- Choose Topics on the left and click Create Topic.
Set Topic Name to topic-demo and retain the default values for other parameters.
Figure 2 Creating a topic
- Click OK. In the topic list, you can see that topic-demo is successfully created.
- Choose Consumer Groups on the left and click Create Consumer Group.
- Enter kafka01 for Consumer Group Name and click OK.
Step 2: Create a DWS Cluster and Target Table
- Create a dedicated load balancer, set Network Type to IPv4 private network. Set Region and VPC to the same values as those of the Kafka instance. In this example, set Region to China-Hong Kong.
- Creating a Cluster. To ensure network connectivity, the region and VPC of the DWS cluster must be the same as those of the Kafka instance. In this practice, the region and VPC are China-Hong Kong. The VPC must be the same as that created for Kafka.
- Log in to the DWS console. Choose Dedicated Clusters > Clusters. Locate the target cluster and click Log In in the Operation column.

This login mode is available only for clusters of version 8.1.3.x. For clusters of version 8.1.2 or earlier, you need to use gsql to log in.
- After the login is successful, the SQL editor is displayed.
- Copy the following SQL statement. In the SQL window, click Execute SQL to create the target table user_dws.
1
2
3
4
5
6
CREATE TABLE user_dws (
id int,
name varchar(50),
age int,
PRIMARY KEY (id)
);
Step 3: Create a DLI Elastic Resource Pool and Queue
- Log in to the DLI console.
- In the navigation pane on the left, choose Resources > Resource Pool.
- Click Buy Resource Pool in the upper right corner, configure the following parameters as instructed, and retain default settings for other parameters.
Table 3 Parameters Parameter
Value
Billing Mode
Pay-per-use
Region
CN-Hong Kong
Name
dli_dws
Specifications
Standard
CIDR Block
172.16.0.0/18. It must be in a different network segment from Kafka and DWS. For example, if Kafka and DWS are in the 192.168.x.x network segment, select 172.16.x.x for DLI.
- Click Buy and click Submit.
After the resource pool is created, go to the next step.
- On the elastic resource pool page, locate the row that contains the created resource pool, click Add Queue in the Operation column, and set the following parameters. Retain the default values for other parameters that are not described in the table.
Table 4 Adding a queue Parameter
Value
Name
dli_dws
Type
General purpose queue
- Click Next and click OK. The queue is created.
Step 4: Create an Enhanced Datasource Connection for Kafka and DWS
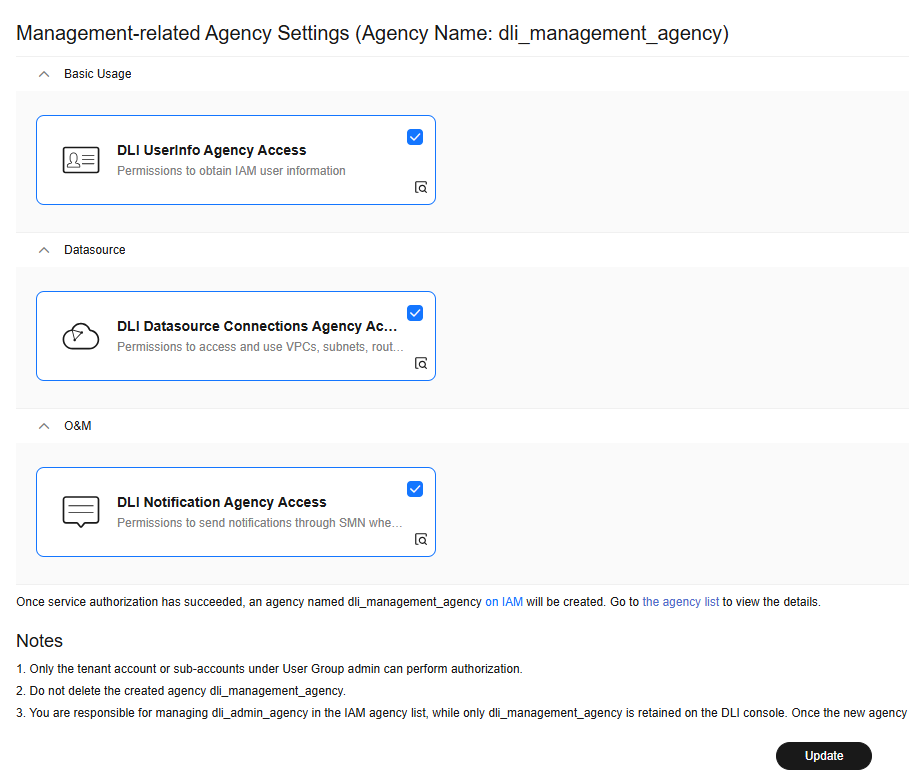
- Update the DLI agency permissions.
- Return to the DLI console and choose Global Configuration > Service Authorization on the left.
- Select DLI UserInfo Agency Access, DLI Datasource Connections Agency Access, and DLI Notification Agency Access.
- Click Update and then click OK.
Figure 3 Updating DLI agency permissions
- In the security group of Kafka, allow the network segment where the DLI queue is located.
- Return to the Kafka console and click the Kafka instance name to go to the Basic Information page. View the value of Instance Address (Private Network) in connection information and record the address for future use.
Figure 4 Kafka private network address

- Click the security group name.
Figure 5 Kafka security group

- Choose Inbound Rules > Add Rule, as shown in the following figure. Add the network segment of the DLI queue. In this example, the network segment is 172.16.0.0/18. Ensure that the network segment is the same as that entered during Step 3: Create a DLI Elastic Resource Pool and Queue.
Figure 6 Adding rules to the Kafka security group

- Click OK.
- Return to the Kafka console and click the Kafka instance name to go to the Basic Information page. View the value of Instance Address (Private Network) in connection information and record the address for future use.
- Return to the DLI management console, click Datasource Connections on the left, select Enhanced, and click Create.
- Set the following parameters. Retain the default values for other parameters that are not described in the table.
Table 5 Connection from DLI to Kafka Parameter
Value
Connection Name
dli_kafka
Resource Pool
Select the created DLI queue dli_dws.
VPC
Select the VPC of Kafka.
Subnet
Select the subnet where Kafka is located.
Other parameters
Retain the default value.
Figure 7 Creating an enhanced connection
- Click OK. Wait until the Kafka connection is successfully created.

If you do not select a resource pool when creating an enhanced datasource connection, you can manually bind one afterwards.
- Locate the row that contains the target datasource connection and choose More > Bind Resource Pool in the Operation column.
- Select a resource pool and click OK.

- Choose Resources > Queue Management on the left, and choose More > Test Address Connectivity on the right of dli_dws.
- In the address box, enter the private IP address and port number of the Kafka instance obtained in 2.a. (There are three Kafka addresses. Enter only one of them.)
Figure 8 Testing Kafka connectivity

- Click Test to verify that DLI is successfully connected to Kafka.
- If the connection fails, perform the following operations:
- Log in to the DWS console, choose Dedicated Clusters > Clusters on the left, and click the cluster name to go to the details page.
- Record the private network domain name, port number, and ELB address of the DWS cluster for future use.
Figure 9 Private domain name and ELB address

- Click the security group name.
Figure 10 DWS security group

- Choose Inbound Rules > Add Rule, as shown in the following figure. Add the network segment of the DLI queue. In this example, the network segment is 172.16.0.0/18. Ensure that the network segment is the same as that entered during Step 3: Create a DLI Elastic Resource Pool and Queue.
Figure 11 Adding a rule to the DWS security group

- Click OK.
- Switch to the DLI console, choose Resources > Queue Management on the left, and click More > Test Address Connectivity on the right of dli_dws.
- In the address box, enter the ELB address and port number of the DWS cluster obtained in 11.
Figure 12 Testing DWS connectivity

- Click Test to verify that DLI is successfully connected to DWS.
Step 5: Prepare the dws-connector-flink Tool for Interconnecting DWS with Flink
dws-connector-flink is a tool for interconnecting with Flink based on DWS JDBC APIs. During DLI job configuration, this tool and its dependencies are stored in the Flink class loading directory to improve the capability of importing Flink jobs to DWS.
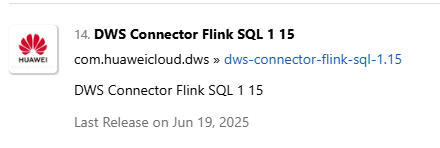
- Go to https://mvnrepository.com/artifact/com.huaweicloud.dws using a browser.
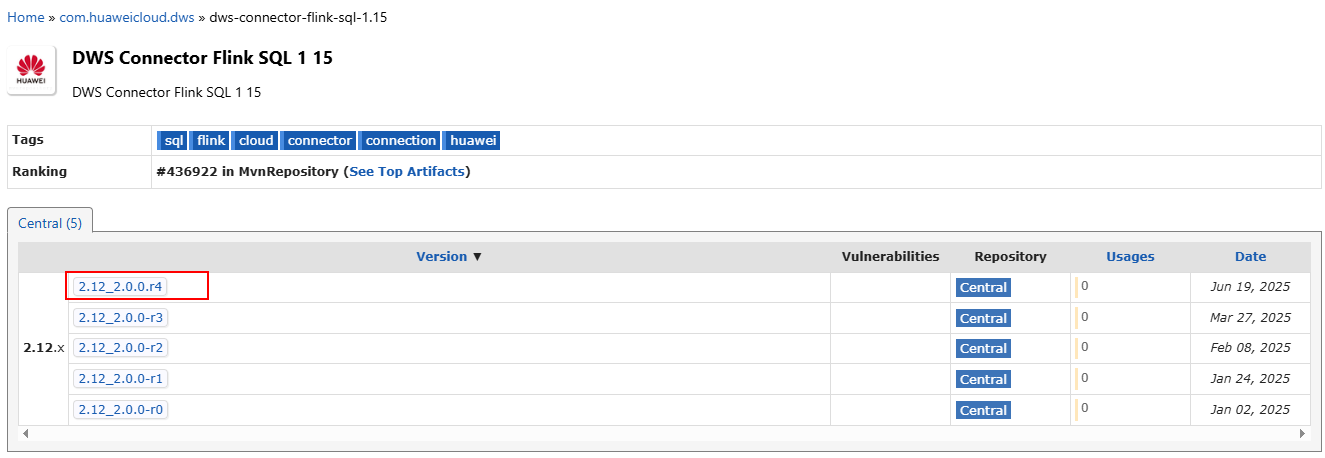
- In the software list, select Flink 1.15. In this practice, DWS Connector Flink SQL 1 15 is selected.

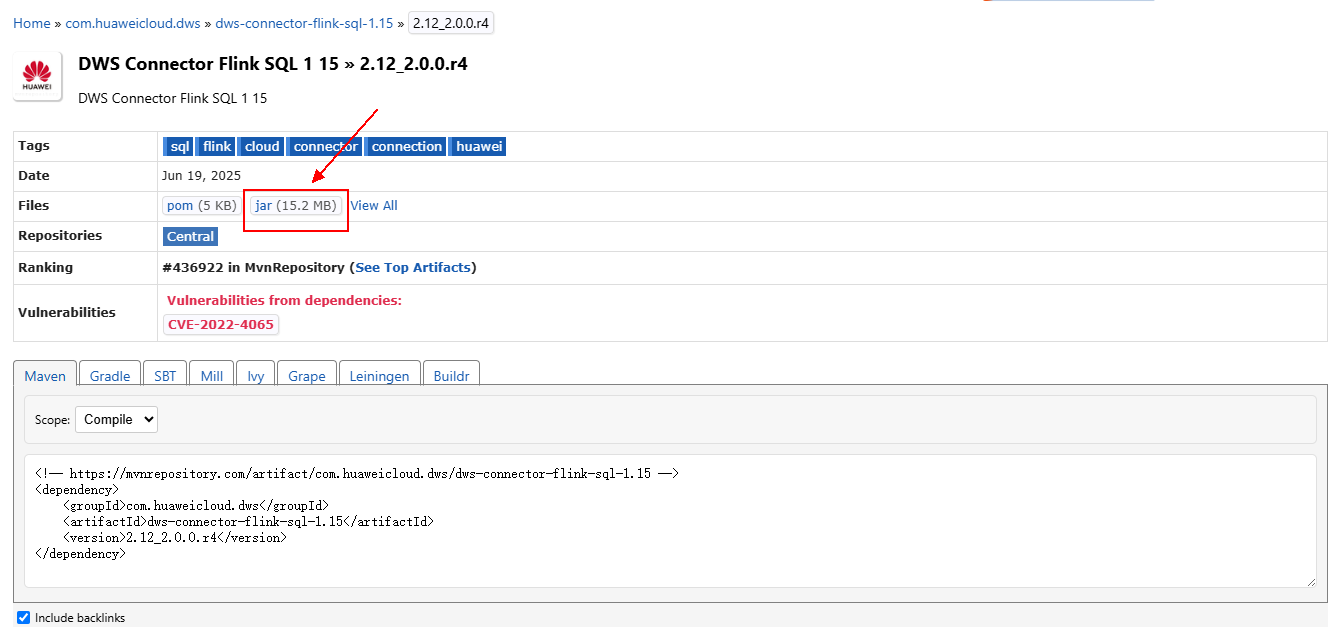
- Select the latest branch. The actual branch is subject to the new branch released on the official website.

- Click the jar icon to download the file.

- Create an OBS bucket. In this practice, set the bucket name to obs-flink-dws and upload the file dws-connector-flink-sql-1.15-2.12_2.0.0.r4.jar to the OBS bucket. Ensure that the bucket is in the same region as DLI. In this practice, the China-Hong Kong region is used.
Step 6: Create and Edit a DLI Flink Job
- Create an OBS agency policy.
- Hover over the account name in the upper right corner of the console, and click Identity and Access Management.
- In the navigation pane on the left, choose Agencies and then click Create Agency in the upper right corner.
- Agency Name: dli_ac_obs
- Agency Type: Cloud service
- Cloud Service: Data Lake Insight (DLI)
- Validity Period: Unlimited
Figure 13 Creating an OBS agency
- Click OK and then click Authorize.
- On the displayed page, click Create Policy.
- Configure policy information. Enter a policy name, for example, dli_ac_obs, and select JSON.
- In the Policy Content area, paste a custom policy. Replace OBS bucket name with the actual bucket name.
{ "Version": "1.1", "Statement": [ { "Effect": "Allow", "Action": [ "obs:object:GetObject", "obs:object:DeleteObjectVersion", "obs:bucket:GetBucketLocation", "obs:bucket:GetLifecycleConfiguration", "obs:object:AbortMultipartUpload", "obs:object:DeleteObject", "obs:bucket:GetBucketLogging", "obs:bucket:HeadBucket", "obs:object:PutObject", "obs:object:GetObjectVersionAcl", "obs:bucket:GetBucketAcl", "obs:bucket:GetBucketVersioning", "obs:bucket:GetBucketStoragePolicy", "obs:bucket:ListBucketMultipartUploads", "obs:object:ListMultipartUploadParts", "obs:bucket:ListBucketVersions", "obs:bucket:ListBucket", "obs:object:GetObjectVersion", "obs:object:GetObjectAcl", "obs:bucket:GetBucketPolicy", "obs:bucket:GetBucketStorage" ], "Resource": [ "OBS:*:*:object:*", "OBS:*:*:bucket:OBS bucket name" ] }, { "Effect": "Allow", "Action": [ "obs:bucket:ListAllMyBuckets" ] } ] } - Click Next.
- Select the created custom policy.
- Click Next. Select All resources.
- Click OK.
It takes 15 to 30 minutes for the authorization to take effect.
- Return to the DLI management console, choose Job Management > Flink Jobs on the left, and click Create Job in the upper right corner.
- Set Type to Flink OpenSource SQL and Name to kafka-dws.
Figure 14 Creating a job

- Click OK. The page for editing the job is displayed.
- Set the following parameters on the right of the page. Retain the default values for other parameters that are not described in the table.
Table 6 Flink job parameters Parameter
Value
Queue
dli_dws
Flink Version
1.15
UDF Jar
Select the JAR file in the OBS bucket created in Step 5: Prepare the dws-connector-flink Tool for Interconnecting DWS with Flink.
Agency
Select the agency created in 1.
OBS Bucket
Select the bucket created in Step 5: Prepare the dws-connector-flink Tool for Interconnecting DWS with Flink.
Enable Checkpointing
Check the box.
Other parameters
Retain the default value.
- Copy the following SQL code to the SQL code window on the left.
Obtain the private IP address and port number of the Kafka instance from 2.a, and obtain the private domain name from 11.
The following describes the common parameters in the Flink SQL job code:
- connector: connector type of the data source. For Kafka, set this parameter to kafka. For DWS, set this parameter to dws. For more information, see Connectors.
- write.mode: import mode. The value can be auto, copy_merge, copy_upsert, upsert, update, copy_update, or copy_auto.
- autoFlushBatchSize: number of records to be buffered before an automatic flush. When the number of buffered records reaches this value, Flink writes data to the target system in batches. For example, Flink writes data to the target system Sink target after 5000 lines of records are buffered. In Flink SQL, Sink (also translated as receiver or output end) is the final output destination in the data stream processing pipeline. It is responsible for writing processed data to external storage systems or sending the data to downstream applications.
- autoFlushMaxInterval: maximum interval between automatic flushes. Even if the number of buffered records does not reach the value of autoFlushBatchSize, a flush is triggered after the interval expires.
- key-by-before-sink: Whether to group data by primary key before data is written to the sink. This ensures that records with the same primary key are written consecutively ad it is useful for some systems (such as some databases) that require primary keys to be ordered. This parameter aims to resolve the problem of interlocking between two subtasks when they acquire row locks based on the primary key from DWS, multiple concurrent writes occur, and write.mode is upsert. This happens when a batch of data written to the sink by multiple subtasks has more than one record with the same primary key, and the order of these records with the same primary key is inconsistent.
 1
 2
 3
 4
 5
 6
 7
 8
 9
10
11
12
13
14
15
16
17
18
19
20
21
22
23
24
25
26
27
28
29
30
31
CREATE TABLE user_kafka (
  id string,
  name string,
  age int
) WITH (
  'connector' = 'kafka',
  'topic' = 'topic-demo',
'properties.bootstrap.servers' ='Private IP address and port number of the Kafka instance',
  'properties.group.id' = 'kafka01',
  'scan.startup.mode' = 'latest-offset',
  'format' = 'json'
);

CREATE TABLE user_dws (
  id string,
  name string,
  age int,
  PRIMARY KEY (id) NOT ENFORCED
) WITH (
  'connector' = 'dws',
'url'='jdbc:postgresql://DWS private network domain name:8000/gaussdb',
  'tableName' = 'public.user_dws',
  'username' = 'dbadmin',
'password' ='Password of database user dbadmin'
  'writeMode' = 'auto',
  'autoFlushBatchSize'='50000',
  'autoFlushMaxInterval'='5s',
  'key-by-before-sink'='true'
);

INSERT INTO user_dws select * from user_kafka; -- Write the processing result to the sink.
- Click Format and click Save.

Click Format to format the SQL code. Otherwise, new null characters may be introduced during code copy and paste, causing job execution failures.
Figure 15 SQL statement of a job
- Return to the DLI console home page and choose Job Management > Flink Jobs on the left.
- Click Start on the right of the job name kafka-dws and click Start Now.
Wait for about 1 minute and refresh the page. If the status is Running, the job is successfully executed.
Figure 16 Job execution status
Step 7: Create and Modify Messages on the Kafka Client
- Create an ECS by referring to the ECS document. Ensure that the region and VPC of the ECS are the same as those of Kafka.
- Install JDK.
- Log in to the ECS, go to the /usr/local directory, and download the JDK package.
1
2
cd /usr/local
wget https://download.oracle.com/java/17/latest/jdk-17_linux-x64_bin.tar.gz
- Decompress the downloaded JDK package.
1tar -zxvf jdk-17_linux-x64_bin.tar.gz
- Run the following command to open the /etc/profile file:
1vim /etc/profile - Press i to enter editing mode and add the following content to the end of the /etc/profile file:
1
2
3
4
5
export JAVA_HOME=/usr/local/jdk-17.0.7 #JDK installation directory
export JRE_HOME=${JAVA_HOME}/jre
export CLASSPATH=.:${JAVA_HOME}/lib:${JRE_HOME}/lib:${JAVA_HOME}/test:${JAVA_HOME}/lib/gsjdbc4.jar:${JAVA_HOME}/lib/dt.jar:${JAVA_HOME}/lib/tools.jar:$CLASSPATH
export JAVA_PATH=${JAVA_HOME}/bin:${JRE_HOME}/bin
export PATH=$PATH:${JAVA_PATH}

- Press Esc and enter :wq! to save the settings and exit.
- Run the following command for the environment variables to take effect:
1source /etc/profile
- Run the following command. If the following information is displayed, the JDK is successfully installed:
1java -version
- Log in to the ECS, go to the /usr/local directory, and download the JDK package.
- Install the Kafka client.
- Go to the /opt directory and run the following command to obtain the Kafka client software package.
1
2
cd /opt
wget https://archive.apache.org/dist/kafka/2.7.2/kafka_2.12-2.7.2.tgz
- Decompress the downloaded software package.
1tar -zxf kafka_2.12-2.7.2.tgz
- Go to the Kafka client directory.
1cd /opt/kafka_2.12-2.7.2/bin
- Go to the /opt directory and run the following command to obtain the Kafka client software package.
- Run the following command to connect to Kafka: {Connection address} indicates the internal network connection address of Kafka. For details about how to obtain the address, see 2.a. topic indicates the name of the Kafka topic created in 5.
1./kafka-console-producer.sh --broker-list {connection address} --topic {Topic name}
The following is an example:
./kafka-console-producer.sh --broker-list 192.168.0.136:9092,192.168.0.214:9092,192.168.0.217:9092 --topic topic-demo

If > is displayed and no other error message is displayed, the connection is successful.
- In the window of the connected Kafka client, copy the following content (one line at a time) based on the data planned in the Scenario Description and press Enter to produce messages:
1
2
3
{"id":"1","name":"lily","age":"16"}
{"id":"2","name":"lucy","age":"17"}
{"id":"3","name":"lilei","age":"15"}

- Return to the DWS console, choose Dedicated Clusters > Clusters on the left, and click Log In on the right of the DWS cluster. The SQL page is displayed.
- Run the following SQL statement to verify that data is successfully imported to the database in real time:
1SELECT * FROM user_dws ORDER BY id;

- Go back to the client window for connecting to Kafka on the ECS, copy the following content (one line at a time), and press Enter to produce messages.
1
2
{"id":"2","name":"jim","age":"17"}
{"id":"3","name":"tom","age":"15"}
- Go back to the opened SQL window of DWS and run the following SQL statement. It is found that the names whose IDs are 2 and 3 have been changed to jim and tom.
The scenario description is as expected. End of this practice.
1SELECT * FROM user_dws ORDER BY id;

Feedback
Was this page helpful?
Provide feedbackThank you very much for your feedback. We will continue working to improve the documentation.See the reply and handling status in My Cloud VOC.
For any further questions, feel free to contact us through the chatbot.
Chatbot


