Rotating IAM Secrets Using FunctionGraph
Scenario
This section describes how to rotate IAM secrets through KMS using a FunctionGraph template.
Constraints
- Only IAM member accounts can be rotated. IAM master accounts cannot be rotated.
- The IAM member account to be rotated must have at least one group of secrets.
- CSMS is available in the region.
Procedure
Create an agency.
- Log in to the DEW console.
- Click
 in the upper left corner of the management console and select a region or project.
 - Click
 in the upper left corner of the page and choose Management & Governance > Identity and Access Management.
 - In the navigation pane on the left, choose Agencies. Click Create Agency in the upper right corner.
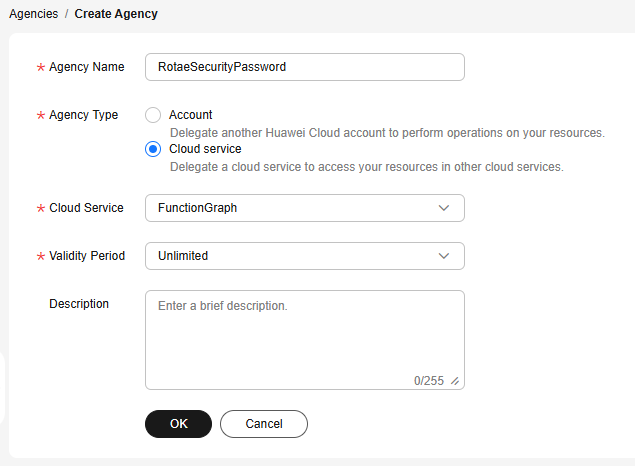
- Configure the parameters, as shown in the following figure. Table 1 lists the parameters.
Figure 1 Creating an agency

Table 1 Parameters for creating an agency Parameter
Description
Agency Name
Enter a custom agency name, for example, test.
Agency Type
Select Cloud service.
Cloud Service
Choose FunctionGraph.
Validity Period
Set this parameter based on the actual scenario. If the function needs to be executed for a long time, choose Unlimited.
Description
Set this parameter as needed.
- Click OK. In the displayed dialog box, click Authorize.
- Select Security Administrator, CSMS FullAccess, and KMS CMKFullAccess, as shown in the following figure.
Figure 2 Assigning permissions

- Click Next and choose an authorization scope, as shown in the following figure.
Figure 3 Authorization scope

- Click OK.
Create a function template and a function.
- Log in to the DEW console.
- Click
 in the upper left corner of the management console and select a region or project.
 - Click
 in the upper left corner of the page and choose Compute > FunctionGraph.
 - Click Create Function in the upper right corner.
- Click Select template. In the Service area, click DEW, locate rotate-iam-credentials in the below, and click Configure in the upper right corner of the box, as shown in the following figure.
Figure 4 Creating a function

- Configure the parameters, which are described in Table 2.
Figure 5 Basic function information

Table 2 Basic parameters Parameter
Description
Region
Select the region where the function is to be deployed.
Project
Select the project where the function is to be deployed.
Function Name
Enter a custom function name.
Agency
Select an agency.
Enterprise Project
If you have enabled enterprise projects, select one for you to add a function to it.
If you have not enabled an enterprise project, this parameter will be unavailable. Skip this step.
- Configure the environment variables, which are described in Table 3.
Figure 6 Environment variables

Table 3 Environment variables Parameter
Description
region
Project.
NOTE:To obtain the project, hover the mouse over the username, and choose My Credentials from the drop-down list. The projects are displayed.
user_id
Enter the ID of the IAM user to be rotated.
NOTE:To obtain the IAM user ID, hover the mouse over the username, and choose My Credentials from the drop-down list. The ID is displayed.
project_id
Enter the project ID.
NOTE:To obtain the IAM user ID, hover the mouse over the username, and choose My Credentials from the drop-down list. The IDs of the projects are displayed.
secret_name
Enter the name of the secret to be created, which cannot be the same as an existing secret name.
- Configure trigger variables, which are described in Table 4.
Figure 7 Trigger variables

- Click Create Function.
Debug.
For details about debugging a function workflow, see Online Debugging.
View the secret.
- Log in to the DEW console.
- Click
 in the upper left corner of the management console and select a region or project.
 - In the navigation pane on the left, choose .
- Query the specified secret in Step 7. Click it to view the details. The current valid secret, historical secrets, and other information are displayed.
Figure 8 Secret details

- Locate the latest version of the secret, click View Secret in the Operation column to check the AK/SK.
Feedback
Was this page helpful?
Provide feedbackThank you very much for your feedback. We will continue working to improve the documentation.See the reply and handling status in My Cloud VOC.
For any further questions, feel free to contact us through the chatbot.
Chatbot


