Deploying Applications to CCE
CodeArts Deploy provides visualized and automated deployment. Various deployment actions are provided to help you formulate a standard process, reducing deployment costs and improving release efficiency.
To deliver software more quickly and stably, the development team needs automated deployment capabilities to reduce maintenance workload.
This section describes how developer Chris deploys a build artifact on CCE. For details about ECS-based deployment, see Deploying Applications to ECS.
For details about how to prepare CCE, see Resource Planning.
Preset Applications
The sample project presets three deployment applications.
|
Preset Application |
Description |
|---|---|
|
phoenix-cd-cce |
For CCE-based deployment. |
|
phoenix-sample-predeploy |
For installing dependency tools before ECS-based deployment. |
|
phoenix-sample-standalone |
For ECS-based deployment. |
This section uses the phoenix-cd-cce application as an example.
Checking Your CCE Cluster
Before deploying applications, ensure that no workload is running in your CCE cluster.
- Log in to the CCE console.
- Click the phoenix-cce cluster.
- Choose Workloads from the navigation pane, click the Deployments tab, and verify that no record exists in the list.
If there are records in the list, select all records, click Delete, select all resource release options, and click Yes to clear the records in the list.
Configuring and Executing an Application
- Go to the Phoenix Mall project, and choose CICD > Deploy from the navigation pane.
- In the Operation column of the phoenix-cd-cce application, click
 and choose Edit.
 - On the Deployment Actions tab, complete the following configurations in each action.
Table 2 Configuring deployment actions Parameter
Example
Description
Cluster Name
phoenix-cce
The name of the target cluster.
Namespace
default
The namespace of the target cluster.
- Click the Parameters tab, and check whether the default values of the parameters are the same as those listed in the following table.
Table 3 Parameters Name
Default Value
ci_task_name
phoenix-sample-ci
version
1.0.0
- Click Save & Deploy. In the displayed dialog box, click OK to start the deployment.
If a success message shows up, the deployment is successful.
If the deployment fails, rectify the fault based on the failed action and the error information in logs. For details, see CodeArts Deploy FAQs.
Verifying the Deployment Result
- Go to the CCE console, and click the phoenix-cce cluster.
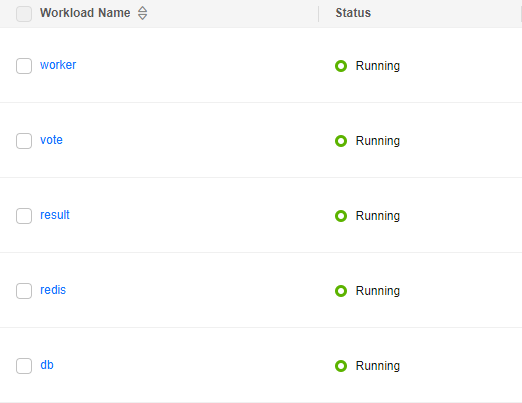
- In the navigation pane, choose Workloads. Click the Deployments tab, and verify that the namespace displayed in the upper left corner of the page is default.
Five records are displayed on the page. All of them are in the Running state.
Figure 1 Viewing workloads
- Click vote to go to the details page. On the Access Mode tab, choose More > Update.
- Configure the parameters in the table below and click OK.
For details about the parameters, see Creating a LoadBalancer Service.
Table 4 Updating a Service Parameter
Example
Service Affinity
Cluster-level
Load Balancer
- Choose Shared > Auto create.
- Instance Name: Enter phoenix.
- EIP: Select Auto create.
Port
- Container Port: 80
- Service Port: 5000
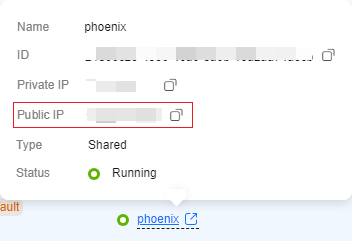
- Hover over the load balancer name
 , and copy the public IP address.
Figure 2 Copying the access address
- Open a new browser and enter http://IP:5000 in the address box. IP is the public IP address recorded in 5. The Phoenix Mall homepage is displayed.
Figure 3 Phoenix Mall homepage

- Return to the Deployments page and update result (select the phoenix load balancer and enter service port 5001) by referring to 3.
Enter http://IP:5001 in a new browser. The dashboard of Phoenix Mall is displayed.
Figure 4 Phoenix Mall dashboard
Feedback
Was this page helpful?
Provide feedbackThank you very much for your feedback. We will continue working to improve the documentation.See the reply and handling status in My Cloud VOC.
For any further questions, feel free to contact us through the chatbot.
Chatbot


